Types of system partitions
The number and contents of hidden sections vary from manufacturer to manufacturer. But as a rule, you can find the following sections on Windows computers.
Section "Reserved by the system"
Windows 7, 8 and 10 create a "System Reserved" partition when you install them. Windows does not assign a letter to this partition, so it is usually not visible in Explorer. But if you've run Partition Manager or a similar utility, you've probably noticed this section. Why does the system need it?
The System Reserved section performs two functions.
- First, it contains the manager and system boot data. This is where the system boot begins.
- Secondly, here are the files used by the system utility for BitLocker encryption. This is necessary to boot the system if you decide to encrypt the system partition.
The System Reserved partition takes up 100 MB of space in Windows 7, 350 MB in Windows 8, and 500 MB in Windows 10. The partition is usually created during system installation and is located before the main system partition.
Recovery partition
This section contains system images from the manufacturer necessary to restore the system and return to factory settings. If you delete this partition, you will make it impossible to return to factory settings in the Windows Recovery Environment or through the manufacturer's recovery utilities.
Manufacturer Sections
Some laptop manufacturers, such as HP and ASUS, create another additional partition on their disks. It may contain laptop drivers, additional software, firmware for updating the BIOS and other system data.
How to hide a system reserved partition in Windows 7
To begin with, I would like to answer the question, reserved by the system, what kind of section is this and what is it for? I will say right away that it will not harm the computer, otherwise some of my friends who are faced with this issue, for some reason, are thinking about infecting the computer with a virus or something like that. So let's figure it out.
The partition is reserved by the system - this can be said to be the windows bootloader, because... It serves to favorably load our system. For example, if we delete it, then Windows will no longer boot and will need to be restored again by taking some action to further start the operating system. In general, this partition should inherently be hidden, but if there are failures or the installation of a second operating system on the computer, it can appear by automatically assigning a drive letter (label). You can also delete a reserved disk, but I think there is no point in doing so, because... You will need to transfer the bootloader to the main local disk using the command line, you will also have to work with the Windows registry, etc. I think it will be easier to hide it, but I’ll show you how to do it below. This instruction is suitable not only for the Windows 7 operating system, but also for versions 8 and 10, among others.
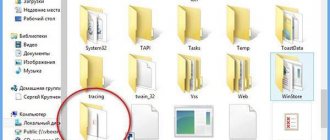
As you can see in the picture, the drive is assigned a letter (G:). To hide it, we just need to remove the label by deleting it.
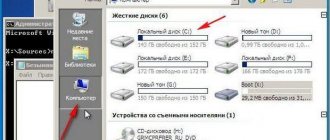
To do this, go to the control by right-clicking on the My Computer icon and selecting it, or by entering the command diskmgmt.msc in the line.
We go to the disk management , where we see the partition that we need to hide, and for this, as mentioned above, we need to delete the assigned letter.
Right-click on it and select Change drive letter or drive path...
In the window to allow access to this volume by drive letter and specified paths, select the label and click delete -> ok .
We confirm the removal of this drive letter.
If a second warning appears, we also ignore it and agree by clicking yes .
Everything, as we see, the section reserved by the system now has no label, which means that it is hidden.
To be sure, go to my computer and check. If the partition has not disappeared yet, you may need to restart your computer.
Leave your opinion about this article, and of course, ask your questions if something suddenly went wrong for you.
Thank you for your attention!
Articles recommended for reading:
- How to install Windows 7 (16185)
- How to expand a hard drive partition in Windows (6082)
- Activating Windows 7 or how to remove the black screen from the desktop (77765)
- How to create a system restore point in Windows 7 (4153)
- How to hide a folder in windows 7 an interesting way (3880)
- How to hide a system reserved partition in windows 7 (9124)
- How to remove the entry in the boot menu Windows 7 Loader XE (41109)
Would you like to thank the author? Share a link to the article!
But still…
It's time to move on to the question of how to remove “Reserved by the system.” We have already established that deleting an existing boot partition will not lead to anything good. Therefore, if you still want to get rid of it, you have a chance to do this during the installation of the operating system. Before you begin to follow the next instructions, take care of the safety of your data. If your hard drive is divided into several parts, then the data from all of them must first be copied to removable media, otherwise they will be lost forever.
- Format your hard drive and delete all partitions.
- When press Shift + F10. This command will open a command prompt for you.
- To begin, enter and confirm your entry.
- Then enter: select disk 0.
- The last command will be: create partition primary.
- Close the command prompt and continue installing the system on this hard drive.
How to remove a system-reserved disk
Having an additional disk among drives can be annoying or confusing for users. In such a situation, they have a desire to remove the disk reserved by the system. Naturally, Microsoft made sure that a computer user could not delete data from it and format it even with administrator rights.
If you want to remove a system-reserved disk from the list of drives, you must do this as follows:
After this, the system-reserved disk will no longer be displayed in Explorer. At the same time, its operation will not be disrupted, and if it is necessary to restore the system, Windows will be able to use the information from this section.
Important:
If you have multiple drives installed on your computer, you may notice that there are two (or more) system-reserved partitions. This suggests that previously the connected disks also had Windows installed, which created this partition. For proper operation of the current system, the “old reserve” is not required, and you can safely delete it, and then format the disk, creating a partition that occupies the entire volume of the drive.
Deleting a partition
Before deleting “Reserved by the system,” think several times.
Firstly, this action will not free up space on the computer, but will simply transfer data from the reserved disk to the local one.
Secondly, you will have to spend a lot of time setting up and downloading special programs - the computer will simply not allow you to make such important changes. And if something goes wrong, Windows may stop loading and, instead of the desktop, display a message that the OS simply was not found.
If you still decide to get rid of “Reserved by the system”, despite all the negative consequences, then this can be done at the stage of installing the system, if you reinstall it manually.
Before removing the partition, be sure to copy important information to the flash drive. Next, format the disk or disks, if there are several of them. Next, when you open a utility window that reinstalls the OS, open the command line using the combination Shift+F10. In it, enter the commands sequentially: diskpart, select disk 0, create partition primary. After this, close the command line and continue installing the system.
The extra partition reserved by the system will no longer appear, and the functionality and protection of Windows will suffer greatly. And it is not advisable to store system data on one disk, since if there are problems, you can lose all your data.
There are many more disadvantages than advantages.
But you can avoid problems by using special programs, for example, Partition Wizard. With its help, you can painlessly create new sections in memory.
Method 3: MiniTool Partition Wizard
If there is no system tool for working with disks in your edition of the "seven", and you have neither the time nor desire to tinker with the "Command Line", a convenient third-party solution, MiniTool Partition Wizard, will come in handy.
- Run the program and wait for the list of drives to load. After that, find the one you need, select it, right-click and use the “Hide Partition” item.
- A list of planned operations and a button to start them will appear in the column on the left; click on it.
- Confirm the operation, after which the program will begin to perform the selected action - at the end of the procedure, the disk will be hidden.
The main advantage of this method is its versatility, since the third-party application does not depend on the version and edition of the operating system.
We are glad that we were able to help you solve the problem. Add the Lumpics.ru website to your bookmarks and we will be useful to you. Thank the author and share the article on social networks.
Describe what didn't work for you. Our specialists will try to answer as quickly as possible.