How to force install drivers on Windows 7.
This type of driver installation almost always helps when the driver for the device is not installed by simply running the setup file
*.exe
or
*.msi
extensions .
But the main condition for successful driver installation in this case is that the driver must be completely unpacked and the file must have the extension *.inf
must be available.
Often, hardware manufacturers package their drivers not only with standard ZIP archivers, but also using intricate programs of their own making. Universal Extractor
can be very useful , which can be used to unpack almost any driver installer.
Let's look at how to force install a driver in Windows 7
the Defender AV-W2035
webcam as an example .
There is a driver downloaded from the Internet AV-W2035_VISTA.zip
, which we successfully unpacked into the folder
C:/AW-0350-MIC-VISTA
.
First, we need to look at where our file with the *.inf
.
To do this, you need to enable the display of file extensions in Windows folder properties so that file names are written with their extensions. Or use the very useful Total Commander
or a similar file manager.
After looking through the folders (you can use the file search), we found the file snpstd2.inf.
We should remember the entire path to this file so that later it will be easier to find it in Explorer
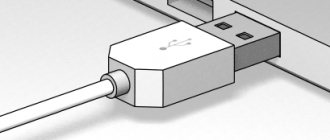
. We connect the camera to the computer and wait for Windows to complete all its operations to detect new hardware.
Open Device Manager
(
Start –> Control Panel –> Device Manager
)
USB camera device is immediately visible
without installed drivers.
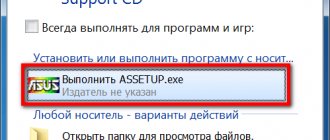
Right-click on the camera and select Update drivers in the context menu...
in the window that opens, click
and then select the Next
A window will open with a list of equipment categories. In order not to waste time or rack your brains, just point to the first line Show all devices
and click the
Next
. In the next window we will see a list of available drivers in the system (if any). But since we know that we have a folder with the driver, without selecting anything from the list, we click on the button
Click the Browse button...
and using Explorer we look for our file with the extension *.inf
, select it with the mouse and follow the
Open
and, of course, the OK
Now our driver will appear in the window with a list of available drivers (if the driver is not suitable for the equipment, the system will generate an error).
Here you should pay attention to the checkbox Only compatible devices
. The fact is that if the connected equipment has not been tested for compatibility with the installed version of Windows, then a driver for it will not be found, despite the fact that it may be completely working. Therefore, in some cases, this checkbox should be unchecked and the driver search repeated again.
So, after the file with the driver is found, select our driver in the list with the mouse and click Next
The driver installation will begin.
A Windows warning may appear indicating that the driver you are installing is not digitally signed or has not been tested for compatibility. If you are sure that the driver was taken from a reliable source and is exactly intended for the equipment being installed, then you should absolutely not be afraid of such a warning, but should agree to further install the driver. When the installation is complete, the system will display a completion window.
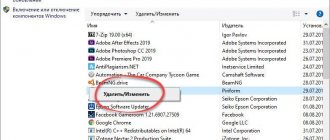
You can verify successful driver installation in Device Manager
, where the connected device will no longer have a question mark, and its name will change to the correct one created by the manufacturer.
In our case with the camera, this will be a device that appears called USB PC Camera (SN9C103)
. The installation is complete, you can safely start using the new equipment!
This publication is intended for users who are already somewhat familiar with computers and want to learn how to independently install and configure the operating system. The accessible language of the material and a large number of visual illustrations will help you correctly install Windows 7 and configure your computer to achieve optimal performance. In addition, the book describes in detail the basic principles of operating system recovery.
All rights reserved. No part of this book may be reproduced in any form without the written permission of the copyright holders.
The information contained in this book has been obtained from sources considered reliable by the publisher. However, taking into account possible human or technical errors, the publisher cannot guarantee the absolute accuracy and completeness of the information provided and is not responsible for possible errors associated with the use of the book.
Forced installation of drivers on Windows 7
This type of driver installation almost always helps in the case when the driver for the device is not installed by simply running the setup file, with the extensions *.exe or *.msi.
But the main condition for successful driver installation in this case is that the driver must be completely unpacked and the file with the *.inf extension must be accessible. Often, hardware manufacturers package their drivers not only with standard ZIP archivers, but also using intricate programs of their own making. Here, for unpacking, the Universal Extractor program can be very useful, which can be used to unpack almost any driver installer.
It is also advisable to disable User Account Control before installing the driver.
Let's look at how to force install a driver in Windows 7 using the Defender AV-W2035 webcam as an example. There is a driver AV-W2035_VISTA.zip downloaded from the Internet, which we successfully unpacked into the folder C:/AW-0350-MIC-VISTA. First, we need to look at where our file with the *.inf extension is located. To do this, in Windows folder properties you need to enable the display of file extensions so that file names are written with their extensions. Or use the very useful Total Commander program or a similar file manager. After looking through the folders (you can use the file search), we found the file snpstd2.inf
You should remember the entire path to this file so that later it will be easier to find it in Explorer. We connect the camera to the computer and wait for Windows to complete all its operations to detect new equipment.
Open Device Manager (Start -> Control Panel -> Device Manager)
The USB camera device without installed drivers is immediately visible. Right-click on the camera and select Update drivers... from the context menu.
In the window that opens, click Search for driver on this computer
A window will open with a list of equipment categories.
In order not to waste time or rack your brains, just point to the first line Show all devices and click Next
In the next window we will see a list of available drivers in the system (if any). But since we know that we have a folder with the driver, without selecting anything from the list, we click on the Install from disk button...
Click the Browse button...
and using Explorer we look for our file with the *.inf extension, select it with the mouse and follow the Open button
and, of course, the OK button
Now our driver will appear in the window with a list of available drivers (if the driver is not suitable for the equipment, the system will generate an error).
Here you should pay attention to the Only compatible devices checkbox. The fact is that if the connected equipment has not been tested for compatibility with the installed version of Windows, then a driver for it will not be found, despite the fact that it may be completely working. Therefore, in some cases, this checkbox should be unchecked and the driver search repeated again.
So, after the file with the driver is found, select our driver in the list with the mouse and click Next
The driver installation will begin.
A Windows warning may appear stating that the driver being installed is not digitally signed or has not been checked for compatibility. If you are sure that the driver was taken from a reliable source and is exactly intended for the equipment being installed, then you should absolutely not be afraid of such a warning, but should agree to further install the driver. When the installation is complete, the system will display a window indicating completion. You can verify that the driver has been installed successfully in the Device Manager, where the connected device will no longer have a question mark, and its name will change to the correct one created by the manufacturer. In our case with the camera, this will be a device that appears called USB PC Camera (SN9C103)
The installation is complete, you can safely start using your new equipment!
ddriver.ru
Required media driver not found when installing Windows 10
Messages: 108
Thanks:
3
| Computer configuration |
| Motherboard: ASRock H370 Pro4 rev. 1.0 |
| HDD: SSD Transcend TS128GSSD370 128GB and Hard Drive Western Digital Blue 1TB 7200rpm 64MB WD10EZEX 3.5 SATA III |
| Sound: Realtek ALC892 |
| CD/DVD: ATAPI iHAS122 |
| OS: Microsoft Windows 10 Pro x64 |
Profile | Send PM | Quote
Windows 10 x64 Russian taken from the official MS website. I know this is a tired topic. But I still haven’t been able to overcome it. Maybe I'm a crab. That's why I'm writing here. I tried the following: Inserted a flash drive into usb 2.03.0 Tried different programs for writing an image to a flash drive Rufus, ultraiso, a standard utility from MS Disconnected cddvd rom, usb hubs of the front case, hard drive. To no avail.
There are no usb drivers on the motherboard website (at least there are no files named usb) https://www.asrock.com/MB/Intel/H370. u.asp#Download Windows is installed from the DVD drive and disk. Help me solve the problem. Maybe some drivers are needed? Or is the flash drive bad? Flash drive: Transcend JF V30/32gb
Processor: i7-8700
Motherboard: ASRock H370 Pro4 Video
card: Gigabyte GeForce® GTX 1080 G1 Gaming 8G RAM: 16gb (2×8) Kingston 8GB CL16 DIMM HyperX FURY Red HX426C16FR2/8 Power supply: Aerocool VP 750 SSD: Transcend TS128GSSD370 1 28GB HDD: Western Digital Blue 1TB 7200rpm 64MB WD10EZEX 3.5 SATA III OC:Windows 10 x64 PRO Router: Eci b-focus 0-4g2pwm
Messages: 2382
Thanks:
388
| Computer configuration |
| Motherboard: ASUS Rampage III Extreme (BIOS version: 1601) |
| HDD: OCZ RevoDrive 3 (240Gb) |
| Sound: Realtek High Definition Audio (ALC889) |
| CD/DVD: LG GH22NS50 |
| Laptop/netbook: ASUS EEE PC Lamborghini VX6S: Atom D2700 (2.1Ghz) | 4Gb RAM | Radeon HD 6470M (1366×768; 12.1″) | Corsair "Force 3" SSD (90Gb) |
| Other: Keyboard: Logitech G19 | Mouse: ASUS GX850 | Acoustics: SVEN-Audio HA-385 |
The description of firmware version 1.10 states that “Modify USB Mass detection code for better USB compatibility.” Perhaps this is just your case. Stitch yourself, in general.
And it’s useless to look for USB drivers; support for USB 3.0 appeared in Windows 8 at the level of the OS itself, so, of course, you won’t find any additional USB drivers for your motherboard. They are simply not needed.
Installing the touch screen driver on HP TouchSmart 7320
Installing a touch screen driver on an HP TouchSmart 7320 duromerJanuary 18th, 2012 This is the first time I’ve encountered such nonsense. Download the driver for NextWindow Voltron Touch Screen, run the installer, which unpacks the driver files into a folder. The effect is zero. When we try to install an inf file with the right mouse button, we receive the message “The selected INF file does not support this installation method.” We bang our heads against the upsten for a long time, then we go to the Hewlet website and carefully read the installation instructions. It turns out that there are two devices in the system with the same PID and VID (in this case VID_1926&PID_0DBD)
And for the driver to work, you need to find a device with the same PID and VID among the “Composite USB devices” and update the driver for it by specifying the .inf file.
After which everything works great. Zhzhzhuzh!
But now you can point your fingers at the big screen.
duromer.livejournal.com
And here an unpleasant surprise awaited me - either the native driver turned out to be crooked, or Windows, or the wire... in general, the driver stopped working, the Windows device manager reported that the device was fully operational, but when I asked for adb devices in the console, I received an empty list and, Naturally, it was not possible to test the application on a tablet.
I wrote a request to TeXeT support, they even answered me with a link to the driver itself, which, as I was already convinced, did not work. I started looking for an answer on the Internet and found a bunch of different assemblies of this driver and manuals, but still none of them started up properly, and even the native driver from the SDK didn’t work at all, which made me despondent... but not despair.
Here I decided to try my hand at writing drivers using the good old method of scientific poking and opened the driver inf file. What gave me hope was the understanding that the software part of the adb interface on the tablet side should be identical for all devices, and USB worked anyway. And so, after several unsuccessful attempts at manually editing the inf file, I found a recipe for treating the inf file seasoning so that it would install and, most importantly, work.
So let's get started.
Step 1. Download the driver. If you haven't already done so, open Android SDK Manager, find the Extras section, check the Google USB Driver box, and click Install Packages. It's simple. Wait for it to load.
Step 2. Find the driver and make a copy of it in a separate folder. Go to the %android-sdk%\extras\google\ folder and see the treasured usb_driver folder there. Copy it somewhere, and we will carry out further manipulations there. In principle, you can edit the “original”, but I preferred to keep the original intact just in case.
Step 3. Edit the inf file. In the folder, open the file android_winusb.inf and look for lines like this:
;Google Nexus One %SingleAdbInterface% = USB_Install, USB\VID_18D1&PID_0D02 %CompositeAdbInterface% = USB_Install, USB\VID_18D1&PID_0D02&MI_01 %SingleAdbInterface% = USB_Install, USB\VID_18D1&PID_4E11 %CompositeAdbInterface% = USB_Insta ll, USB\VID_18D1&PID_4E12&MI_01 Make a copy of these lines, replace Google Nexus One with %name_of_your_device% for identification in the future and... open the windows device manager. We are looking for our device there (Android, Android Composite ADB Interface or something in this style). Open the device properties, the “Details” tab, select the “Equipment ID” item in the list and see this picture.
We copy the line that is most similar to the one shown in the figure (It is, in theory, just a little shorter), and paste it into our inf file.;TEXET TM-7025 %SingleAdbInterface% = USB_Install, USB\VID_18D1&PID_0003 %CompositeAdbInterface% = USB_Install, USB\VID_18D1&PID_0003&MI_01 %SingleAdbInterface% = USB_Install, USB\VID_18D1&PID_0003 %CompositeAdbInterface% = USB_Install, USB\VID_18D1&PID_0003&MI_01 In %SingleAdbInterface% we remove the end of the line, as you can see, in %Composite AdbInterface% is inserted entirely. There’s probably no need to repeat everything twice, but I already have everything and I’m too lazy to experiment :) Save (be careful - in some cases you need to run notepad with administrator rights, because in user mode you won’t be allowed to overwrite inf file).
Step 4. Driver installation. Now that everything is prepared, go back to the device manager and remove all previously installed adb drivers (if any). We update the list of devices and see our device without drivers. We open its properties and select “update drivers”, select the installation from the folder, specify the folder with the corrected inf and start the installation - our driver is instantly found, but during installation it may swear about incompatibility with the question “should I continue, nasalneka?” Let's continue. That's it, the driver is installed.
Step 5. Final. To be precise, unplug the USB port, wait until everything is detected, open the console (Win+R, enter cmd) and write adb devices. If everything went well, we see the treasured list item, indicating that adb now sees our device. From now on, you can safely launch eclipse and build programs, enjoying convenient automatic assembly, installation and the ability to debug directly on your device.
If the adb command does not work for you at all. Computer -> Properties -> Environment Variables. We look for the Path variable and at the end we add (in no case overwrite) a semicolon at the end, and then the address of the folder where adb lives (usually %android-sdk%\platform-tools\). After a reboot it should work.
Sometimes adb does not start automatically when the system starts. Start manually.
What was it?
It's actually simple. For some reason (Winda is a must-have / progers have crooked hands / the Google inf-file was written only for native Google devices / the Higgs bosons have ruined everything on your computer), Windows does not want to use the Google driver for non-Google devices that are not recorded in the inf-file. Apparently, everything there is tied to these ID equipment. But the software on the vast majority of Android devices is identical in terms of the debugger connector to the PC, so the driver should communicate normally with any Android device. Our task is to deceive Windows and force it to accept the device as a “driver-compatible” device, which we did by adding its ID to the driver inf file. I hope this manual will help someone get their own Chinese or other device for which they forgot to make a normal adb driver when assembling the system, or for those who are bothered to download the official driver from the device manufacturer (this can be so annoying that it’s faster to do everything described above - This happened to me with the driver for the LG E510 phone).
PS I have not conducted mass testing of this method, so I cannot guarantee that it will work 100% in all cases. But it worked for me on Windows 7, and then on Windows 8. The file had to be edited separately for each time, but I don’t think that’s such a problem.
habrahabr.ru
Installing the driver manually in Windows 7
The method of manually installing drivers for programs and devices sometimes helps when the usual automatic installation fails. Let's say, a recent example is installing an audio card driver for Windows 7 installed in VirtualBox. There are other examples, so this method can be quite useful.
So, you can install the driver manually as follows.
Press the key combination to open the Run window. Enter the command hdwwiz in it and click on the OK button.
The Hardware Installation Wizard will launch. In the first window, click the Next button. In the second window, select the Install equipment manually selected from the list radio button, and then click the Next button.
In the new window, select Show all devices and click Next.
As you can see, a list of all available devices will now be shown. You can search for what you need or install the driver from the disk. To do this, click on the Have disk button.
The Install from Disk window will open, in which you need to click the Browse button and navigate to the folder on the disk where the required driver file with the .INF extension is located.
This publication is intended for users who are already somewhat familiar with computers and want to learn how to independently install and configure the operating system. The accessible language of the material and a large number of visual illustrations will help you correctly install Windows 7 and configure your computer to achieve optimal performance. In addition, the book describes in detail the basic principles of operating system recovery.
All rights reserved. No part of this book may be reproduced in any form without the written permission of the copyright holders.
The information contained in this book has been obtained from sources considered reliable by the publisher. However, taking into account possible human or technical errors, the publisher cannot guarantee the absolute accuracy and completeness of the information provided and is not responsible for possible errors associated with the use of the book.
A required media driver was not found during Windows installation
When installing Windows 10, 8 and Windows 7 on a computer or laptop, the user may encounter errors “The required media driver was not found. It could be a DVD drive, USB drive, or hard drive driver" (during installation of Windows 10 and 8), "The required driver for the optical drive was not found. If you have a floppy disk, CD, DVD, or USB flash drive with these drivers, insert this media" (when installing Windows 7).
The text of the error message is not particularly clear, especially for a novice user, because it is not clear what kind of media we are talking about and one can assume (incorrectly) that the problem is in the SSD or the new hard drive on which the installation is taking place (more about this here: Not the hard drive is visible when installing Windows 7, 8 and Windows 10), but usually this is not the case and the problem is different.
Basic steps to fix the “Required media driver not found” error, which will be described in detail in the instructions below:
- If you are installing Windows 7 and doing it from a flash drive (see Installing Windows 7 from a flash drive), connect the USB drive to the USB 2.0 connector.
- If the distribution disk is recorded on DVD-RW, or has not been used for a long time, try re-burning a boot disk with Windows (or better, perhaps, try installing from a flash drive, especially if you have doubts about the full functionality of the drive for reading disks).
- Try burning the installation USB flash drive using another program, see The best programs for creating a bootable USB flash drive. For example, relatively often (for unclear reasons) the error “The required driver for the optical drive was not found” is seen by users who burned a USB drive in UltraISO.
- Use another USB drive, delete partitions on the current flash drive if it contains several partitions.
- Download the Windows ISO again and create an installation drive (the problem may be a damaged image). How to download original ISO images of Windows 10, 8 and Windows 7 from the Microsoft website.
Book:
Let's consider a situation where a set of INF files is used to install equipment.
Open Control Panel
and launch the
Device Manager
. As a result, a window will open in which you can see a list of all devices detected by the operating system on the computer (Fig. 16.1).
Most of it consists of devices located on the motherboard, and only a few entries indicate devices that are installed in the form of an expansion card or connected using external ports.
Our task is to install a driver for a device that is not detected by the operating system. If your device is not yet connected to your computer, now is the time to do so.
If the device is already connected to the computer, then right-click on the computer name at the very top of the list and in the menu that appears, select Install old device (Fig. 16.2). This will launch the Hardware Installation Wizard, which will help you and guide your actions when installing equipment (Fig. 16.3).
Rice. 16.1.
Launch the Device Manager mechanism
Rice. 16.2.
Select Install old device
After reading the introductory speech and preparing the driver disk, if needed, click Next.
to begin the device installation process.
Rice. 16.3.
Hardware Installation Wizard
The installation wizard offers a choice of two options for further actions: automatic and manual installation of equipment (Fig. 16.4). Automatic installation will not do anything, since the operating system has already tried to do this during the installation process. For this reason, it is necessary to immediately move on to the second option. Set the switch to Install equipment manually selected from the list
and click
Next.
Rice. 16.4.
Selecting an action option
In the next window you will see a list of devices of different types, drivers for which are available in the operating system (Fig. 16.5).
Rice. 16.5.
Specify the type of device that needs to be installed
Let's first consider the option when you find the driver you need in the list of manufacturers and drivers. Once you have checked it, click Next.
to proceed to install it.
In the next window, the Hardware Installation Wizard will show a list of all drivers available in the system for the selected device type, sorted by hardware manufacturer. If you are sure that one of the proposed drivers is suitable for your equipment, then select the desired manufacturer on the left side of the window, and the required driver on the right. After that, you can try to install it by clicking Next
(Fig. 16.6).
Next
again (Fig. 16.7).
After driver installation is confirmed, the Add Hardware Wizard copies the necessary drivers to the system and attempts to initialize the device. If the device initialization was successful, you will see a message window indicating that the driver for the device was installed correctly and the device is ready to use. Otherwise, the wizard will report that the installation failed and the device cannot be started, or that there are some difficulties (Fig. 16.8).
Rice. 16.6.
Specify the driver for the device
Rice. 16.7.
Confirm driver installation
Hello dear reader of my blog! Stable operation of the Windows operating system depends on how correctly the driver for the device is installed.
In this article, I will tell you how to install a device driver in the Windows operating system in several ways.
A driver is a program with which the Windows operating system gains access to a specific computer device (video card, network card, printer, etc.).
Choosing the model of my motherboard
I select the folder where to save the driver and click “Save”
Next, the downloaded driver must be installed. The driver can be supplied either as an executable file (for example: setup.exe) or as a folder with driver files without an installation file. If the downloaded drivers have an installation file, there will be no problem installing it. Simply run the executable file and follow the on-screen instructions. If you have a driver in the form of a folder with files without an installation file, then read the following installation method.
Installation errors
If there is a problem in Windows OS, then most often DriverPack Solution simply does not install, giving an error. The installation may be canceled for several reasons:
- Outdated OS. Often the lack of a particular Windows update plays a key role in the installation process. Therefore, you should run automatic system updates and install recommended packages.
- There is no NET.Framework in the OS. DriverPack Solution requires the Microsoft NET.Framework package to operate. If it is not installed, then there can be no talk of any installation. If it definitely exists, then most likely the version of the component is not suitable. You need to update it through the official Microsoft website.
- Working antivirus. When installing a software product on your computer, it is recommended to disable any anti-virus product. These programs classify the installer's actions as dangerous to the system and prohibit its operation.
Once these issues are resolved, the installation should complete successfully.
It is recommended to update the operating system from time to time, as update packages include numerous fixes that positively affect the security of your PC.
Installing the driver through device manager
If you have drivers for a specific device (on a hard drive or flash drive), but there is no installation file and this driver is not installed on your system, do the following:
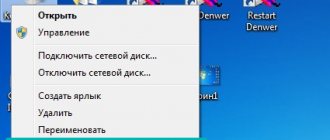
Open the “Start” menu, find the “computer” icon, right-click on it (hereinafter: RMB) and select properties...
A system window will open, click on “Device Manager”
The device manager will open, in which we see all the devices installed on our system. If there is a yellow exclamation mark next to a device, it means that drivers are not installed for this device or the driver is installed incorrectly. Right-click on the problematic device and select “Properties”
We see in the properties of this device that no drivers are installed for it. Click "Update driver..."
Now we have a choice, either the Windows system automatically searches for drivers or installs the driver manually. Select “Search and install drivers manually”
We tell the system where to look for drivers. To do this, click “Browse”
and select our drivers folder. Click "OK"
We see that the driver for the device is being installed
If the installation is successful, a window will appear indicating that the installation of drivers for this device is complete.
Click “Close” and we see that the yellow exclamation mark has disappeared from our device (TV tuner). The driver is installed!
If you do not have a driver for this device, you can select “Automatic search for drivers.” In this case, Windows will try to find a driver for the device on this computer and on the Internet
But this method does not always work, so it is better not to rely on it.
Note: This method is described for the
Windows 7 operating system. If you have Windows XP or Windows 8 installed, the steps will be similar.
How to fix?
When you see a message like this, you should try the instructions below (it helps me):
Go to the list of equipment (device manager). You can get into it in different ways, depending on the version of Windows. But the simplest method is to right-click on the “Start” button and select the appropriate action from the list:
We find an unknown element among the equipment (marked with a yellow icon) and right-click on it, then select the “Update ...” action:
Two options will be offered. Automatic scanning is not suitable for us. It will once again lead to the error: “invalid service installation section in this inf file.” Select search on your computer:
All device types supported by the PC will be displayed. You should find and highlight the “MTD” item:
Driver update program DriverPack Solution
DriverPackSolution is a program for automatically installing, searching and updating drivers.
My favorite and most universal way to install drivers. Having previously downloaded the “Full” version to a disk or flash drive, you can install drivers on a computer that does not even have access to the Internet.
Go to the website: drp.su/ru/
. Click “download”.
Select the “Full” or “Vip” version. The “Full” version can be downloaded for free, without registration via torrent. I will tell you what a torrent is in the following articles, so here’s the blog. After clicking the “download” button, download the torrent file of the “Full” version to your computer.
Using a torrent client, download the driver assembly to your computer
The downloaded ISO file (disc image) can be uploaded to a 9GB DVD and used. Below I will tell you how to do this.
If we decide to choose “VIP status”, click “Registration”
After this, a page with a login and password will appear, where you can register or log in using the previously created credentials
After registration, you will be sent an email where you will need to confirm your address by clicking on the link...
After confirming your account, you can click on “Download DriverPackSolution configurator”
By the way! The blog has a Telegram channel. Subscribe to the channel to be the first to know about the release of new articles on the blog + various IT news.
“VIP” status can be obtained by taking certain actions to promote the drp.su/ru website. This includes completing various quests, joining a group in contact, exchanging links, inviting friends, etc. If you are ready to promote their project for the sake of VIP status, then please
You can also download drivers for laptops on the site by clicking on the “For laptops” section and selecting your laptop model from the list
Now I will show you how to use the DriverPackSolution automatic driver installation and update program by downloading the “Full” version and burning this image to a 9GB DVD.
Run the installation file from the disk. Typically this is DriverPackSolution.exe. The program shell will open and begin collecting information about devices and installed drivers on your computer or laptop.
After collecting information about devices, the program will show drivers that are not installed on the system or that can be updated with new versions.
The numbers in the figure indicate explanations:
- If you check the “Expert Mode” box, the program will show a detailed list of drivers to install. I recommend checking the box;
- Block for selecting a specific driver with a tick. Here you can select specific drivers and click the “Install all” or “Update all” button;
- Buttons for automatic intelligent driver installation. These buttons are used if you decide to install drivers for the device one at a time;
- “Install all” or “Update all” button (depending on the situation, the button may change its name)
If you clicked the " Install and update all"
", a window appears with a selection of the necessary drivers and programs to install. Click “Start installation”
After the drivers are installed, be sure to restart the computer.
All drivers for our devices are installed and updated!
Installing the driver using Ma - config. com/ru
The Ma-config.com/ru website is designed to determine the configuration of your PC and find the necessary drivers for your system.
Go to the website Ma-config.com/ru
and click
“My Drivers”
After the file is saved, it will automatically start and download the remaining elements of the program
The driver updater will then begin to install. Select the language and click “Okay”
After installing the program, go to their website again and click “Refresh Page”
Then click “Start Analysis” again and see on the right how the process of analyzing our equipment is progressing
Then a new page will open, go to the very bottom of the page and click “Find drivers”
After this, a new page will open with a list of drivers that need to be installed or updated. In my case, only the driver update for my video card came out. Click “download”
A new page will open with a description of the driver and a download button. Click on it
A new page will open showing information about the file being downloaded, its size and where you will download it from. Click on the link to download the driver to your computer
Finding a driver by device ID
It happens that not one of the methods is suitable for us or is impossible due to certain circumstances. Then you can try to install the device driver using the hardware identification number (hardware ID).
To do this, go to the “Start” menu - right-click on the “Computer” icon - “Properties”
We find the device for which the driver is not installed (it is highlighted with a yellow question mark), right-click on it, select “Properties”
Now go to the website devid.info
and paste our hardware ID from the buffer into the
“Enter driver code”
(press the “Ctrl” + “V” keys). Click the “Search” button. If the search is successful, information about the found driver will be shown at the bottom of the page. Click the icon with a picture of a floppy disk to save the driver to your computer
Incompatibility with system bit size
You may encounter a similar problem when trying to install a driver that is incompatible with the OS bit depth. If you downloaded the driver from an official or third-party site, make sure it is compatible with your system version. If you do not know the bitness of your OS, open “System Information” utility msinfo32 and look at the value of the “Type” .
“x86-based computer” will indicate that the system is 32 -bit, “x64-based computer” will indicate that the system 64 -bit.
What you need to install the driver
In order to install the driver manually, you need an installation disk or special software that will help you step by step through the entire installation procedure. Below we will look at one of these programs - Driver Easy. There are situations when, due to incompatibility, the driver from the installation disk generates an error. It is in such cases that we need programs that will help us find and update the driver. In addition, this option will be more acceptable for owners of netbooks, which often do not have a disk drive. For such cases, there is an option to install the necessary driver from a USB drive, we will also look at that today, since this method has its own characteristics.
"The required optical drive driver was not found" error when installing from DVD
The main cause of the error “The required driver for optical disks was not found” when installing Windows from a disk is a damaged disk or a DVD drive that does not read disks well.
At the same time, you may not see any damage, but on another computer installation from the same disk occurs without problems.
In any case, the first thing you should try in this situation is to either burn a new bootable Windows disk or use a bootable USB flash drive to install the OS. The original images for installation are available on the official Microsoft website (instructions on how to download them were given above).
Manual installation - instructions
Installing the driver manually using Device Manager
1. Open the Windows 10 Control Panel by pressing the Win + X key at the same time (Windows key and X key) and left-click on “Control Panel”
2. For convenience, it is advisable to set up small icons.
3. Click on “Device Manager”.
In the Device Manager window, expand the categories and find the device you need. Then right-click on the device name and select Update Driver Software. The photo shows an example of installing the Realtek PCIe GBE Family Controller network adapter driver.
Installing the driver manually using Driver Easy
1. In the main window of the Driver Easy program, click on the driver of the device that needs to be updated. After this, you will see the standard task manager window, which was described above. Select the device to update.
2. You will see two options in the pop-up window. Click Browse My Computer to install the driver software.
3. Click Browse to locate the downloaded driver file.
Click the Down Triangle button in Driver Easy, then select Open File Location to open the driver folder.
For convenience, you can copy and paste the location of the downloaded files into the field.
The path to the file:
As you already understood, the update takes a lot of time and requires basic knowledge of working with a personal computer. In addition to updating manually, Driver Easy can automatically search, download and install all drivers that need updating. But, as we already said, this is not safe, since this function works in automatic mode, and in this case it is impossible to make a backup copy in case of a serious failure.
Installing the driver from a CD or DVD
Almost all computer and hardware manufacturers provide a set of drivers for various hardware devices. For example, the driver CD that comes with your printer contains drivers for many different printers, not just the one you purchased. When installing drivers, make sure that you are installing drivers for your printer model and not for another one. Also, make sure that you are installing it for the version of Windows that is installed on your computer. The process of installing a driver from a CD is no different from the standard installation process of any other program. Be sure to follow all instructions in the installer the first time you run it. In some cases, you need to remove the old driver before installing the new one.
If you have a driver CD but your computer doesn't have a drive or it doesn't work, you can also load the drivers from a USB drive.
Installing drivers from a USB drive
After copying the drivers to a USB drive, you can install the necessary software on your computer. Make sure the drive is connected to your computer, open Windows Explorer and find your device name in it. For example, if you have a USB drive that is assigned to the E: drive when connected, then you need to click on the icon named E: in order for the contents to open.
Once the drivers are found on the disk, you must determine exactly how they will be installed on your computer. If the directory contains executable files or an installation file (extension *.exe), then you can install the driver using this file. If the drivers are compressed into a ZIP file, you will need to extract the file using archivers such as 7-Zip and WinZip.
Solving the problem of installing “firewood” step by step
1) Is your device visible? Are the cables and ports working?
The first thing I recommend starting with is to decide: “can your device be seen by a laptop (computer)?” It is possible that there is a problem with the cable or USB port, and when you connect the phone, it is simply “invisible”, which is why the drivers are not installed.
How to determine this?
Very simple. Notice whether the battery appears to be charging when you connect the device to a PC USB port? If it appears, then most likely everything is in order with the USB cable and port. By the way, pay attention to whether a characteristic sound appears in Windows when the device is connected.
You can also connect other devices to the USB port with this cable, or connect the phone to another PC. In general, decide whether the equipment itself works.
2) Checking the device manager - searching for unknown hardware
And so, the ports seem to be working, the cable too - the next step is to see if the equipment is displayed in the device manager.
To open Device Manager:
- Press the key combination WIN+R;
- enter the command devmgmt.msc
- click OK.
- The method works in all modern versions of Windows (note: in Windows 10, by the way, to open the device manager, you can simply right-click on the START menu).
How to start Device Manager
In Device Manager, expand the “Other Devices” tab. It is in it that all those devices that the computer (laptop) sees, but cannot install drivers, should be displayed. The screenshot below shows just such a case: the phone is visible to the PC, but Windows 10 drivers cannot be installed in auto mode.
3) How to find and install the required driver – solution attempt No. 1
First, I recommend trying to find and install exactly the driver that is recommended for your equipment, based on its ID properties (each equipment has its own identification data, so you can search for drivers without even knowing the exact brand of the device).
To view the ID properties, right-click on the unknown device (note: by the way, when you disconnect the device from the USB port, this unknown device should disappear from the other devices tab), and go to its properties.
Properties of an unknown device
Next, you need to open the “Details” tab, select “Equipment ID” in the “Property” column and copy the line with the value (see screenshot below).
Copy the device ID
Next, simply paste the copied line into any search engine (Google, Yandex) and find the driver for your device. Next, run its installation and test its operation (in many cases, you won’t have to do anything else).
4) Finding and installing the driver in Windows auto mode - attempt No. 2
Modern versions of Windows (8, 10) can automatically find and install drivers for many devices, and they do it quite well.
To check if this works: go to the device manager, then right-click on the desired device (for example, on an unknown device), and in the context menu that pops up, select “Update drivers. “.
Next, select the automatic search and update option (point one, see screenshot below).
Automatically search for updated drivers
In general, the method is quite good and helps out in many cases, but in mine it didn’t work, after a while it was said that:
- There was a problem during the software installation process for this device
- Third party MPT DEVICE INF does not contain signature information (see screenshot below).
There was a problem during the software installation process
5) Selecting a driver from those already installed is another solution to the problem
I’ll say one seditious thing: some people are looking for a miracle driver to solve this problem, but there is no problem as such. The drivers they are looking for have already been on their PC for a long time, there was simply an error in identifying the device and driver, and therefore the computer simply does not accept them. You need to show him the path to them again, and everything will work.
Therefore, if the previous steps did not help, I recommend opening the device manager (see how to do this - see above in the article), open the “Other devices” tab (it shows all devices for which there is no “firewood”), right-click on desired device and select the option “Update drivers. “(as in the screenshot below).
Next, select “Search for drivers on this computer.”
how to search for a driver
In the next step, do not specify the folder with drivers, but click on the link “Select a driver from the list of already installed drivers” (see screenshot below)
Select a driver from the list of installed ones
Next, you need to specify the type of devices from the proposed list. In my case, we were talking about a phone connected to a USB port - i.e. about the USB device. This is what I chose from the list.
Next, Windows automatically prompts you to install drivers for MPT DEVICE - you don’t need to uncheck any boxes, you just agree.
Voila! The drivers were installed successfully. I go into Explorer and see the phone, it is displayed in “This Computer”, now you can upload files to it and upload photos from it (problem solved).
Note: if instead of a successful installation message you see an error (for example, also related to the INF file), click the “Back” button and try to continue the installation again. This is exactly the method that helped me.