How to see when the computer was last turned on
The last time the computer was turned on and off can be viewed in the Windows 10 event log. The event log, in turn, allows the user to additionally view all events occurring in the Windows 10 operating system. Event viewing is often used to detect problems that cause system failures.
- Open the event log by running the command eventvwr.msc in the Win+R .
- Go to Windows Logs > System , and click the Filter current log ...
- In the window that opens, in the Event Source set the value to Winlogon , and apply the filter by clicking OK .
The Winlogon source event sends a user logon notification to the Customer Experience Improvement Program. After applying the filter, you can see in the results not only the time the computer was last turned on, but also the time Windows 10 shut down.
The user just needs to look at the data presented in the window in order. The first date and time the computer was turned on will be displayed, the second the date and time the computer was last turned off.
How to determine the start time in the program
If you don’t want to analyze the system log, you can use a simple utility. It's called TurnedOnTimesView. In the screenshot below, the official website of the developers is indicated at the bottom right. There you will find many different programs, to download TurnedOnTimesView use the link: https://www.nirsoft.net/utils/computer_turned_on_times.html.
After downloading, you need to unpack the archive and run the application file. There is no need to install it. Interface in English. If you want to change the language, then scroll down the page (from which you downloaded) - and additionally download the appropriate language pack. Then you will need to find it in the “Downloads” folder and move it to the folder where the application file is stored (that is, the one with which you launch the program).
Where can I see when the computer was turned on in the program itself? Everything is simple here. First, click on the Startup Time column to sort the dates. Now pay attention to the colored circles:
- Yellow is the current session.
- Red – the system booted, but the PC was not completely turned off.
- Green – login to the OS and shutdown.
Let's look at examples to make it as clear as possible.
Let's take June 20. There is only one field with this date, and it is marked with a green circle. I logged in at 7:24 am and logged out at 5:36 pm.
Now let's take 21.06. The first line is marked with a red circle. This means that I turned on the computer at 14:08, but then it went into sleep mode and therefore the shutdown time is not indicated here. But the second line is marked in green: at 15:35 the PC woke up from sleep, and the system was logged out at 18:06.
I hope now it won’t be difficult for you to understand when you turned on the computer. The main thing is to analyze the data and you will definitely understand whether someone logged into your account at work, or maybe the child is not doing exactly what you ask.
Rate this article:
( 1 ratings, average: 5.00 out of 5)
About the author: Anya Kaminskaya
- Related Posts
- How to open a document with a docx extension: several ways
- How to open hidden files on a flash drive
- The computer does not see the flash drive, what should I do?
How to see the last login time
The user has the opportunity to enable the display of messages about the time the computer was last turned on. The next time the computer is turned on, the user will be shown data containing the time the computer was last turned on. You can also see all unsuccessful login attempts under your account.
You can enable the display of your last logon time by using the Local Group Policy or Registry editors. In any case, it is better to first create a backup copy of Windows 10. The created backup copy allows you to roll back the latest changes to the operating system at any time.
Group Policy Editor
The editor allows you to make changes to the group policy of the Windows 10 operating system. You can open the local group policy editor in the Enterprise and Professional editions of Windows 10.
- Open the Group Policy Editor by running the gpedit.msc in the Win+R .
- Go to: Computer Configuration > Administrative Templates > Windows Components > Windows Sign-in Options .
- Change the Show previous login attempts when user logs in setting to Enabled .
Actually, this policy setting determines whether the computer will display information about previous successful and unsuccessful logon attempts when a user logs on. By default, information about previous authorization attempts is not displayed.
Registry Editor
Before making changes to the registry, we recommend that you create a backup copy of the Windows 10 registry. If you change the registry data incorrectly, you will always have the opportunity to quickly roll back the latest changes. To display information about previous login attempts, you will have to create a registry entry yourself. As a result, information will be displayed in the same way as after changing Group Policy.
- Open the registry editor by running the regedit in a Win+R .
- Go to: HKEY_LOCAL_MACHINE\SOFTWARE\Microsoft\Windows\CurrentVersion\Policies\System .
- In the current location, create a DWORD value (32-bit) named DisplayLastLogonInfo a value of 1 .
After you use any of the methods to enable the display of your last logon time, you must restart your computer. The next time you turn it on, you will be able to find out when the computer was last turned on.
Conclusion
The methods presented by many specialists with the execution of one command, unfortunately, no longer work in the current version of the Windows 10 operating system. Users can only find out the operating time of the Windows 10 computer. To find out when the computer was last turned on, you need to use the event viewer or enable the display of information during authorization user.
Checking whether the computer is turned on using the “Audit” policy
Enabling “Audit” of events will allow you to track everyone who logged into the system not only locally, but also in network mode.
Step 1. In the command line, opened with the combination “Win + R”, write “gpedit.msc”.
Enter the command “gpedit.msc” into the field, click “OK”
Step 2. Select “Computer Configuration” by double-left clicking the mouse.
Select “Computer Configuration” by double-left clicking the mouse
Step 3. Next “Windows Configuration”.
Expand the “Windows Configuration” folder
Step 4. Expand the “Security Settings” directory.
Expand the “Security Settings” directory
Step 5. After that “Local Policies” and “Audit Policy”.
Expand the “Local Policies” directory, then “Audit Policy”
Step 6. Now select the top “Login Audit”, and check o and “Rejection Audit”, apply these settings.
Select the top “Login Audit” and double-left-click on it
Check the boxes next to “Success” and “Failure”, click “Apply”, then “OK”
Now the system will keep records of all system starts, accounts logged into the OS, as well as the date and time. You can view this in the security log, the entry to which was described earlier.
Automatically turns on the computer by time in the BIOS.
Tell your friends about the article... VK
In one of our previous articles, we talked about how to configure a computer to automatically turn on after a power outage and power supply.
Today, at the request of a subscriber on our Youtube channel, we will tell you how to configure your computer to turn on at a certain time, which is also configured in the BIOS.
I once used this auto startup of my computer as an alarm clock: I configured it to turn on in the BIOS and added a music track to startup that was launched via Winamp :).
Since the BIOS versions are different, the methods for setting up the computer to automatically turn on differ from each other in the menu interface, but the principle is the same everywhere.
We can enter the BIOS via Del or F2.
Let's start with the good old BIOS American Megatrends, which has three subtypes:
1.BIOS American Megatrends 2009.
1. Go to the Power Management Setup . In the list that opens, find “ Restore On AC Power Loss ”: change to “On”. 2. Go to the point below “ Wake Up Event Setup ”. In the list that opens, change Redume By RTC Alarm option Enabled ”, after which we see the items “Date” – Every Day and “HH:MM:SS” – turn-on time. 3.Complete the setup, saving the settings via F10 (Save Changes and Exit) and OK .
2.BIOS American Megatrends 2010.
1. Go to the “ Power ” menu tab. 2. In the “ ARM Configuration ” menu. In the list that opens, find “ Restore On AC Power Loss ”: change to “ Power On ”. 2. Go to the item below “Power On By RTC Alarm” – “Enabled” . After enabling this option, the additional items “RTC Alarm Date” – Every Day (for daily activation) and “ RTC Alarm Houre ” – hours, “ RTC Alarm Minute ” – minutes, “ RTC Alarm Second ” – seconds were activated. RTC Alarm Date item : you can select “ Every Day ” to turn on every day, and in the “ RTC Alarm Time ” item we will set a specific time for the computer to automatically turn on. 3.Complete the setup, saving the settings via F10 (Save Changes and Exit) and OK.
3.BIOS American Megatrends 2011.
1. Go to the “ Advanced ” tab. Menu item “ ACPI Configuration – Restore on AC/Power Loss ”: change to “ Power On ”. 2. Below we find the item “ RTC Alarm Power On ”: change it to “ Enabled ”. After enabling this option, we have two additional menus “ RTC Alarm Date ” and “ RTC Alarm Time ”. RTC Alarm Date item : you can select “ Every Day ” to turn on every day, and in the “ RTC Alarm Time ” item we will set a specific time for the computer to automatically turn on. 3.Complete the setup, saving the settings via F10 (Save Changes and Exit) and OK.
4. Let's move on to setting up automatic PC startup on UEFI.
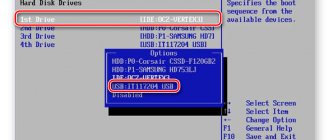
1. In the main window, go to the “ Advanced ” tab (F7 key). 2. Find “Advanced Power Management” in the APM and go to it. 3. In the new window, change the status to Enable in the Enable via RTC . 4. After activating the RTC , a menu appeared to indicate the time, fill in the time as we need. 5. Save and exit the BIOS (F10 – Yes). 6. Check.
Tell your friends about the article... VK