Home " Proper removal of old Windows versions and files
Programs and services
Sections: optimization, services
Vladimir Shishkov 11/23/2018
316
Proper removal of old Windows versions and files
5 (100%) 62 votes
When you reinstall Windows, the old versions are always left behind. Of course, storing old versions on a disk, especially if this disk is an SSD and has a small volume, is too wasteful. Therefore, it is better to delete old versions and files and free up hard drive space. But they need to be removed correctly so that there are no extra tails taking up space on the hard drive.
Old versions of Windows are located on the boot disk in the C://Windows.old folder. Sometimes it is not possible to delete this folder from the disk directly, and if it is possible, then unnecessary tails of system files remain.
Therefore, it is necessary to remove the old Windows system correctly and correctly.
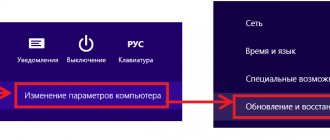
To remove old versions of Windows and temporary unnecessary files, go to the “Start” menu (Fig. 1-item 1).
Manual removal
Step 1. Enter the directory of the disk with the installed system.
We enter the directory of the disk with the installed system
Step 2. Select the Windows.old folder and use the “Shift+Del” combination. When prompted, confirm the deletion.
Confirm deletion
On a note! Do not delete a folder to the trash using the context menu or using the “Del” key. The hard drive will not be cleaned - the data in the recycle bin still takes up space.
Manually removing an old Windows installation
If for some reason you want to delete the folder with the old version of Windows manually, you will have to tinker a little and make a number of settings.
First, you need to log in with an administrative account with full rights. Otherwise, you will not be able to delete the pack.
Now let's make the settings step by step:
- Open My Computer.
- Open the drive with the operating system installed (for example, local drive C).
- Find the "Windows.old" folder.
- By right-clicking on the folder, open the context menu and select the “Properties” line.
- In the window that opens, select the “Security” tab.
- Click the "Advanced" button - the "Advanced security settings for Windows.old" window will open in front of you.
- Go to the Owner tab and click the Edit button.
- In the next window, select your account as the owner, that is, the account from which the deletion will be performed, and click “Apply”.
- You will see a message stating that you have become the owner of the Windows.old folder - click OK and close the properties window.
- You can start deleting the folder with the old Windows operating system.
There are also two ways to delete a folder. The first is to right-click on the folder icon and select “Delete”. Agree that you want to delete the folder. Then empty the trash. The second is to select the folder by left-clicking the mouse, simultaneously pressing the Shift+Del keys on the keyboard, and agree to delete. The folder will be deleted bypassing the trash, that is, it will not need to be emptied.
After you have completed installing the new OS and deleting old files, we recommend reading the article about drivers for Windows 10, since not all of them are included in the installation package. If you haven’t switched to a new system yet, you can find out how to download drivers for the “Seven” here.
Uninstall via command line
In fact, this method is also a manual removal, but uninstallation is carried out at a low level, which guarantees a better result due to the simultaneous scanning of hard drive sectors.
Step 1. To open the command line in the Start menu, in the “Search programs and files” line, you need to enter the cmd command, call the context menu and run the handler as administrator.
Enter the cmd command
Step 2. To delete the directory, enter the command “rmdir /sc:windows.old”.
Enter the command “rmdir /sc:windows.old”
On a note! You can use rd instead of the rmdir command. Pay attention to the syntax - the command is case insensitive, that is, “RMDIR” and “rmdir” are both equivalent and equally possible. At the same time, pay attention to the directory entry - if the folder intended for deletion is named “Windows.old”, and you specify “windows.old”, then nothing will be deleted.
Step 3: Confirm deleting the Windows.old folder by pressing the “n” key and “enter”.
Confirm deletion of the Windows.old folder by pressing the “n” and “enter” keys
On a note! The “/s” switch allows you to delete a directory, including all subfolders and hidden files. If you add the “/q” key, then confirmation of the request will not be required, however, in order to avoid deleting the wrong folder, it is better to leave the request.
Live CD
Another almost 100% way to remove old Windows that has become unnecessary after installing a new one is to use a product for deploying the operating system without the need for installation. Using C9PE as an example, the process looks like this:
- The user starts from the Live CD and selects one of the available methods to boot the desktop.
- Waits for the information to load.
- And by opening the “My Computer” menu.
- Right-clicks on the title of the folder with unnecessary data.
- Selects the “Become an owner” option.
- Then it deletes the directory in the standard way.
Important: Depending on the file system and other settings of the system drive, it may not appear in the My Computer menu. In this case, the user should try other ways to remove the old Windows or download and run a Live CD from another developer.
Removal via Disk Cleanup
Step 1. To call the utility, in the “Search programs and files” line, you need to enter the line “Disk Cleanup” and run the program as an administrator.
In the “Search programs and files” line, enter the line “Disk Cleanup” and run the program as administrator
Step 2: Select the device you want to wipe and click OK.
Select the device on which to perform cleaning and click “OK”
Step 3. Wait for the analysis process to complete. The assessment is made by sections of the hard drive.
We are waiting for the end of the analysis process
Step 4. At the end of the analysis, a window will be displayed listing possible items for partitions to be deleted. Start the system file cleaning analysis process by clicking on the appropriate button.
We start the process of analyzing the cleaning of system files
Step 5: Select the device you want to wipe and click OK.
Select the device on which to perform cleaning and click “OK”
Step 6. Wait for the analysis process to complete. The assessment is made by sections of the hard drive.
We are waiting for the end of the analysis process
Step 7: Highlight Previous Windows Installations and click OK.
Select “Previous Windows installations” and click “OK”
Step 8. Wait for the cleaning process to complete.
Video - How to remove old Windows after installing a new one
How to delete the Windows.old folder on drive C (Windows 10)
Hello.
After upgrading Windows 7 (8) to Windows 10, the Windows.old folder appears on the system drive (usually drive “C”). Everything would be fine, but its volume is quite large: several tens of gigabytes. It is clear that if you have a HDD of several terabytes, then you don’t care, but if we are talking about a small SSD, then it is advisable to delete this folder...
If you try to delete this folder in the usual way, you will not succeed. In this short note I want to share a simple method for deleting the Windows.old folder.
———————————-
Important note! The Windows.old folder contains all the information about the previous installed Windows 8 (7) OS from which you updated. If you delete this folder, it will be impossible to roll back!
The solution in this case is simple: before upgrading to Windows 10, you need to make a backup copy of the system partition with Windows - https://pcpro100.info/kak-sdelat-rezervnuyu-kopiyu-hdd/. In this case, you can roll back to your old system at any time of the year (day).
———————————-
How to delete the Windows.old folder in Windows 10
The most convenient way, in my opinion, is to use the standard tools of Windows itself? namely, use Disk Cleanup.
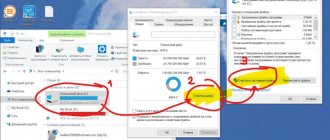
1) The first thing you need to do is go to my computer (just launch Explorer and select “This PC”, see Fig. 1) and go to the properties of the system drive “C:” (the drive with Windows installed).
Rice. 1. disk properties in Windows 10
2) Then, under the disk capacity, you need to press the button with the same name - “disk cleanup”.
Rice. 2. disk cleanup
3) Next, Windows will search for files that can be deleted. Typically the search time is 1-2 minutes. After the search results window appears (see Fig. 3), you need to click the “Clean up system files” button (by default, Windows does not include them in the report, which means you won’t be able to delete them yet. By the way, during this operation Administrator rights will be required).
Rice. 3. cleaning system files
4) Then in the list you need to find the item “Previous Windows installations” - this item is what we were looking for, it includes the Windows.old folder (see Fig. 4). By the way, on my computer this folder takes up as much as 14 GB!
Also pay attention to the points regarding temporary files: sometimes their volume can be comparable to “previous Windows installations”. In general, check the boxes for all the files you don’t need and press and wait for the disk to be cleaned.
After such an operation, you will no longer have the WIndows.old folder on the system disk!
Rice. 4. previous Windows installations - this is the Windows.old folder...
By the way, Windows 10 will warn you that if files from previous Windows installations or temporary installation files are deleted, you will not be able to restore the previous version of Windows!
Rice. 5. system warning
After cleaning the disk, the Windows.old folder no longer exists (see Figure 6).
Rice. 6. Local disk (C_)
By the way, if you still have some files that are not deleted, I recommend using the utilities from this article:
https://pcpro100.info/ne-udalyaetsya-fayl-kak-udalit-lyuboy-fayl/ - deleting “any” files from the disk (be careful!).
PS
That's all, good luck with Windows everyone...
Social buttons:
pcpro100.info
Installing another OS in parallel with Windows 7
Let's now consider the situation when you install the operating system on another hard drive partition. This situation usually occurs if you install Linux or simply decide to create a special partition for the operating system. Of course, you can format your hard drive, partition it, and start over from scratch. But this option is not always acceptable, as you noticed above. What to do in this case? The entire process of uninstalling Windows 7 in this case resembles the previous option, only a couple of nuances are added. To begin with, please note that in this case all the files of the old operating system are not in the Windows.Old folder, but as they were when using the old OS - the “Users”, “Windows” and “Program Files” folders are in root partition of the disk, and you will have to delete them from there.
Go to the control panel and open “Folder Options” there. Next, in the “View” tab, we need to check the “Show hidden files” checkbox. Uncheck “Hide system-protected files.” Accept the changes and close the window. Now you need to delete files related to the old operating system from the partition on which the old OS was installed. They will look "pale" compared to the rest, so you can't go wrong. The main thing is to delete two files – hiberfil.sys and pagefile.sys. Thanks to this, you can free up 3-4 gigabytes of hard drive space. Ready? Great, let's move on.
During boot, you probably noticed that a menu for selecting the operating system appeared. Let's now get rid of the line related to the old OS. This will save us from the need to constantly select the desired OS when booting, because we have only one, although the system thinks that there are two. Now, depending on what OS you installed, let's slightly edit this menu, leaving only one option.
Windows XP
In this case, the process is quite simple - just open hidden and system files (although you should already have them open if you followed our advice - see above for more details). We need the boot.ini file, which is located at the root of the partition on which XP is installed. We delete everything related to Windows 7 there, set it to Windows XP by default and now everything works as it should. The file structure is quite simple, so it is almost impossible to make a mistake.
Windows Vista78
In this case, it will no longer be possible to act as in the case of XP. This file simply does not exist, so there is nothing to edit. No problem - press Win+R, write “msconfig” and run it. We need the "Download" tab. Doesn't remind you of anything? Yes, this is quite similar to the boot.ini text file in Windows XP. The only difference is that it is now much easier to edit it, and the chance of error is now an order of magnitude lower. In addition, a similar menu is available in computer properties - additional system settings - Boot and recovery. Uncheck the box “Display a list of operating systems”. That's it, now there is no trace left of the old OS.
Linux
As for the Linux OS that uses the GRUB bootloader, there are some difficulties with editing it. A full description of this process would require a separate article, so the only thing I can recommend to simplify the process is the Grub Customizer application, designed to edit the boot loader. Otherwise, the process of uninstalling Windows 7 using Linux is almost the same, with the only difference being that deleting files is much easier.
Instead of an afterword, we remove the download entries
Actually, you can stop, since the operating system cannot physically be loaded, but there are saved boot records in the active system and it would be nice to get rid of them too:
- Press the Win + R key combination to open the Run window.
- Enter in the line: MSCONFIG to open the “System Configuration” window.
- Go to the "Download" tab. If there is a second entry in the operating systems window - different from the current operating system, then select it with the left mouse button and click the “Delete” button under the list area.
- All you have to do is click the “OK” button and restart the computer to check.
Completely remove Windows (if two systems are installed)
It is best to remove it from the system that you decided to leave. I don't know how important this is, but it's better to do it this way.
For example, I decided to leave Windows 8, and I will show you how to remove Windows 7.
This means that in this case, we carry out all actions from the figure eight. First, we will make our system, which we decided to leave, the main one (it should boot by default), and then we will remove the system we do not need from loading.
Go to the desktop and press Win+R
.
In the Run window, enter the msconfig
, and click
OK
.
In the new window, go to the tab, select the operating system that we want to keep (in our case, it’s Windows , and click on the Set as default
(opposite OS, the corresponding status “Default loaded OS”) should appear.
Now, select the system that we want to remove (in our case, this is WIndows 7), and click on the Delete
.
A window will appear, I advise you to select .
The computer will reboot, and without the ability to select an operating system, the system that we left should immediately boot. In our case, this is Windows 8.
What to do with files from the old system?
Yes, all that remains is to deal with the partition that previously contained the operating system. The easiest way is to format it and store files on it.
Just be careful when you format the partition. Check its contents, there should be folders there: Program Files, Windows, Users, etc. And this cannot be drive C, it will have a different letter.
Attention!
Formatting will delete all information on the local drive. If we consider our case specifically, all information that was stored on the local drive C (desktop, my documents folder, my photos, etc.) will be deleted in the operating system that we want to delete.
Second way.
You can delete a partition, and add the free space that appears after deleting it to an existing partition. I don’t know how much of a necessary procedure this is, because it’s much easier to just leave this section for storing files.
But, if you decide to remove it completely, you can do this using the standard Disk Management
, which I wrote about in this article ““. Do not pay attention that the article was written for Windows 7, on eight, everything is exactly the same.
In Disk Management, right-click the partition you want to delete and select Delete Volume...
“.
Then, right-click on the partition to which you want to add memory from the deleted partition and select Extend Volume
. Follow the instructions, everything is simple.
Afterword
Here is a proven way to remove an operating system if you have two or even more of them on your computer. I think that there should not be any problems. The main thing is to be careful not to delete something wrong or format a section with valuable information.
If anything, ask your questions in the comments, I will try to help. Share information, perhaps you did this procedure differently. Best wishes!
Personally, I am satisfied with the Windows 7 operating system on my laptop, I have already gotten used to it and have fixed some of the glitches that existed. But the other day, while talking with a friend, I heard his opinion about this OS, and also that problems arise if you decide to uninstall the “seven” yourself and install the usual XP. Indeed, if you decide to remove Windows 7, you better observe some subtleties in this work.