- 7shared
- 0Facebook
- 6Twitter
- 1VKontakte
- 0Odnoklassniki
With each new major update, Windows changes little by little in appearance. From minimalism, the system interface moves to glamor, from glamor again to minimalism or a mixture of styles, as can be seen in the example of Windows 10. The graphical shell of the system receives new elements over and over again, only the cursors remain practically unchanged in it. The majority of users are quite happy with their appearance, but among them there are still those who would prefer to see something prettier instead of unremarkable signs.
Where can I get non-standard cursors?
If the standard set of cursors seems insufficient to you, and you cannot find an interesting option, then you can download a set of cursors from the Internet. To do this, enter the phrase “cursors for Windows X” in the Yandex or Google search bar, where X is the number of your operating system version.
Fortunately, today the choice of cursors is quite large. You can choose options to suit every taste. There are both classic cursor options and animation options. You just need to select the cursor package you like and download it. Next, in order for the cursors to be available for work, you need to move the downloaded folder to the following address: “C:\WINDOWS\Cursors”.
It is worth remembering that if the cursors you downloaded are archived, then you need to extract the files from the archive before using them.
You can download cursors for Windows on this site - https://7themes.su/stuff/kursory_windows/7
Installing a theme
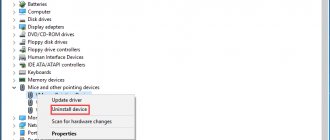
If you downloaded mouse pointers from the Internet as a set, then most likely in the folder with them there is a file with the extension “.inf”, which allows you to install the entire set as a theme. To do this, right-click on this file, select “Install” in the context menu and go to the mouse pointer settings, where your custom assembly should appear in the “Schemes” drop-down list. Select it and confirm the installation by clicking on “Apply”. All types of arrows will change to those contained in your theme.
WATCH THE VIDEO
How to change the Windows 7 cursor
And so in order to change the mouse cursor in Windows 7 you need to go to the toolbar.
In the toolbar, switch to Small icons and find the Mouse item in the lists.
Next, go to the Pointers tab and in the Scheme item, select the mouse cursor you like. If you downloaded non-standard schemes and placed them in the Cursors folder, then they should appear here; if this does not happen, you can click on the overview and select the folder with the downloaded cursors yourself.
How to set the mouse cursor on Windows 7 through third-party programs
How to change the mouse cursor on Windows 10 - installation instructions
There are a number of programs and utilities that make it possible to change the design of the pointer, its style and some other display parameters, without going to the standard settings and without any independent actions other than choosing the display scheme you like. Below you will find a number of programs that accurately answer the question of how to change the mouse cursor on Windows 7 using third-party tools:
CursorFX
The program allows you to install in one click any cursor from the database that will suit the taste of a particular person. The application tools help not only to select already created pointers, but also to edit them or create your own, unique arrows for each of the selected actions. Moreover, they will not be static, but animated thanks to the use of all available capabilities of the operating system. You can download the software on special software websites.
RealWorld Cursor Editor
A program that allows a person to create the cursor that he wants. Of course, this software will be more difficult for beginners, but it can be mastered. It is enough to download the program the user needs, install it and launch the shortcut created automatically on the desktop. Next, you just have to choose whether the cursor will be created from scratch or a picture should be loaded for it.
RealWorld Cursor Editor Interface
After loading, you should specify the type of arrow (regular, animated, multi-layered, etc.). After applying the configurations, the parameters will be saved and the pointer will take on an unusual appearance.
How to change the Windows 8 cursor
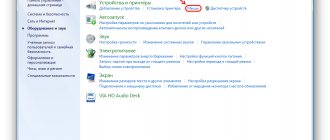
In Windows 8, everything is done the same as in Windows 7. The only thing you can do here is to get to the control panel by right-clicking on the windows icon and selecting Control Panel.
In the control panel, select Small icons and Mouse.
In the mouse properties, go to the Pointers tab and select the mouse cursor you like.
A little about the cursor
First, you need to understand that a cursor is nothing more than a rectangular piece of graphics. Of course, we only see the cursor itself, and this is because the rest of the graphics is transparent, and the Alpha channel value is reduced to zero. This means, first of all, we need a graphic editor in which you can work with translucent areas and which can save them, for example in GIF or translucent PNG 24. And this is, of course, Photoshop, although the cursor image can be made even in Illustrator, since it also saves to web formats. I note that the time of GIF is irrevocably running out. Unlike PNG, it has only 256 colors and does not support translucency.
Saving cursor to PNG
Go to File > Safe for Web and Devices and this window is specifically designed to save and optimize graphics for the web, phones and tablets. In the window that appears, you will see three areas. Middle area with image. Left area with tools. And the right area with settings. In the right area, select PNG 24 from the drop-down menu and don’t forget to check Transparancy , which adds an alpha channel to the file, hiding part of the image. And these are all the settings for our cursor. Click OK .
How to make a cursor in CUR format
We have practically created a cursor, but it is still a PNG with an image of the cursor, and not the cursor itself. You can’t use it in the operating system, you can’t put it in the code for a website. A real cursor is, first of all, a type of system file to which a cursor picture is attached. The format of such a file depends on the operating system. For Windows they are the same, for Mac OS they are different. We'll talk about the CUR format. This is a static cursor format that works with Windows .
At the beginning of this article, I mentioned that programs like CursorEditor save in similar formats. Unfortunately, most of them are either paid or have a trial period of 30 days, and the graphic capabilities of all these programs leave much to be desired. I have tried a dozen similar programs and in my opinion the best of them is IcoFX . You can find the official website here. Here you can . Here you can see some lessons about working with this program. And the main advantage of IcoFX is that it can be downloaded for free and without a trial period, at least for now. It works with most icon and cursor formats for major operating systems. And its ability to create graphic designs is far superior to other old-school programs. There is translucency, a lot of brushes and gradients and basic tools, but all this is nothing against the abilities of Photoshop, so I will not dwell on the IcoFX . Just download it and let's make this cursor already!
Drawing a cursor in Photoshop with a vector
For the most part, we don’t need to draw a cursor either in Photoshop or in any other graphic editor, since almost none of them can save files in cur or ani . And only special programs designed for drawing cursors can save to these formats, however, most of these programs are either hopelessly outdated and have not been updated since Windows 98, or provide poor graphics management capabilities. That's why I suggest making graphics in good old Photoshop, instead of dealing with these ala CursorEditor PRO, which differ from Paint only in the presence of an Alpha channel.
Start by creating a working surface File > New and for our purposes the size 120 by 120 px with a resolution of 72 dpi RGB color mode .
Transforming the cursor in Photoshop
Now we need to transform the object. To do this, select Edit > Free transform , which you can read more about in my article Transformation in Photoshop, and see the practical application in the lesson on using Free Transform. Select Edit > Free transform and a transform frame will appear. Position the cursor so that its tip is in the upper left corner.
Now let's deform the cursor a little and here's why. You've probably noticed that the standard cursor is directed not from right to left, but from bottom to top. It's not just like that. Perhaps Grandfather Freid would have explained it better, but psychologically it is much easier to perceive a pointer pointing from the bottom to the top. It's like starting to eat with your left hand. You can get the hang of it, but isn’t it easier to do it right away?
Again select Edit > Free transform, first expand the cursor, then make it smaller and then press CTRL . Without releasing it, pull the corners of the transformation frame. Move the tilt angle closer to the left edge as in my picture.
Merge layers and make the cursor smaller
We have almost finished drawing the cursor, and as you can see, unlike all cursor-like programs, we did not smear with a brush, did not move the mouse around the work area, creating some kind of daub. All we did was draw a shape with a vector and click on the settings to create the original look of the cursor. Moreover, we have recorded a great Metallic style with highlights. And now, let's move on to the final stage of working on the cursor. But before that, turn off the background white background in the layers panel. We no longer need it, and we don’t want it to be saved along with the file. We only need a cursor and a transparent background.
Now select all layers, use SHIFT . Then go to Layers > Merge Layers I'm not afraid to merge the image and lose my vector path in the first place because it doesn't have much value since we made it in 3 minutes. Plus, I saved the created style and can apply it to anything with one click. However, if you think that you will still need this layer, save it as a PSD . That's why I merge the layers. Now we will make the cursor smaller, since most often cursors are quite small, they do not take up half the screen or even 200 px. This is their cursor meaning.
Of course, I can always use the Scale Styles in the Image Size and Photoshop will try to scale the style, but it will not be able to do this reliably enough and the style will still move. I want to merge the layers to convert the attached style to pixels, since it is very important for us that the small cursor looks the same as the large one. Now the layers are merged, we have only one layer with the cursor in the raster. Go to Image > Image Size and change the size from 120 to 120 px to 32 to 32 px . And we practically made our cursor.