Back in the day, there were very few ways to control the volume on a Windows computer. However, Windows 10 works well with smartphones, remote desktop connections, various software patches, and more. There are now more ways to control volume in Windows 10 than ever before.
Here are some of the best ways to control sound in Windows 10.
Are you looking for something specific?
- Control Windows 10 Sound Using Remote Mouse for iOS
- Control Windows 10 Sound Using PC Remote for Android
- Use EarTrumpet to control individual app volume in Windows 10
- Limit volume in Windows 10 using Speaker Locker
- Controlling Windows 10 volume using the mouse wheel
- Changing volume on Windows 10 screen using 3RVX
- Use audio and volume control of Rainmeter skins
- Use AutoHotKey to Control Windows 10 Volume
- Control Windows 10 volume using mouse gestures via StrokePlus
Control Windows 10 Sound with Hippo Remote Lite for iOS
Hippo Remote Lite is a free iOS app that gives you remote control of your Windows 10 computer. Hippo Remote Lite offers a decent set of features for free. You can easily turn your iOS device into a Windows 10 remote control.
Volume control is also incredibly easy.
- Download Hippo Remote Lite for iOS
- Download and install Hippo Remote Lite Server for Windows (also available for macOS and Linux)
- Connect your iOS device and computer to the same Wi-Fi network and create a connection
- Control the volume on your Windows 10 computer using the volume switch on your iOS device or using the slider in the Hippo Remote Lite app
Look, it's simple!
The volume control isn't the only thing the Hippo Remote Lite does. You can use it as a keyboard or a media controller, plus it supports Boxee, XMBC, and Plex.
Download : Hippo Remote Lite for iOS (Free)
Download: Hippo Remote Lite Server for Windows | macOS | Linux (free)
Control Windows 10 Sound Using PC Remote for Android
You can then use PC Remote for Android to control audio on your Windows 10 computer. Like Remote Mouse, you install PC Remote on your Android device and the server version on your Windows 10 desktop or laptop. You can then establish a connection using Bluetooth or Wi-Fi, controlling your Windows 10 PC's audio directly from your Android device.
- Download PC Remote for Android
- Download and install PC Remote for Windows
- Connect your Android device and computer to the same Wi-Fi network or via Bluetooth
- Control the volume on your Windows 10 PC using the volume switch on your Android device or using the slider in the PC app.
Simple again!
PC Remote also has extensive functionality. For example, it has many built-in game controller configurations so you can use PC Remote to control your favorite games. It has built-in file transfer, direct streaming from your Android device's camera to your Windows PC, app launcher support, dedicated keyboards, and more.
Download: PC Remote for Android | iOS (free)
Download : Remote PC Server for Windows (Free)
Use EarTrumpet to control individual app volume in Windows 10
EarTrumpet is a fantastic open source software that gives you much more control over your Windows 10 volume control. The single best feature of EarTrumpet is the management of multiple audio inputs and outputs for a single system. Instead of using the Windows 10 Control Panel or Settings, EarTrumpet creates a separate volume panel for each audio device. Moreover, it integrates perfectly with Windows 10 and looks like a native Windows app.
Another incredibly convenient feature is dragging and dropping audio-playing apps onto different audio devices, as well as controlling the volume of those individual apps.
How to change volume based on application in Windows 10
How to Change Volume Based on an App in Windows 10 Most people don't know that Windows offers a way to change the volume on a per-app basis, but there's a third-party app that makes it even easier! Read more,
Download : EarTrumpet for Windows (Free)
Limit volume in Windows 10 using Speaker Locker
Sometimes you may want to limit the volume range available to Windows 10 users. Greennaturesoft's Locker Speaker does just that. Speaker Locker has four options:
- Don't turn off the speaker volume
- Limit speaker volume to upper limit
- Keep the speaker volume at the proper level
- Limit conversation volume to lower limit
Best of all, you can combine these volume limits with runtime. For example, you can set the volume level below 50 percent from 6 a.m. to noon, but then above 75 percent from noon to 5 p.m.
Speaker Locker has administrative passwords so other users cannot disable it. You can also set Speaker Locker to run on Windows to make sure it's always there.
Download: Speaker Locker for Windows (Free)
Control Windows 10 volume using your mouse wheel
You can control volume in Windows 10 using the mouse wheel. Nirsoft's Volumouse allows you to use your mouse wheel to control system volume. Volumouse works best in combination with another trigger button, not just on its own.
For example, you can set Volumouse to only work when you hold down the right CTRL key, or when the mouse cursor is over a certain part of the screen, etc.
Nirsoft has also developed some plugins that allow you to control the active window or open and close the door of your CD-ROM/DVD using the mouse.
Download : Volumouse for Windows (Free)
Setting up 5.1 audio via S/PDIF in windows 7
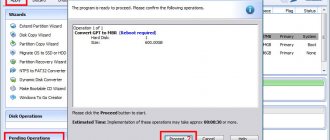
There is a computer with Win 7 on board There is a 5.1 receiver with support for DTS and DolbyDigital When connected via a digital output, the sound is only in stereo mode. At the same time, for films with DTS or DD tracks, 5.1 works only in Windows Media Player Films with regular 5.1 tracks are played as stereo. When connected via analog, everything is ok. How to enable 5.1 by default for the entire system? — Sound card — built-in Realtek ALC888/1200 Receiver Kenwood KRF V4070
latest version of Klite and AC3Filter
- Question asked more than three years ago
Subscribe 4 Comment
- I solved the problem by purchasing a sound card that supports DOLBY DIGITAL LIVE! (Creative audiogy 4) and the library of the same name on off. manufacturer's website. I'm happy, I recommend it.
Thanks for answers.Like Comment
Invite an expert
- 5.1 worked great for me for movies in VLC (in the settings, select “All options”, section Sound, check the “Use S/PDIF if available”). It's unlikely to work for the entire system. Like Comment
- “Movies with regular 5.1 tracks” – what are these regular ones? Multi-channel movie tracks can be encoded in different formats (DTS, DolbyDigital, etc.). If the track standard matches the capabilities of your receiver (a bunch of all sorts of icons on the front panel), then it will reproduce multi-channel sound. If this is a game or something else other than what he can decode, then you won’t hear anything. In this case, a sound card can reproduce this whole thing because its capabilities are not limited by DTS or DolbyDigital. — Similar solution: Receivers have modes for virtual decomposition of stereo signals into all 5.1 channels. Usually this is Dolby ProLogic or similar. Check the instructions for your receiver. Then you will have all 5 speakers playing, although the input signal will be stereo.
And yet, by default AC3Filter does not seem to have the option to output the signal to SPDIF.Like Comment
- Good day! I decided not to create a new topic, the question is almost similar. there is an LG TV 42″ with an S/PDIF output on board, a PC with a Sound Blaster X-Fi Xtreme Audio PCI Express sound card on board S/PDIF in, 5.1 analog speakers. We want to watch movies with DTS with 5.1 sound. with TV everything is OK, the output from the computer is also OK, but the input is only stereo and everything is there.
I set it up (3-4 years ago) everything worked, but the other day I reinstalled Windows and it arrived, I remember I also suffered for a long time, please help me with advice on where to digLike 1 comment
The most interesting thing in 24 hours
Instructions on how to deal with a bunch of wires from a 5.1 audio system and correctly connect it to your computer.
What you will need:
- Actually, the audio system is 5.1
- sound card supporting 5.1
- 3 cables “red-white tulips - jack 3.5mm”
Step #1:
As you know, 5 and 1 are the number of audio channels through which the sound signal travels. That is why we have, roughly speaking, 6 speakers at our disposal: subwoofer ( SubWoofer
– designated SW) – the main giant of our system, a low-frequency speaker for creating bass; two front speakers (they are called FrontLeft (left) and FrontRight (right), and are designated FL and FR (see photo)); two rear ones (called either RearLeft (left) and RearRight (right), or SurroundLeft/SurroundRight (RL/RR or SL/SR, respectively) and another central column (Center - designated CEN). Knowing all this, you can begin the process itself connections...
Step #2:
Now your task is to connect all these 6 channels (2 front, 2 rear and subwoofer + center) to the connectors of your sound card. It’s easy to guess that by connecting 6 pairwise combined channels at the output, we should get only 3. And these same 3 outputs should look like this, as shown in the photo...
Step #3:
That is, the connection process is as follows: - two “tulips” connected to the front speakers should go to the green socket of the sound card - two “tulips” connected to the rear speakers should go (as a rule) to the black socket of the sound card - two “ tulip" connected to the subwoofer and center should go (usually) to the orange jack
ATTENTION
! Paired tulips must be inserted specifically into the “Audio Input 5.1” section, because single tulips coming from the speakers themselves are inserted into the “Audio Output” section (sometimes this section is not named at all)! This is the only way you can achieve true 5.1 surround sound.
Step #4:
Now that all the wires are connected to the required connectors, all you have to do is go to Control Panel, select the Sound section (or first Hardware and Sound), then Speakers and click the “Configure” button. Here we select the “5.1 surround sound” item, click Next and – voila!
Tips and warnings:
- Remember: any multi-channel audio (sound in a movie or multi-channel music) will be spread over 6 of your speakers ONLY PROVIDED that the recording is designed specifically for such sound! The rest of the sound on your speakers will sound like simple stereo.
- All the necessary cables should already be included in the speaker set, but if, for example, there are no “tulip-jack” cables, you will have to buy them in the store
Call or directly on the website! Our specialists will be happy to help you
Today I will teach you how to connect 5.1 audio systems to devices without multi-channel audio support. Anyone.
So, let's imagine a situation: you already have a good multi-channel audio system. RCA connectors (tulip) are used as inputs.
. At the same time, as a result of upgrading device gadgets with suitable interfaces, the system cannot be used.
How to connect such 5.1-channel speakers to devices with HDMI/Toslink digital outputs, the popular USB, or use a stereo output? Or, how to convert multi-channel digital audio signal to multi-channel analog?
Use audio and volume control of Rainmeter skins
Rainmeter is a free and open source desktop customization tool for Windows. Developers sometimes create incredible Rainmeter skins, including usage counters, audio controls, calendars, applets, and more. I haven't tinkered with Rainmeter for a few years until the time of writing this article, so I've covered some of the latest custom designs.
- Audio Switcher is a very simple Rainmeter skin that allows you to quickly switch between headphones and speakers.
- Radian Linear Visualizer is a real-time audio visualization applet for your desktop with automatically updating album art and many other settings
- VolKnob adds a simple volume knob to the desktop that you turn by scrolling your mouse wheel (similar functionality to Nirsoft's Volumouse)
- AppVolumePlugin adds volume meters and volume controls for individual apps
- Minimal Volume Control adds an extremely simple yet functional volume control panel to your desktop
Other Rainmeter skins come with built-in audio and volume controls. There are many Rainmeter skins available, as well as a huge number of plugins and applets, so you'll find one that suits your needs. Start your journey of customizing your Rainmeter desktop with our simple Rainmeter guide.
Download: Rainmeter for Windows (Free)
Sound tuning programs
Surely, almost every user wants the sound reproduced by his computer to be of the highest quality. If you are one of them, then most likely you have thought about how it can be improved. The most effective solution, of course, would be to buy better equipment, such as a good audio system, an additional sound card, and things like that.
However, you can do without this, because there are many programs designed to customize and improve the sound quality of your computer. This material will present the most effective of them.
Realtek HD Audio
The most popular driver package for configuring built-in Realtek sound cards. Provides basic audio customization options.
Unlike competitors, it ensures the correct operation of the sound card and has only the most necessary functions.
Volume2
A small program that is a replacement for the standard Windows volume control. In addition to standard features, it has several additional functions.
Having the least functionality among other programs, Volume2 aims only to increase the convenience of volume adjustment and does an excellent job of it.
FxSound Enhancer
FxSound Enhancer contains a small set of simple but effective tools for improving sound. They allow you to improve sound quality in real time.
This program allows you to adjust individual sound parameters, such as, for example, increasing clarity and enhancing low-frequency sounds. However, its free version has somewhat reduced capabilities.
ViPER4Windows
This program has enormous capabilities for customizing sound. With the right skill, you can achieve almost professional sound quality.
ViPER4Windows includes all the same features as FxSound Enhancer and, in general, has the largest set of tools for changing sound parameters among its competitors, but also requires some knowledge to get quality results.
All of the programs presented above for changing sound parameters have the necessary functions to improve the sound. All you have to do is choose the most suitable one for yourself.
We are glad that we were able to help you solve the problem. Add the Lumpics.ru website to your bookmarks and we will be useful to you. Thank the author and share the article on social networks.
Describe what didn't work for you. Our specialists will try to answer as quickly as possible.
Did this article help you?
NO
Use AutoHotKey to Control Windows 10 Volume
AutoHotKey allows you to create custom keyboard macros. You can program AutoHotKey to control Windows 10 volume settings. The following basic script allows you to increase and decrease Windows volume using Windows Key + Page Up and Windows Key + Page Down.
#PgUp :: Send {Volume_Up 3} #PgDn :: Send {Volume_Down 3}
But what do you do with the script?
- Download and install AutoHotKey
- Right-click on your desktop and select New > Text Document
- Copy the script to a new text file
- Head to File > Save As and change the file type to .ahk (AutoHotKey Script) .
- Run the AutoHotKey script; You can change the volume using a custom keyboard macro
You don't have to stop there. The AutoHotKey SoundSet document describes in detail the further configuration of the script. You can add controls for muting, bass, treble, bass boost, and many other functions.
Download: AutoHotKey for Windows (Free)
Want to learn more about AutoHotKey? Check out Ian Buckley's quick guide to AutoHotKey for beginners
A Quick Guide to AutoHotkey for Beginners
A Quick Guide to AutoHotkey for Beginners AutoHotkey is a powerful, free, and open-source Microsoft Windows tool that can automate repetitive tasks. Find out how to use it here. Read more!
Windows volume control
The Windows volume control is so familiar. It would seem - what could be interesting in it? Increased the volume of computer sounds, decreased the volume of computer sounds... And yet, let's look at the capabilities of the Windows volume icon a little wider.
Starting from Windows Vista onwards (Windows 7, 8, 10), the system began to allow you to change the volume of individual applications using the capabilities of the mixer . After all, it often happens when some application makes sounds that are clearly louder and more persistent than others. Or vice versa, the volume is turned up, and the application barely meows something. And, although Windows provides several ways to fine-tune sound settings and normalize volume, we will not go too deep, but will use the quick and visual capabilities of the mixer.
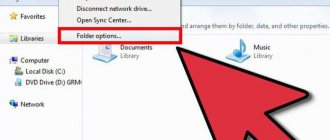
Right-click on the speaker icon and select Open Volume Mixer .
While your active applications are quiet, only the master volume control and the system volume control .
As soon as the application starts making sounds, it will appear in the mixer, and you can immediately adjust its volume by simply dragging the slider. Web browsers such as Google Chrome use a separate system process for each new tab, so if you enable music in multiple tabs, the mixer will display each tab separately.
Unfortunately, the volume settings for each application are not saved and will need to be adjusted again the next time you launch the application. The system remembers only the overall volume level (the first slider).
More effective control over Windows sounds can be achieved using third-party programs. For example, for Windows 10 there is a small free open source program called EarTrumpet (which translates to “ear trumpet”). Not only does it make sound adjustments more visual, it also remembers all the sound levels that you have set for each application. And even after restarting the computer, all settings are saved .
The file you need to download is called Ear.Trumpet.Setup.exe
Once installed, EarTrumpet appears in the tray as a small hunting horn. When you click on it, a panel appears with all the volume controls, as if you immediately went into the mixer. Only the sliders in EarTrumpet are horizontal. Also, the program allows you to control sounds in more applications than the built-in system mixer.
For previous versions of Windows - XP, 7, 8 , there is also a free program that allows you to very flexibly manage all sounds in the system. This is Volume² . .
Volume² is an alternative volume control that can completely replace the standard Windows volume control. Volume² provides easy setup of hotkeys and mouse events to control volume. It also has a simple task scheduler that lets you launch apps or control the volume. This application has quite a lot of fans and grateful reviews.
If you have any questions about computer settings, ask them in the comments and I will definitely answer!
Control Windows 10 volume using mouse gestures via StrokesPlus
Your final option for adjusting Windows 10 volume is StrokePlus. StrokesPlus is a free mouse gesture recognition tool. Using StrokesPlus, you can program your own mouse gesture to control Windows 10 volume.
StrokesPlus is relatively intuitive. In most cases, you hold down the right mouse button and draw a gesture. To adjust the volume, you can draw a "U" to increase the volume and a "D" to decrease the volume. You can go further with modifications, extensions, adding a mouse wheel and much more.
Download: StrokesPlus for Windows (Free)
Ear Trumpet - separate volume control for Windows 10
I want to warn you right away that the standard separate volume mixer in Windows 10 can be accessed without special programs.
Moreover, it is just two clicks away from the taskbar.
Ear Trumpet only removes one extra mouse click and gives a nicer, more compact look to the standard volume control window.
Default audio volume level
This is how we get into the standard system volume mixer:
- right-click on the sound icon...
- then to “Open volume mixer” and there it is, our mixer...
Here you can simply move the slider to adjust the sound volume for any application currently running on your computer individually.
Ear Trumpet Sound Volume Level
With the Ear Trumpet program, this procedure, as mentioned above, is accelerated by one mouse click - just left-click on the program icon in the tray and...
…no comments.