Several types of problem
A defect such as a dead pixel can look different:
- elements that always remain off are called “dead pixels” and will appear as dark dots against a light background;
- pixels that are always working are considered “hot” - you can see them on a dark or completely black background, where they continue to remain white;
- “Stuck” are elements that do not change color - they become noticeable only when the shade does not match the main image.
Important: if several pixels in one area fail at once, such damage is called a “group of dead pixels.” Together they stack into rectangles ranging in size from 2 x 2 to 10 x 10 elements, or even in lines horizontally or vertically.
How to check your monitor
Often when purchasing a computer, we pay more attention to one part of it - the system unit, reducing the importance of another - the monitor. But a flawlessly working monitor, configured correctly, is very important not only for maintaining visual acuity, but also for comfortable spending time at the computer. It is important to check how the monitor works both before purchasing and during use in order to configure it correctly.
1
There are usually no problems checking for external flaws. But how can you find out about a hidden marriage? After all, the most common defects are related to the operation of the monitor matrix, for example, the presence of dead pixels or a slow matrix response speed, which you will not notice at first glance. For this purpose, special programs have been developed, as well as online services that can quickly and accurately test the monitor.
2
One of the most popular programs for testing monitors is the TFT test utility. Its convenience is that it does not require installation, you just need to download the file with the program, and the interface is intuitive and simple. The program has several tests that need to be run sequentially.
3
The first of the tests, “Shaded Screen,” consists of filling the screen alternately with different colors, which allows you to identify pixels that do not respond to color changes - they will glow white or black. The following tests are designed to check the monitor's reproduction of color gradations ("Diagonal", "Step Gradient"), image clarity ("Lines", "Grid", "Circles", "Patterns") and text readability, as well as the response speed of the monitor matrix ( "Moving Square") Evidence of the slow reaction speed of the matrix is the “tail” that appears when the square is moved.
4
The disadvantage of the TFT test utility is that it is not always possible to worry in advance and take the program saved on a flash drive with you to the store. In such a situation, the Online monitor test resource comes to the rescue, the capabilities of which can be used directly in the store by opening the desired Internet page.
5
On the main page there is a menu where you need to choose how it is convenient for you to carry out testing: HTML-Window - the page with the test will open in the current browser tab; HTML FS – a new window will open; Executable mode – an option that allows you to download the program to physical media and no longer use the Internet; Input lag test - designed to test the operation of two monitors working in pairs. It is also possible to test a smartphone, tablet or TV. Run the test and you'll immediately see a black-and-white scale that lets you check how grayscale is displayed. To continue, move your mouse to the top of the screen and a pop-up menu will appear with various tests. By the way, there is also a hint window with explanations for each test, although only in English.
Using such simple programs, you can accurately check your monitor for various defects and incorrect settings.
SovetClub.ru
Allowable number of dead pixels
You should check the monitor for damaged matrix elements immediately upon purchase. Such a check will allow you to avoid problems with returning the product under warranty and conducting an examination to prove that the cause of the problem was a manufacturing defect and not the actions of the user.
According to the ISO13406-2 standard, each monitor is allowed a certain number of defective items. Therefore, even if checking the monitor for dead pixels showed their presence, this will be considered the norm in such situations:
- the product belongs to quality class 4 and can have up to 50 “hot” pixels, up to 150 “dead” pixels and up to 500 with other types of defects;
- the matrix was released in class 3, which allows for up to 5 always-on, up to 15 always-off elements, as well as up to 50 pixels with other problems;
- monitor quality class is second, and up to 2 “hot” and “dead” pixels and up to 5 “stuck” pixels can appear on the screen;
- first class monitor - there should be no dead pixels at all.
You can only count on the complete absence of defective elements when purchasing a first class product. However, most production models belong to the second category, and when checking them, you can find 1-2 or even 5 incorrectly working pixels. Although the monitor class shows how many defects are not considered defective, in fact, most products are completely absent.
It is recommended to determine whether the matrix is damaged at the store where you buy the monitor. However, if this is not possible or the product is purchased online, the check can also be carried out at home. For this, an online test or a special program is used, although noticeable defects can be detected with the naked eye.
Testing the monitor for serviceability
The monitor is one of the most important components of a computer, because it is responsible for the beauty of the picture. No matter how wonderful and powerful the video card on your computer is, you cannot do without a good monitor that can present the graphics in all their glory. But, in addition to how good the monitor is in its characteristics, it is also important how efficient it is, because any equipment can be defective or fail for a variety of reasons. In this article, we will take a closer look at how to check your monitor for functionality, dead pixels, and other possible problems. Let's get started. Go!
The monitor is one of the most important components of a computer.
If you are purchasing a new or used monitor, be sure to check it thoroughly. The tips below will help you identify any possible problems or problems.
Start by inspecting the cables. Banal cable damage is one of the most common problems. If everything is in order, connect the monitor to the computer and turn it on. Keep in mind that even if the screen is new, it may have dead pixels. You can detect them by eye, but this is not the best approach, since this will be very problematic on modern screens with high resolutions and high pixel density. Fortunately, there are special programs that allow you to quickly and effectively detect a defect. One of the most popular software products of this kind is the Tireal TFT Test utility. Working with this program is very simple. Run each of the available tests in turn. There are four of them in total. It’s worth starting with a primary color test, which will reveal which pixels do not display the main range of colors (red, black, blue, green, pink, white). As a rule, this test is sufficient, but it would be a good idea to run the rest so that the test is as effective and complete as possible.
Tireal TFT Test Program
Tireal TFT Test makes it possible to check the screen for the absence or presence of noise, how well gray color and all its shades are displayed. If you're going to be working on a computer with graphics, be sure to run the RGB test. This software product makes it possible to fully test the monitor for performance, so it is recommended to use the Tireal TFT Test functionality to the maximum.
Unfortunately, it is unlikely that it will be possible to conduct full testing directly in the store. As already described above, detecting dead pixels requires special software that most likely no one will provide to you in the store, so you should check this aspect at home. But even in a store you can conduct quite extensive testing.
Start with shimmer. Go to your display settings and set lower values for brightness and contrast. This will make flickering much easier to detect. Then turn on some video and watch to see if any artifacts appear. Artifacts refer to trails that occur when objects move on the screen. Next, see how the picture is displayed from different viewing angles. Shine something on the screen to see if glare appears. Do not neglect the sounds that the monitor makes during operation. Any strange or loud noises indicate that the product is poorly built or something is not working as it should.
Now you know how you can test your monitor for functionality with and without a computer right in the store. Let us know in the comments whether this article was useful to you, share your advice on this issue with other users and ask if anything is unclear.
NastroyVse.ru
Visual verification method
The simplest monitor test for dead pixels is to display a solid background of standard colors on the screen - black, white, red, green and blue. These five options will detect "burning", "dead" and "stuck" pixels.
You can check the monitor for defects in this way both at home and in stores. In the latter case, the backgrounds are copied to a flash drive and launched on the computer connected to the purchase. In addition to monochromatic images, you can use test pictures by finding them on the Internet.
Main page and Color Range test
How to connect a second screen to your computer. Connecting a second TV monitor
After running the test, its Main page opens:
On it you will see rectangles in grayscale. The hue change step is 1%. This test will allow you to evaluate the monitor's ability to display similar shades. A good monitor can distinguish a 2 percent difference in dark tones. On very good monitors, a 2% percentage difference is visible even in the lightest shades.
In fairness, I note that it is more convenient to watch this in the “Color Range” mode - “Black / White%” (if you move your mouse pointer to the top edge of the screen, you will see a menu
test, where you can turn off hints):
Since we've reached the Color Range menu, let's continue exploring it. In addition to the “Black/White%” mode, in this menu you will find similar tables of red, green and blue, as well as their gradients. The principle is the same - on a good monitor the differences between shades should be visible. Gradients must be smooth.
Software
Another way to find defects is to use a program to check your monitor for dead pixels. You can use a suitable application both at home and in a store by recording not test images on a flash drive, but one of the verification utilities.
Dead Pixel Tester
One of the most popular programs for testing a monitor is Dead Pixel Tester. You can download it from the official website.
To check you should do the following:
- Launch an application that does not require installation and select the appropriate mode in the Pettern section and color using the Color Selector button.
- If necessary, set the mode change using the Auto Color Cycle option.
- Check to see if dots appear on the screen that do not match the color of the picture.
The Exerciser function, activated by pressing the corresponding button, allows you to find defects in a specific part of the screen. It creates a rectangular area that you can drag around the screen to look for dead pixels.
IsMyLcdOk
Another program suitable for diagnosing computer monitor matrices is IsMyLcdOk. It can also be downloaded for free and does not require installation. Instructions for performing the test appear on the screen after the first launch.
The check is launched with 4 keys - from F2 to F5. The list of available testing modes includes the display of colored stripes, rectangles, vertical or horizontal lines. In addition to standard tests, you can display a monochromatic or gradient image.
Checking your monitor at home after use
Buying used devices always comes with some risks. Because when buying something secondhand, a person does not receive any guarantees regarding the condition of the device.
Faults can be both hidden and obvious. For this reason, the monitor test will have to be carried out more carefully. A test monitor is often used for this. It helps you spot problems and quickly fix them.
First of all, a standard check is carried out, as in a store. After this, it is recommended to perform a number of actions:
- You need to check the fasteners on the back wall. If the paint on them is uneven, there are scratches or other signs that the bolts have been unscrewed, then the device has been disassembled for repair. If the purchase is made from a repair shop, this is normal. Because the buyer is given a guarantee in case of a similar breakdown. Under the same conditions, it is not recommended to buy the device by hand.
- The smell of the monitor is an important point to consider when purchasing second hand. If the device emits a burning rubber smell, most likely it was subjected to network overloads. And this could lead to melting of the microcircuits. If there is a smell of mold and dampness, the monitor may have been stored in the basement or garage. And this sometimes leads to oxidation of contacts, boards or microcircuits.
- In addition, to check the monitor for functionality, you need to shake the device. If it starts to rattle inside, there is no need to purchase the device.
- Another way to check is to turn on the device in the dark. You need to let the screen work for 10-15 minutes. After this, the device is turned off. If the LED lights go out gradually (the image fades in stages), the monitor is nearing the end of its life. It is also not recommended to buy such a device.
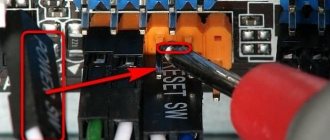
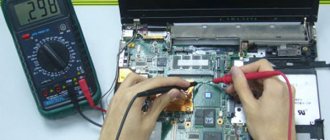
It is also useful to check the inverter on the monitor. The board is a kind of transformer that supplies energy and powers the monitor. To do this, perform a number of actions:
- Disconnect the power cable from the monitor.
- Remove the front panel.
- Find the inverter board.
- You need to read the information using a multimeter.
- Turn on the screen.
Particular attention should be paid to checking the temperature of the laptop. If it overheats after short periods of use, the screen will not last long, nor will the device itself.
Online services for verification
If you cannot download and run the utility (for example, due to restrictions on downloading and launching on a work PC), you can check your monitor for dead pixels online. There are quite a few sites that allow you to find defects, but among them there are two that are simplest and easiest to use.
Monteon
monteon.ru/
To check matrix defects on this resource, just click the start testing button and select one of seven types of diagnostics and its variation.
Important : unlike most other sites, Monteon.ru uses not a static image for testing, but a looped video. Therefore, with its help you can not only find defects, but also control the refresh rate of pixels on the screen.
Vanity Monitor Test
tft.vanity.dk
Another popular service that allows you to quickly detect problems with displaying images on the screen. To run the utility on a PC, you will need Adobe Flash Player installed and a browser that supports it. To start checking, click the HTML Window inscription.
Modes in the online service are selected using the drop-down menu at the top. And you can use it to check for dead pixels not only on a computer monitor, but also on the screen of a laptop, tablet, and even a smartphone.
Monitor test using the program
InfoFinance Checking Troika card balance online
In addition to the online test, there are a huge number of programs for checking monitors. For the most part, these programs contain the same set of tests. Often the differences are only in the interface.
Such a test program is provided by the testing service described above. You can download it from their website - https://tft.vanity.dk
The capabilities and interface of this program completely coincide with the online checking functions described above.
Program features:
- test for uniform illumination of the matrix and the absence of “broken dots”;
- color gradient to check matrix linearity;
- circles for checking “non-native” permissions;
- ring gradient to check matrix linearity and discreteness;
- patterns for checking interpolation of “non-native” resolutions;
- checking font readability;
- grid for checking the legibility of parts;
- moving square;
- moving square with a scale grid.
This is where I end my article and wish you easy work at the computer.
.
PS The best rest after hard work is a walk in the fresh air. Don't forget to take breaks, take care of your eyesight and health.
Hi all! Today I will show you how to test your monitor for dead pixels and malfunctions.
. This will be useful for you not only to see how your monitor works, but also when buying a monitor, why? Read on!
We need a program for testing, download:
The program does not require installation, just open it.
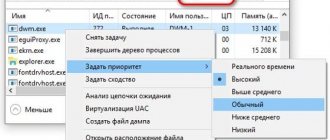
At the top the program shows information about the monitor.
And at the bottom left you can specify a specific resolution and frequency.
Tests are already underway on the right.
For example, test number 3 of the monitor, which will show how uniformly the monitor works with colors.
In the test, you can control the arrows on the keyboard or the mouse.
If you press the key to the right or left, you can see the color uniformity not only horizontally, but also vertically.
Also make sure that the colors are saturated so that the white matches the white.
So that there are no ripples on the monitor.
And the most important thing is that there are no dead pixels. The color should be uniform across the entire screen.
The program also includes a letter readability test. Letters must be clear and readable.
It is also useful to look at the last and penultimate tests. Thanks to them, you can see how the monitor will behave in games. There should be no flickering. And also when increasing the speed on the up key, there should not be large loops. Those. traces behind a moving square... The smaller the better.
This is how you can see if the monitor is working properly. Or check your monitor for dead pixels. Or at the time of purchase.
Repairing damaged areas
- Sometimes the functionality of a damaged matrix can be restored without contacting service. You can decide how to remove dead pixels on your monitor after you understand where they came from. If the control transistor fails, the damaged screen element can only be removed using a special laser. However, if the cause is subpixel freezing, the user can get rid of the defect by using the Bad Crystal program.
- The UndeadPixel utility also performs very well. If you encounter a pixel error, launch the application by clicking "Start" in the "Undead Pixel" section. A square will appear on the screen that changes colors. Using the Drag & Drop function, you can move the square over the defective area. A permanent color change should occur over several hours - after this procedure the pixel can be restored. Please note that it is no longer possible to bring completely black pixels back to life.
- The free EIZO Test Monitor (suitable for any device) contains 24 test images and will help you quickly optimize color settings and check the screen for dead pixels. This utility does not require installation. Extract the ZIP archive and launch the application by double clicking. After that, click on the “Start TEST” button. Eight scenarios are available in the utility, including brightness and contrast calibration. If there is a need to change any settings, the program will tell you how to do this.
- Another treatment method involves physical exposure. To remove the damage, take a cotton swab and gently press on the dead pixel. After a few minutes (10 to 15), the failed element may start working. It will be possible to cure the matrix in this way if the pixels were “stuck” or “hot”.
What you can check
You can check the performance of the monitor using various aspects and its characteristics. Each characteristic that can be tested has its own characteristics.
Some aspects of the scan require you to download a special utility. For others, it’s enough to find suitable pictures on the Internet.
Color rendition
This parameter is used to check the settings of the primary colors and shades. Most often, there are no problems with color rendering. This test allows you to check if colors are displayed correctly.
Defective pixels
Each pixel consists of three channels. Most screens use the RGB color model. This abbreviation consists of the names of three colors in English - red, green, blue. They mix and result in a full spectrum of colors.
These tests allow you to check your screen for dead pixels. Otherwise they are called dead. To do this, open an image of any of the specified colors (monochromatic) and carefully examine every inch of the screen. If there are black dots on the screen, then there are dead pixels. In this case, the pixels are checked in three channels, i.e. on the three colors above.
If everything is good in one background, it may be worse in the next. The new monitor should not have black spots; This is acceptable on older monitors.
Gradients
The tests contain screen templates with smooth gradient transitions. The colors should blend smoothly into each other. There should be no sharp transitions, separate stripes or lines.
Flicker
On many monitors, you have to adjust a parameter called phase synchronization. It is necessary to take into account the ability of the matrix to quickly transfer the image to the screen (in hertz). The test images are viewed in full screen. At a great distance from the monitor they should be gray. And up close, separate black and white pixels should be visible. In this case, polarization must be taken into account.
If you don't check your monitor's calibration correctly, pixels move or flicker. Correction is also necessary if, upon close examination, the pixels are invisible: they turn into stripes of black or white.
Monitors often have an auto-adjustment function for this parameter. And in some models it is necessary to configure the parameter manually.
Sharpness
This characteristic is responsible for the degree of clarity of the boundaries between light and dark elements of the image on the screen. For example, if the text is blurry, you should adjust the sharpness; then it will appear clear.
There is no correct level of sharpness, so you need to select it yourself, based on your own preferences. In this case, you need to take into account even the distance from the eyes to the screen and the level of vision.
Contrast and Brightness
Screen contrast and brightness are one of the most important characteristics of a monitor. All boundaries between shapes and stripes should be clearly visible in the images. If they merge, brightness and contrast calibration is necessary.
Zone brightness
The test allows you to check the level of brightness reproduction. You can also use it to check the clarity of the image. In this case, the central part of the images must be smooth for verification. And closer to the edges the contours should be clearer.
If oval or egg-shaped shapes appear at the edges of the image, there is a problem with your monitor.
Geometry and meshes
Tests that verify the correct operation of this characteristic are designed to verify the correctness of the geometry. In addition, they check whether the image fits into the monitor screen.
Image Clipping
Not every monitor is capable of displaying all the pixels that are transmitted by the video card. You can find a special image on the Internet to calibrate this parameter. On each side of the picture there are numbers from 1 to 5. The number indicates how many pixels are missing in this part of the screen.
If several rectangles are missing the outer white stripe, calibration is required.
Features of returning a monitor to a store
If all else fails, the user who discovers a defect has the right to return the monitor or exchange it for an equivalent product. Within 14 days, returns are made without specifying a reason: you just need to provide a sales or cash receipt and packaging of the returned equipment, on which there should be no traces of use.
If 2 weeks have already passed from the date of purchase, the buyer has the right to count on warranty repair of the monitor or its return if the device cannot be repaired. However, in this situation, the equipment is first sent for examination: based on its results, it is determined at whose expense the monitor will be repaired - the buyer or the seller.
Video card is the likely reason why the monitor does not show an image
There is one more option left and, most likely, it will be correct - the video card burned out. True, the probability of this breakdown is not so high. Maybe, of course, the video card is intact. But in this case, the matter is somewhat more serious - you need to change the motherboard itself.
How to check a video card? Remove it from the slot, check the contacts and insert it back again.
If you have a second computer at hand that supports the video card you are testing, insert it there and turn it on. If the computer boots normally, then the problem is not there. If nothing happens, change the video card. This option is only acceptable if you have a place to check your video card at hand.
If not, then you need a master. In general, if you have a gaming computer and you “stress” the video card a lot, then it is recommended to periodically diagnose it so that it does not crash at the most inopportune moment. There are a number of programs for diagnostics, among which one of the most popular is FurMark
FurMark is a specially developed program that stress tests a video card compatible with the OpenGL API package. A special feature of this utility is its flexible settings menu, in which you can set many functions. The program includes the latest versions of additional utilities GPU-Z and GPU Shark. Using FurMark is a good test of video card performance.
Checking the power supply
Well, the last thing to check is the power supply.
For this we will also need a working power supply. We open the computer, disconnect all connectors of the power supply being tested from the motherboard and connect a working one instead. After that, turn on the computer. If everything works, then the reason is in the power supply. If nothing happens, then the problem is in the motherboard and you will need to change it.
Here, in general terms, is a scheme for checking the performance of both the computer itself and its individual elements.
If, when you turn on the computer, your monitor does not turn on, but the indicator is blinking. Advice, if you turned on the computer, but it either did not turn on, or the monitor did not light up, turn it on again and listen carefully to how it hums and how many times it “beeps”.
By the number of beeps, you can determine the error code. There are quite a lot of descriptions of these codes everywhere, and finding them will not be difficult.
Author of the publication
offline 2 years