Setting up Bandicam to record games
Bandicam is one of the most popular programs used to record screen videos. Most gamers who create content based on playing games use this software. Every day more and more beginners come to this area, respectively, with many leading questions about interacting with Bandicam and its correct configuration for recording games. Today we would like to help newbies understand this issue by providing all the necessary guides.
Setting up Bandicam to record games
We will divide our today's instructions into steps to make it as easy as possible for everyone to understand each stage and configure it for themselves. Of course, on some points you can give 100% effective advice, but some parameters are configured by users individually. Keep this in mind when reading the current material. Let's begin to analyze the task at hand, starting from the very first step.
Step 1: Purchasing a license
Bandicam has a free version, but it is limited by the size of the recorded file, and the program logo will also be visible on the screen. Therefore, it is recommended to purchase a license, which is not that expensive. However, this should only be done in cases where you really plan to actively use this software for a long time. You will find detailed instructions for registering Bandikam in our other material at the following link.
Step 2: Select Recording Mode
After successfully downloading and installing Bandicam, you can immediately proceed to the settings. First of all, you will be greeted by a tab called “Home”, where the most basic parameters are located:
- Getting started is to select a recording mode. As you can see in the screenshot below, there are four of them here. Of course, gamers will immediately notice "Game Recording", but it's not always the best choice.
However, we will first consider this mode, since it is used most often. There’s really nothing to configure here, you just need to remember that the record and stop button is done by pressing F12, and taking a screenshot is done by pressing F11.
If you select the Rectangular Area recording type, a new editable window appears on your desktop. It is precisely this that is responsible for the captured area. Simply move the borders to select the appropriate size.
Here you also have access to additional tools - drawing, highlighting, using arrows or writing text. However, this is practically not used in games.
Step 3: Basic Options
We won't focus too much on the basic options, since there aren't that many of them added here. At the very top of the window, select the output folder for finished records, that is, the place where they will be saved. Next, you can activate the function so that Bandicam is on top of all windows, starts only in the tray, or starts along with Windows. This doesn’t really apply to games, so we only advise you to change the save location, and then immediately proceed to the next step.
Step 4: Output FPS to Screen
FPS - number of frames per second. This parameter determines the smoothness of the picture. The software in question has a special section in which you can configure the display of the FPS counter on the screen over the game.
- You need to go to the appropriate configuration window. Here you can find the activation key for showing and hiding, the key for changing position, and the display of frames itself is active only if the “Show in position” checkbox is checked.
Now go down a little further to the “FPS Limit” section. Enabling this setting will limit the number of frames per second the game produces. This may be necessary for different purposes. The user only needs to set the restriction and activate it at the right time.
Pay attention to the window above. Click on one of the six positions to display the counter in the desired location.
Step 5: Video Setup
One of the important stages of configuring Bandicam for recording games is setting the recording parameters, because the professionalism of all the material depends on the quality of the picture. All necessary editing is carried out in the “Video” tab.
- First, let’s look at the “Recording” section. There are several items here, which can be activated by checking the boxes. The inclusion of these parameters occurs solely at the request of the user.
Next, look at the standard parameters of the media container. Sometimes they completely satisfy the user’s needs, but most often they are set incorrectly, so go to the “Settings” category by clicking on the appropriate tab.
In the tab that opens, select the file format, video size, codec used, quality and FPS limit. Below you can edit the sound parameters, but more on that a little later.
Step 6: Sound Settings
Usually, what is happening on the screen is recorded and audio is captured; in addition, some users like to accompany actions with active monologues over the microphone. If you are going to record an audio track, you should definitely make sure that all the settings are set correctly, and our separate article, which is available at the link below, will help with this.
Basic settings
Let's start with the fact that the program allows you to capture any area of the screen, and, therefore, is suitable for creating videos of a wide variety of formats. However, we are interested in setting up Bandikam for recording games, and without lags. Once launched, the utility prompts you to select a special game mode, hidden under a button in the form of a gamepad. Let's activate it and see what settings will be available to us.
There is a minimum of interesting things on the main page - the main hot keys for recording/stopping videos and taking screenshots are listed here.
The “Basic” tab contains such basic parameters of the program’s behavior as autorun, working on top of windows, power management, recording FPS values to a file, editing the name template for the recorded video, etc.
The “FPS” section settings are responsible for visualizing the frames per second counter - you can turn it on and off, choose where it should be displayed on the screen, and also limit the number of frames per second produced by the game.
How to use Bandikam: setting it up correctly
Still don't know how to create cool videos using Bandicam? In this case, Yandex, faithful to you, was not mistaken again and sent you to the right address. Yes, yes, it is here, within the confines of this very article, which you happily began reading less than a minute ago, that we have revealed and, most importantly, clearly illustrated all the features of using such a well-known utility as Bandicam. What? Do you want to know right now how to set up Bandikam correctly? Then let's no longer waste your precious time on all sorts of lyrical digressions, but let's get down to business right away!
Bandicam options: customize the program for yourself
Well, having installed Bandicam on your computer, the first thing you need to do is take a good look at all the options built into it. Why is this necessary? You ask! At a minimum, so as not to ask yourself and others stupid questions in the future, but otherwise, in order to make the most of the opportunities provided to its developers. And we note that the program has enough of them for more than one modern software.
In particular, the latest build of Bandicam boasts two main operating modes at the same time, namely gaming, which is designed to record video directly from games and programs running on DirectX, and screen, which ensures that what is happening on the desktop and web is saved as a ready-made video.
Tasty? What did you think! True, before using a mode suitable for recording video, you need to correctly and effectively configure its operation in Bandicam. What will you have to deal with?
1) With FPS or, more simply put, the number of frames per second that the video card squeezes out of itself when running a particular application. Bandicam developers, in particular, propose to either impose or limit the display of this video quality indicator when recording it. At the same time, setting this parameter does not require any supernatural efforts: just go to the appropriate program menu and set the appropriate setting.
- with special video settings. So, by going to the “Video” menu of the Bandicam program, each user has the opportunity to:
- assign hotkeys with which you can start, pause or end video recording;
- configure cursor display;
- select appropriate mouse click effects;
- post video from your webcam;
- change the audio and video file format.
Errors and how to fix them
The Bandikam program is considered one of the best among similar software due to its versatility, high performance, and good quality of footage. However, in some cases, errors or crashes occur in the application. This is usually due to incorrect settings, installation, lack of computer power, or working in an unregistered trial version of the program.
In the latter case, this is expressed in the presence on the video filmed in Bandicam of an inscription at the top (logo), which can be removed on subsequent materials by purchasing a license from the manufacturer, as well as free downloading here on the website of the KeyMaker activator (KeyMaker crack) or cracked (hacked) program versions.
Codec initialization error
If Bandikam does not record the screen, the game in game mode, crashes and displays the indicated error, the reason why this happens is a conflict between the software and the graphics chip. To fix the problem, you can use a simple method by changing the codec to another in the video settings.
If the problem persists, it is recommended to install drivers for Bandicam from the manufacturer's official website. On it you need to go to the “Support” - “Advanced user tips” tab, where you select and download the desired codec.
After downloading and unpacking the archive, copy 2 files to C:/Windows, replacing the corresponding ones.
Next, in the video settings of the Bandicam program, select the desired codec.
Many users cope with the error (Nvidia NVENC codec) by running Bandikam and the game as administrator.
The program does not record the game
A possible reason why Bandikam does not start recording the game and crashes is the lack of PC power.
To correct the situation, it is advisable to reduce the number of frames and change the resolution from Full HD to HD in the video settings.
If the problem persists, it is recommended to change the recording format from AVI to MP4. The preferred codec is H264.
No sound is recorded
If Bandikam does not record sound from the microphone or voice when shooting, the first thing to do is go to the appropriate settings: Basic - Advanced - Other - Video recording settings.
Next, check if the “Sound recording” checkbox is checked and assign “Additional device”.
If an error appears when working with the Bandicam program: “Failed to launch audio capture,” you can fix it using the method presented in the video.
How to remove noise
To get rid of unwanted noise and rustling noises during filming, it is recommended to go to the program’s sound settings and lower the microphone volume (by about 1/3). In "Additional devices" set it to disabled. Click "Ok".
In this case, the recommended settings (the “Video” tab):
Application crashes asking to reinstall
If, when starting the Bandicam program, an error appears: “The application has failed, please reinstall the application,” then it is recommended to follow the suggested advice.
In this case, use Revo Uninstaller to remove it. Next, be sure to restart your PC.
Then Bandikam is reinstalled, the cracked version 2018-2019 or KeyMaker can be downloaded on our website.
A solution to the problem is presented in the video:
FPS drops when recording
If the FPS drops when recording with the Bandikam program, the reason may be the low power of the PC, especially if the number of frames is set to high.
Users say that setting a priority above medium or high in the video settings is a solution to the problem.
It is also advisable to choose a low-power PC template.
There is a sound setting in the Bandicam program with which you can turn the sound off and on, make a separate file with sound, and record sound from different devices simultaneously.
How to set up a microphone in Bandicam
In addition, other video recording parameters can be easily edited from the Settings section of the Recording panel. In particular, here you can select the color of the cursor backlight, set the advanced video capture method, set a logo, enable the audio recording function, select the webcam to which the program will connect, and also specify a microphone, etc.
At the same time, using Bandikam to take screenshots, you should pay attention to the “Images” menu. In this section, for example, you can:
- Set a hotkey that will be used to capture an image (screenshot).
- Select the periodicity (frequency) of photographing.
- Configure cursor display.
- Turn on the camera shutter sound.
- Determine the appropriate format for the future screenshot.
At the same time, you do not need to ignore other program settings. So, from the “Basic” section you can access the selection of the folder in which finished videos and screenshots will be saved; set auto-start and auto-complete recording; edit the interface language; set Bandicam launch parameters, etc.
How to use Bandicam. Installation
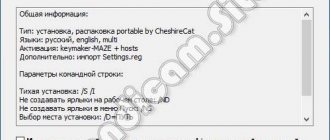
First, let's see how to install Bandikam. After downloading the Bandicam installer, launch it by double-clicking the left mouse button. Having done this, a window will appear in front of you with a choice of installation language:
Select the very first item, that is, Russian (you can choose any other if you wish), and click the “OK” button to move on:
This is the initial welcome window in which you just need to click the “Next” button:
Here you will need to accept the license agreement (although no one reads it, you can be an exception) by clicking on the “I Accept” button:
At this step, you can choose where the program shortcut will be located after installing it. By checking the “Program Group” box, after installing the program, a shortcut will be created in the program group, “Desktop Icon” will be created on the desktop, and “Pin to Taskbar” will be created on the taskbar.
Having selected the desired item, click the “Next” button to go to the next window:
Here you can select the installation folder. Having done this, click the “Install” button to proceed to the installation of the program itself.
After waiting for the Bandicam installation to complete, a new window will appear, where, without unchecking the “Launch Bandicam” checkbox, click the “Finish” button. The installation of Bandikam can be considered complete.
Now let's move on to looking at the program interface, and we'll start with the very first menu, called “General”.
How to set up Bandikam to record games without lags
So, how can you use Bandicam to create a video based on what is happening in a computer game? In principle, there is not much work here. First, as it should be according to the logic of things, we will need to launch the computer game necessary for recording on the computer. Is there such a thing? In this case, the next step will be to directly configure Bandicam.
Actually, in the program itself we need:
- Select “Game Mode” by clicking the corresponding button on the panel.
- Set hotkeys to start and stop video recording, so that in the future you will not be distracted by deleting unnecessary video fragments, noise, etc.
- Adjust the sound parameters, if, of course, you want to provide the future video with voice comments during recording.
At the same time, as you already guessed, you can make similar settings in the “Video” section. At the same time, in order to start direct video recording of a fragment of the game, it is enough to press just one button, namely Rec.
It is worth saying that in a similar way you can record videos from video players open on your computer using Bandicam.
We shoot video games
To start shooting games through Bandicam, you need to click on the “Target” button and select “DirectX/OpenGL Window”.
Bandicam settings for game recording
Next, launch the game and for Bandicam to start recording games, just press the F12 key, and pressing the same key will stop the recording. To take a screenshot you need to press the F11 key (these keys can be customized). To shoot Bandicam without lags, you need to select MPEG-1 mode in the video settings. If Bandicam does not record video for more than 10 minutes, then bandicam needs to be activated.
How to take a screenshot in Bandikam
As mentioned above, in order to take a screenshot or record a video from your desktop using the Bandicam program, you first need to select the screen operating mode in its settings. You can do it like this:
Actually, after the selection of the mode for Bandikam is completed, we have to determine a little bit the size of the lens of our software photo or video camera. What does this require? Nothing special, except maybe look at the size selection menu and indicate the option that suits us:
In general, having successfully completed this preparatory stage and indicated in the settings the desired settings for the future masterpiece, we can only begin to create it. To do this, just click the Rec button in the top panel of the open window (frame) (to record a video) or the camera icon (to take a screenshot).
How do you like it? Is it difficult to work with the program? So it seems to us that no! Therefore, we boldly cast all our doubts aside, and let’s go enjoy creating really cool videos and screenshots using only the restless Bandicam utility! Let's show the world that we are still Spielbergs!
How to set up Bandikam to record games without lags: step-by-step instructions
The first thing the user is asked to do is download and install Bandicam on the computer. The next question that arises is how to set up a bandikam to record games.
- In the “FPS” section, you can configure the location of the counter on the screen and control buttons.
- Next, move on to the main item – “Video”. A useful feature is adding video from a webcam. It activates a window on top of the main capture area, where the footage from the webcam is visible.
- It is important to pay attention to how to adjust the sound in the bandicam. “Recording Settings” contains basic options such as “Audio Recording” and recording devices. It is mandatory to indicate them. Speakers (Win7Sound or Win10Sound, if a Skype conversation is being recorded) are often chosen as the main device, followed by a Microphone.
- The webcam is configured in the next tab. The user is asked to separately save the video taken from the webcam and select the desired view: display the video above the main video or save it separately.
- The mouse settings section offers functions for connecting a cursor, adding backlighting and various pointer effects.
Among the formats (the “Video” subsection) offered by bandicam, there are several special options for those who shoot videos on YouTube. This is the most convenient option for bandikas, which does not require further configuration
If we look at the format settings in more detail, then there is a choice of file format (AVI, MP4), video, and audio. For a video shot on YouTube, MP4 is best suited with video dimensions of 1920 by 1080 pixels, FPS is 30, the video codec is H264, and the audio codec is AAC with a bitrate of 192 and a stereo channel.
Where can I download Bandikam?
But before we talk about how to set up Bandikam to record games, we need to make a note. The fact is that many people simply do not know where to download this program from. Of course, there is only one answer to this question - from the official website of the developer. Now we'll tell you why.
When you download Bandicam from an unreliable source, you risk introducing a virus into your operating system. After all, absolutely anyone can easily change the program code by placing malicious software there, and then release the already infected version of the program into the public domain. Where can you download the program from, thereby infecting your computer.
Even if you have an antivirus installed, this does not mean that it will have time to detect and eliminate the danger, or that it will miss it altogether. Nowadays, hackers have become adept at creating viruses that can easily bypass your protection.
After we have figured out where it is best to download the program from, we can proceed directly to how to set up Bandicam to record games.
Correctly setting up Bandicam to record games
In this article we will look at the correct option for setting up Bandicam for comfortable recording of games. The program allows you to record in three modes:
- game;
- screen video capture;
- recording from a third-party video device.
Before starting any actions, it is recommended to download the latest version of Bandicam. Usually new programs work much better.
At the moment we are interested in the game mode and all its subsequent settings. In the main window of the program, this operating mode is indicated by a joystick (if you hover the mouse cursor over it, a description will appear below), click on it and confirm your choice.
On the left side of the main window there are settings tabs, including:
The settings we are interested in are located in the “FPS” and “Video” tabs. Other sections do not require configuration changes.
Setting up the “FPS” section
For those who don't know, FPS is the frame rate at which videos are played. In order for the program to display this same quantity, you need to check the corresponding box (“Show in position”) and select a convenient location on the screen. The main advantage of this function is the ability to see whether recording is in progress (the FPS icon is highlighted in red - it is in progress, green - not). This is where our interest in the FPS tab ends.
Note: the FPS icon will not be displayed on frames of the final video file.
Video setup
Video settings are the main settings that should be done immediately after installing the program on your computer. After all, it will allow you to shoot high-quality material, which will subsequently be easy to process and mount.
This setting is considered the largest, but this does not mean that it is the most difficult, especially if you follow our instructions, you can do it in a matter of minutes.
So what you will need:
- Go to the FPS tab, which is located on the main page of the program.
- Select the position of the frame rate indicator on the monitor. To do this, check the box next to the appropriate item and indicate the position a little to the right.
- Set frame rate limits when recording. To do this, enter 30-60 FPS in the field next to it. This setting will allow you to improve your computer's recording performance. If you are confident in the power of your PC, then set it to 60 FPS, if not, then, accordingly, 30 FPS.
- Go to the "Video" tab.
- In the “Recording” column, check the box next to “Start/Stop - hotkey”. In the field next to it, indicate the same key. In the future, by clicking it, you will start recording.
In general, these are all the settings related to video, now you know a little more about how to set up Bandicam for recording games, but that’s not all, there’s still sound adjustment ahead.
Setting up the "Video" section
Having selected the desired tab, go to the “Recording Settings” item. The “Sound” tab opened in front of us. You can make the audio track synchronous with the game sounds by setting the following configurations:
- Check the “Sound recording” option.
- Select the main audio output from which you will listen to game sounds (speakers/headphones).
- Deactivate the additional audio output.
To record your voice comments, you will need to activate the microphone by selecting it as an additional device.
In order for not only your voice, but also you to be present in the video, go to the “Web camera” tab to configure it. Check all the boxes, check the connection of the device and select a position on the screen to broadcast the image from it.
If you need to place a logo on your video, the tab with the same name will help with this. Select the location of your logo on your PC, check the “Place logo on screen” checkbox and determine its position on the video. The two remaining tabs, “Mouse” and “Options,” are left unchanged.
Sound settings
With sound, everything is much simpler; there are not many parameters, or to be more precise, only two. The fact is that initially the program disables the option to record sound from both the system and the microphone, and all you need to do is enable these options. For this:
- While on the “Video” tab, click on the “Settings” button, which is located in the “Recording” column.
- In the window that opens, go to the first tab - “Sound”.
- Check the box next to “Record audio.” Here, if you want the audio to be recorded separately from the video, check the box next to “Save in parallel to uncompressed WAV audio files.”
- Where it says “Main device”, indicate your speakers or you can leave it using the “Win 7 Sound (WASAPI)” standard.
- If you want audio to be recorded from a microphone, select it in the “Additional device” column below.
- Click OK.
Now you know how to set up the Bandicam sound for recording games.
Advanced settings and format selection
In order to begin more detailed configuration changes regarding the game recording mode, click on the “Settings” button in the “Format” section.
A new window has opened for you to select the video recording format. As you can see, by default the program saves the recording in AVI format. The file is of very good quality, but at the same time huge in size. Therefore, to record long videos, including games, it is recommended to use the MP4 format.
The optimal set of values: full-size screen, 60 FPS, picture quality – 100. If you have a low-power computer, the capture size should be reduced to 1200x720, and FPS to 30. This will help the program run without distortion and lag.
As for the sound settings in this tab, they are as good as possible and it is best to leave them at default.