How to find out the PLL chip model on a laptop motherboard
Ways to find out the model of the PLL chip (Clock Generator) on a laptop motherboard:
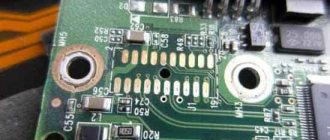
- Disassemble the laptop and look at the PLL chip markings on the board;
- Find data about the chip on the Internet by searching, indicating the motherboard model;
- Using the selection method in the overclocking program.
There is no point in using programs like Everest, Aida64 and CPU-Z; they will not provide information that will help you find out the Clock Generator of the motherboard on a laptop.
It is worth noting that you can only determine the PLL chip model by disassembling the laptop if you are using a very old motherboard. On modern motherboards, the PLL chip is already embedded into the chipset chip. There is no use looking for him.
I hope the article “How to find out the model of a PLL chip (Clock Generator, clocker) on a laptop” was useful to you.
Didn't find the answer? Then use the search form:
A motherboard is a multifunctional platform that ensures the functionality of each component of a personal computer: RAM, video card, hard drives, and central processor. Therefore, it is important to figure out whether the components will be compatible with the motherboard before purchasing additional equipment. The only way to deal with the task at hand is to find out the model of the motherboard already installed in the system unit. And, as practice suggests, there are more options for performing this operation than it seems at first glance...
Overclocking a laptop processor using the SetFSB utility
In general, overclocking the processor installed in a laptop is not so simple - the increase in performance is often not as thorough as we would like. This is prevented by possible overheating of the processor and other components installed in the laptop.
Naturally, this scenario is initially laid down during the development of the device, because all modern processors have in their arsenal a system that prevents overheating: upon reaching a critical temperature, the processor automatically reduces performance. If this is not enough, the laptop will simply automatically turn off (or freeze).
Yes, overclocking the processor by raising the supply voltage will not be considered in this review, because carries increased risks, especially in terms of mobile processors that are installed in laptops. And often this feature is completely blocked at the hardware level.
1) Determine the PLL chip
In order to proceed directly to overclocking, you need to find out the brand of PLL chip that is installed in the laptop.
In short, this chip is responsible for generating the operating frequency for individual components and elements of the laptop and ensures synchronization between them.
Different laptop models (including those from the same manufacturer, with a specific model range) can use a variety of PLL chips. It is impossible to single out any specific solution that is widely used by laptop manufacturers.
PLL chips are manufactured by third-party companies, the most famous of which are: STMicroelectronics, ICS, Texas Instruments, Silego, etc.
To determine the PLL chip used in your laptop, you can use the following methods:
- You need to find out the brand of motherboard installed in the laptop. You can read about how to find out the brand and name of the motherboard in the article “How to find out the brand (model) of the motherboard: an overview of methods.” And then, using a search engine (for example, Google or Yandex), find out which PLL chip is installed in this motherboard. This information, as a rule, is posted on the Internet by overclocking enthusiasts who have previously encountered the motherboard/laptop that you have.
- Or you can disassemble the laptop yourself and visually highlight the necessary information from the chip. However, if you have not previously disassembled a laptop, then it is not recommended to resort to this method.
2) Specify the microcircuit and increase the frequency
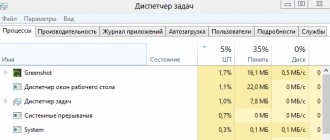
Run the previously downloaded SetFSB utility. Select your PLL chip from the list in the window that appears and click the Get FSB .
The window will display the current frequency characteristics. In the lower right corner of the utility, the current operating frequency of the processor installed in your laptop is displayed.
To increase it, check the box Ultra , and then start moving the slider to the right. You shouldn’t get carried away with this; if you push the slider to its extreme position, the likelihood of stable operation may decrease. Start small, move the slider a few notches (literally 5 ... 20 MHz).
Then click on the button next Set FSBto apply the settings.
If you did everything correctly, choosing the correct PLL chip, and the manufacturer did not block the ability to increase the frequency, etc. at the hardware level, then you will be able to watch how the overall frequency (Current CPU Frequency parameter) of the processor in the lower right corner increases.
If the laptop freezes while changing the frequency, then after rebooting, check whether the PLL chip is set correctly, the overclocking level, etc. There is a possibility that at some stage you made a mistake.
Having successfully raised the frequency of the laptop processor, you should test it for stability.
3) Testing an overclocked processor
Next, run the pre-prepared PRIME95 utility and start the testing process.
As a rule, if the processor is overclocked and exhibits instability or overheating, then this program will detect this within 5.. 10 minutes. As a result, the computer will either freeze or display errors.
Undoubtedly, this utility can be used for testing and over a long period of time, for example, left for an hour, but in most cases this will be unnecessary.
If the testing results do not reveal any instability in the operation of the laptop, then you can try to raise the frequency by a few more points, repeating everything that was described in the second step.
And after this, naturally, it will be necessary to re-test the stability of the system. In this simple way, you can identify the maximum permissible overclocking frequency, at which the processor performance increases, but the stability of the processor and the system as a whole does not suffer.
Based on average values, an increase of 5 to 15 percent can be achieved in this way.
How to find out your motherboard model using Windows
The Windows operating system copes with the task of checking the hardware in no time. Moreover, in both Windows XP and Windows 8, the procedure is the same - you will have to refer to the “System Information” section, which is accessible using the msinfo32 command (the procedure will be described below). Every detail related to a personal computer is displayed there - the amount of RAM, the current video card, operating system, hard drive capacity. But there is no alternative way to tell you about the installed motherboard in Windows (except from the command line) - neither Device Manager nor computer properties will tell you about the “main hardware”, and will only shed light on additional components.
View in msinfo32
The procedure is quite predictable:
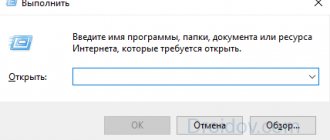
- First of all, you need to call the Run command using the WIN + R key combination (the WIN button causes Run and is usually located on the keyboard between CTRL and ALT).
- The next step is to enter a combination of letters and numbers msinfo32. The Enter button will help you confirm the operation.
- After a huge table with additional information appears on the screen, it’s time to move on to the search, which is located at the bottom of the interface. First, you should enter the combination “Main board manufacturer” (the motherboard manufacturer will be displayed). And secondly, “Main Board Model” to get the full name.
Alas, Windows is not always able to see the name of the motherboard in Windows 10 - in 50 percent of cases you will have to be content with the inscription: “Unavailable,” indicating the inability to figure out the exact name of the motherboard. Searching again won't help. And that means it’s time to move on to other methods.
Using the Windows command line
How to find out what motherboard is worth without using additional software? Using the command line, of course:
- The search platform is accessed through the Start menu and a CMD query in the search bar (alternatively, type “Command Prompt” and then press Enter).
- After the operating system loads the command line, you will be able to enter the following message: wmic baseboard get product. In response to the entered combination, a message about the type of motherboard will appear. If you enter the message wmic baseboard get manufacturer, the name of the manufacturer will appear.
Interacting with the command line is convenient - there are no unintelligible answers, and situations where the system is not able to recognize the equipment are minimized.
Review of programs for overclocking Intel processors
SetFSB
An easy-to-use utility that allows you to overclock the processor on the fly by simply moving the slider.
After making changes, it does not require restarting the computer.
The program is suitable for overclocking both older processor models like Intel Core 2 duo and modern ones.
However, it does not support all motherboards, and this is an absolute necessity, since overclocking is carried out by increasing the reference frequency of the system bus.
That is, it affects the clock generator (PLL chip or, as it is called, a clocker) located on the motherboard.
You can find out whether your board is included in the list of supported ones on the program website.
Advice!
To avoid processor failure, working with SetFSB is recommended only for experienced users who understand what they are doing and are aware of the possible consequences. In addition, an untrained user is unlikely to be able to correctly determine the model of his clock generator, which must be specified manually.
So, to overclock the processor using SetFSB, you need:
- Select from the “Clock Generator” list the model of the clocker installed on your motherboard.
- Click the “Get FSB” button. After this, the SetFSB window will display the current frequency of the system bus (FSB) and processor.
- Carefully move the slider in the center of the window in small steps. After each slider movement, it is necessary to monitor the processor temperature. For example, using the program.
- Having selected the optimal position of the slider, you need to press the Set FSB button.
The advantage (and for some, the disadvantage) of the SetFSB utility is that the settings made in it will only be valid until the computer is rebooted. After restarting, they will have to be installed again.
If you don’t want to do this every time, the utility can be placed in startup.
CPUFSB
CPUFSB is the next program in our review for overclocking Intel core i5, i7 and other processors, which can be downloaded from the developer’s website.
If you are familiar with the CPUCool utility - a comprehensive tool for monitoring and overclocking a processor, then know that CPUFSB is a dedicated overclocking module from it.
Supports many motherboards based on Intel, VIA, AMD, ALI and SIS chipsets.
Unlike SetFSB, CPUFSB has a Russian translation, so it is much easier to understand how to handle it.
The principle of operation of these two programs is the same: increasing the reference frequency of the system bus.
Operating procedure:
- Select the manufacturer and type of your motherboard from the list.
- Select the brand and model of the PLL (clock oscillator) chip.
- Click “Take frequency” to display the current frequency of the system bus and processor in the program.
- It is also necessary to increase the frequency in small steps, while controlling the processor temperature. After selecting the optimal setting, click “Set Frequency”.
CPUFSB allows you to set the FSB bus frequency the next time you start the program and when you exit. The current settings are also saved until the computer is restarted.
SoftFSB
Our review ends with the SoftFSB utility, another tool for overclocking a processor on the fly. It is no more difficult to use than previous programs.
Just like them, it supports many models of motherboards, various models of clock generators and any processors.
Unlike the paid SetFSB and CPUFSB, you can use SoftFSB for free.
However, there is no guarantee that it will run on your computer as it is no longer supported by the author.
To overclock a processor using SoftFSB, you also need to know the model of the motherboard, PLL chip and be a fairly experienced user.
Procedure:
- In the “FSB select” section, specify the model of the board and clock generator.
- Click the "GET FSB" button to capture the processor and bus frequencies.
- While monitoring the processor temperature, find the optimal frequency by moving the slider in the middle of the window.
- Having selected the appropriate value, press the “SET FSB” button.
As you can see, everything is the same here. A lot of other programs for overclocking processors under Windows work using a similar algorithm.
In addition to universal ones, there are utilities with overclocking functions that are produced by motherboard manufacturers themselves.
They are somewhat easier and safer to use, since they are designed for a simple user and obviously cannot harm the system.
Important!
All the programs reviewed allow overclocking on both laptops and desktop PCs. But if you have a laptop, you should be very careful not to raise the system bus frequency to high values.
A motherboard is a multifunctional platform that ensures the functionality of each component of a personal computer: RAM, video card, hard drives, and central processor. Therefore, it is important to figure out whether the components will be compatible with the motherboard before purchasing additional equipment. The only way to deal with the task at hand is to find out the model of the motherboard already installed in the system unit. And, as practice suggests, there are more options for performing this operation than it seems at first glance...
The Windows operating system copes with the task of checking the hardware in no time. Moreover, in both Windows XP and Windows 8, the procedure is the same - you will have to refer to the “System Information” section, which is accessible using the msinfo32 command (the procedure will be described below). Every detail related to a personal computer is displayed there - the amount of RAM, the current video card, operating system, hard drive capacity. But there is no alternative way to tell you about the installed motherboard in Windows (except from the command line) - neither Device Manager nor computer properties will tell you about the “main hardware”, and will only shed light on additional components.
View in msinfo32
The procedure is quite predictable:
Alas, Windows is not always able to see the name of the motherboard in Windows 10 - in 50 percent of cases you will have to be content with the inscription: “Unavailable,” indicating the inability to figure out the exact name of the motherboard. Searching again won't help. And that means it’s time to move on to other methods.
Using the Windows command line
How to find out what motherboard is worth without using additional software? Using the command line, of course:
Interacting with the command line is convenient - there are no unintelligible answers, and situations where the system is not able to recognize the equipment are minimized.
Recognition programs
If for some reason it was not possible to reveal the secrets of the motherboard using the tools built into the Windows operating system, then it’s time to move on to the heavy artillery - special programs that are downloaded from the network, and then tell in detail about the available hardware and even help download the latest drivers:
- Speccy is a freely distributed utility developed by the CCleaner studio, which summarizes the available components, including Motherboard. One of the advantages of this approach is lightning-fast collection of technical information without using the command line. There is also a translation into Russian available, a table of contents search, instructions for beginners, and even a special terminal that displays the temperature of the central processor, video card, and hard drives.
- AIDA64. If Speccy was unable to determine the motherboard, then it’s time to move on to AIDA64 - perhaps the most omnivorous tool that can look even into the unexplored corners of a personal computer. The assistant collects information about everything at once - the operating system and available licenses, temperature, voltage, overclocking, cooler rotation speed, DirectX version, Internet speed and security settings. An additional advantage (those that go beyond the scope of the question “how to find out what motherboard is on your computer”) is the presence of a “Test” section. Here the developers propose to conduct special testing at “maximum speeds”, with the sole purpose of determining how well the computer copes with maximum loads.
- Driver Booster - formally, a tool from the IObit studio does not detect available components and does not display statistics of installed video cards, RAM or board. But it also tells you which components’ drivers are high time to update. And at the same time, it helps to download the necessary drivers and install them (and before starting the procedure, you can even organize a restore point - just in case). Working with Driver Booster is easy - translation into Russian is available, the interface is clear, and interaction with the available functionality occurs in a semi-automatic mode, where it is impossible to press the wrong button.
Visual inspection
How can I find out which motherboard is installed on my computer if it is impossible to turn on the PC due to missing hardware? The only way to get to the truth is to conduct a visual inspection. You will have to look at the markings and inscriptions left by the manufacturer. As a rule, even beginners who have never encountered personal computers are able to cope with the task. The main thing is to strain your vision and imagination, and then all you have to do is arm yourself with a smartphone or tablet, turn on Google and enter the found combinations of letters and symbols. With a 99% probability, the necessary information will definitely be found.
How to find out the “clock generator” of the motherboard?
Only the SetFSB tool can deal with the task, and therefore you will have to act as follows: * Download the archive with the tool from the official website.
- Immediately after the test run, enter the identification number located at the top of the interface into the empty text field (in the screenshot, for example, you can see the combination 1726030115).
- After a kind of license check has been completed, a new information and reference window will appear, which lists a colossal amount of various information. Including the Clock Generator indicator. If the specified window is empty, you will have to either test again, or close SetFSB, and then re-enter the identification number in the empty text window. As practice suggests, the necessary information will definitely appear the third or fourth time.
Surprisingly, analogs of SetFSB have not yet appeared on the Internet. Therefore, to check Clock Generator you will have to follow the instructions described above!
Brief summary
From the article we learned how to increase the frequency of the mobile processor installed in the laptop. This overclocking method is relatively safe, but it is necessary to control the temperature (you can read about this in the material “How to find out the temperature of laptop components: processor (CPU, CPU), hard drive (HDD), video card. How to reduce the temperature”) and the stability of the overclocked system generally.
I wish you successful overclocking!
If you have any questions, you can ask them in the comments.
In turn, you can also help us a lot .
Just share the article on social networks with your friends.
By sharing the results of the author’s work, you will provide invaluable assistance to both him and the site as a whole. Thank you!
A motherboard is a multifunctional platform that ensures the functionality of each component of a personal computer: RAM, video card, hard drives, and central processor. Therefore, it is important to figure out whether the components will be compatible with the motherboard before purchasing additional equipment. The only way to deal with the task at hand is to find out the model of the motherboard already installed in the system unit. And, as practice suggests, there are more options for performing this operation than it seems at first glance...
How to find out the manufacturer of the motherboard on a laptop
The equipment available in a laptop or netbook, although it differs from the “standard” in size, interacts with the motherboard and additional components here in exactly the same way (of course, not counting visual inspection - on a laptop or netbook such things should be dealt with in the last place - it’s too high when disassembling the case, there is a risk of damaging the cables leading to the monitor or keyboard, or violating the current warranty). For example, using AIDA64 or Speccy, or alternatively:
- CPU-Z – Initially, the tool told only about the processor, but later additional information appeared - for example, the name and name of the motherboard, the cooler used, current BIOS information, version of graphical interfaces, RAM speed. If desired, the developers offer to output especially important data to a TXT file. So, they say, you won’t be able to lose important parameters even with a strong desire.
- HWiNFO32 is another help desk service available on Windows XP, 7, Vista, 8 and 10, both in full format and in a Portable version that can be easily downloaded to an external drive for use anywhere you need Find out the model of the motherboard on your computer. On the plus side, information is collected at lightning speed, and it’s free. Russian language included. For beginners who have not yet understood computer basics, hints are available using a special question mark, which is located opposite each information point. It’s worth spending a little more time and many more details will be revealed.
How else can you find out what motherboard is on your computer? Use tips for Windows 10. About using the Command Prompt and the Run command.
In the afternoon I started it up, cleared the slush from the car and headed out to visit. I stopped at a gas station, filled up and...the “battery” light came on. I realized that the charger was gone. The car began to slow down and not move at all. I opened the hood, tapped the generator with a crank (the stuck brushes fell into place), and charging appeared. I arrived home and planned to find brushes in the store. I found out that Bosch and Valeo were installed on this car... It froze because... I don't know, maybe they changed it entirely. How can I understand what model it is and what brushes I need for it without removing the generator? Has anyone encountered this? PAssat VAriant 3B5 1999 AHL 1.6 (power steering + air conditioner).
Tags: ahl, generator, generator brushes, marking
Comments 26
Isn't it easier to remove the voltage regulator along with the brushes, just as an option?
Some manuals write that you can remove the regulator with brushes without removing the generator. BUT, you need to remove part of the receiving circuit. And in order to remove the gene, you need to uproot the viscous coupling... With dancing and tambourines.
are there any photos? Today I removed the bracket and changed the viscous coupling bearing
Photos of what exactly?
I unscrewed it on the spot, I want to see it
Yes, and what kind of brushes did you buy? If there is an article number, please post it
There were no photos of the process, and at night it was somehow not comme il faut to photograph all this in the rain. But I can verbally describe the process: Keys (size 5, small wrench, extension for the wrench (4 cm somewhere), head 13) 1. Removed the terminal from the battery. (key 10) 2. Remove the false panel (which has the VW badge), unscrew the 4 hexagons. 3. I removed B+ by unscrewing the 13 nut with a head. There was a plastic cover on it; I removed it with a screwdriver. I removed the terminal block that goes to the brushes. 4. Next is the process of removing the generator casing (on the back of the gene) (2 bolts for reverse Torx). I unscrewed it with a 5mm head (I think) using a small wrench from the tool kit. The stroke for unscrewing using a wrench is small, so I moved them from their place, and then transferred the head to a short extension and twisted them by hand. All this is performed under the reception area behind the generator. 5. After removing the cover, I shined a flashlight and found 5 more bolts for reverse Torx. Then I found out that only three of them held the brushes. I unscrewed it (with a screw and then with my hands using a short extension). 6. The voltage regulator with brushes was in my hands.
How to find out the PLL chip model on a laptop motherboard
Ways to find out the model of the PLL chip (Clock Generator) on a laptop motherboard:
- Disassemble the laptop and look at the PLL chip markings on the board;
- Find data about the chip on the Internet by searching, indicating the motherboard model;
- Using the selection method in the overclocking program.
There is no point in using programs like Everest, Aida64 and CPU-Z; they will not provide information that will help you find out the Clock Generator of the motherboard on a laptop.
It is worth noting that you can only determine the PLL chip model by disassembling the laptop if you are using a very old motherboard. On modern motherboards, the PLL chip is already embedded into the chipset chip. There is no use looking for him.
I hope the article “How to find out the model of a PLL chip (Clock Generator, clocker) on a laptop” was useful to you.
Didn't find the answer? Then use the search form:
Learn how to identify a Briggs & Stratton engine and find the series & model number, as well as type and engine codes.
Let's start overclocking
All work with the program will take place in the “ Control ” tab. In the " Clock Generator " field, select your chip, and then click on " Get FSB ".
At the bottom of the window, on the right, you will see the current processor frequency.
We remind you that overclocking is carried out by increasing the system bus frequency. This happens every time you move the center slider to the right. We leave all other half-knowledges as is.
If you need to increase the range for adjustment, then check the box next to the “ Ultra ” parameter.
It is best to increase the frequency carefully, 10-15 MHz at a time.
After adjustments, press the “SetFSB” button.
If after this your PC freezes or turns off, then there are two reasons for this: 1) you specified the wrong PLL; 2) greatly increased the frequency. Well, if everything was done correctly, the processor frequency will increase.
Briggs & Stratton Engine Identifier
How to identify a Briggs & Stratton engine?
Our engines are identified by model, type and code numbers printed directly on the engine. The model numbers of engines used in lawn mowers are usually stamped directly on the blower housing, muffler heat shield, or in a location a few inches above the spark plug. Engine code numbers may be hidden depending on the engine casing used. You may need to remove this cover to find the model, type and code to identify the engine.
Find Model Number, Type & Engine Code
For step-by-step instructions on finding your engine model number, type or code, watch this short video:
Additional videos on model number, type and code locations, grouped by type of equipment powered by the engine, are also available below:
Where can I find the model number, type & code of an OHV generator engine?
Many horizontal shaft overhead valve engines have serial and model numbers stamped on the rocker cover. However, on some overhead valve generator engines, OEMs install a decorative chrome rocker cover over our cover. If your engine has a trim cover, you may need to remove it to find the engine model number, type, and code.
If you need help identifying your Briggs & Stratton engine, refer to our engine model number locator guide to learn how to find these numbers.
Also, keep in mind that the numbers listed on the engine emissions label (bottom left)
may be mistaken for the engine model, type and code. Unfortunately, these numbers cannot be used to identify your engine.
How to force the PC to start at a new frequency?
You should already know that the program works with the new frequency only until a reboot. Therefore, in order for the computer to always start at the new system bus frequency, it is necessary to put the program in startup. This is a must if you want to use an overclocked computer on a regular basis. However, in this case we are not talking about simply adding a program to the Startup folder. There is a way to do this - creating a bat script.
Opens Notepad , where we will create the script. We write a line there, something like this:
C:\Desktop\SetFSB 2.2.129.95\setfsb.exe –w15 –s668 –cg[ICS9LPR310BGLF]
ATTENTION! DO NOT COPY THIS LINE! It should turn out different for you!
So, let's break it down:
C:\Desktop\SetFSB 2.2.129.95\setfsb.exe is the path to the utility itself. Your location and version of the program may vary! -w15 — delay before starting the program (measured in seconds). -s668 - overclocking setting. Your number will vary! To find it out, look at the green field in the Control tab of the program. There will be two numbers separated by a slash. Take the first number. -cg[ICS9LPR310BGLF] is the model of your PLL. Your data may be different! You must enter the model of your PLL in square brackets as it is specified in SetFSB.
By the way, along with SetFSB itself you will find a text file setfsb.txt, where you can find other parameters and apply them if necessary.
Once the line has been created, save the file as .bat.
The last step is to add the baht to startup by moving the shortcut to the “ Startup ” folder or by editing the registry (you will find this method on the Internet).
Meaning of Model Numbers, Type & Engine Code
What do the model, type and code numbers on your engine mean?
To view a chart that explains 1965 model numbers, visit the Numbering System page.
If you are looking for a model number, type or engine code for any purpose, your best bet is to contact your Briggs & Stratton dealer. They have all the information regarding Briggs & Stratton engine warranties, parts, short blocks, pricing, service/repair, specifications, etc.