Epu power saving mode what is it
Let's look at the BIOS settings of the ASUS PRIME Z370-A motherboard built on the Intel Z370 Express chipset. When loading the PC, hold down the Delete key. And we get into the UEFI BIOS, by default in a simplified mode: EZ Mode. It displays basic information about connected devices: memory, SATA/PCIe NVMe drives, fans, processor, as well as processor temperature and voltage, fan speeds and system operating mode.
When you press the F11 hotkey, a menu appears for overclocking the system based on components, cooling and system usage scenario. Here you can configure the RAID array. EZ Tunning Wizard > OC > Current System Configuration - current system configuration. Next.
PC scenario > Daily Computing or Gaming/Media Editing. Next.
Main cooling system > Box cooler, Tower cooler or Water cooler. Next.
Estimated tuning results.
For the installed memory set, select the Extreme Memory Profiles (XMP) profile. There is only one Profile#1 available for the CORSAIR Vengeance RGB CMR16GX4M2C3200C16 memory kit.
A message will appear: “Notice. Would you like to apply the all core enhancement with the XMP settings for improved performance? Select "No" for Intel stock operation. Sufficient processor cooling is required under the all core enhancement." Click on the button: Yes.
And we get XMP DDR4-3200 16-18-18-36-1.35V memory.
By pressing the QFan Control (F6) button, a graph for setting seven fans and one air cooler pump will appear. Speed control. Select your target fan, then move the slider to select any of these profiles: standard, quiet, turbo, and full speed. You can also move the slider to the Manual position and manually adjust the fan speed.
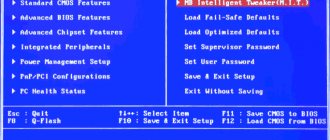
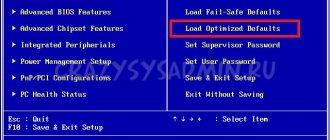
Let's go to advanced mode: Advanced Mode (F7), in it we will find 8 standard bookmarks (My Favorites, Main, Ai Tweaker, Advanced, Monitor, Boot, Tool, Exit). Bookmark: My Favorites , here you can add any parameters at your discretion for quicker access to them (to do this, click on “My Favorite (F3)” at the top of the menu or use the F3 hotkey).
CPU Core Ratio allows you to choose three options: Auto, Sync All Cores, Per Core.
Other settings in the My Favorites tab:
Main tab contains basic information about the system: BIOS version, installed processor model and memory specifications, here you can also select the menu language, etc.
Ai Tweaker bookmark . Ai Overclock Tuner – here we select the type of RAM overclocking from the drop-down list: Auto (nominal settings without overclocking), Manual (manual mode) and XMP (overclocking only memory using the XMP profile). In manual and XMP modes, you can change all settings in the BIOS. In automatic mode, the motherboard itself selects the necessary settings closer to the optimal ones. BCLK Frequency - system bus frequency (default value: 100 MHz). The BCLK frequency varies up to 650 MHz. ASUS Multicore Enhancement – enable or disable automatic increase in processor multipliers. In automatic mode (Auto is the default value), the board tries to increase the processor core multipliers to the maximum. When turned off, the recommended settings are loaded according to Intel specifications. AVX Instruction Core Ratio Negative Offset – setting negative multipliers for AVX instructions. Such tasks heavily load the cores, so sometimes it is advisable to leave the processor at a high frequency for other operations, but for AVX tasks the processor will work at a lower frequency, losing performance. In this case, errors will not appear and overclocking will be maintained. Range of values: from 0 to 31 (frequency 1600 MHz). CPU Core Ratio - type of control of processor core multipliers: Auto - automatic, Sync All Cores (all synchronized), Per Core - separately for each core (the maximum multiplication factor can be 83) or set per core depending on the load.
BCLK Frequency: Dram Frequency Ratio – select the multiplier for memory (1:1 or 1:1.33). Dram Frequency - the following frequencies are available: 800-8533 MHz in steps of 100 or 133 MHz. The current operating frequency of the memory is displayed. TPU – automatic overclocking function by the motherboard. The BIOS settings for memory, processor frequency, activation of processor limits, etc. are used. Overclocking usually occurs to the maximum Turbo multiplier. There are 2 ready-made scenarios - with a good air cooling system, and with a cooling system. Default value: Keep Current Settings. Power-saving & Performance Mode – select the operating mode of the motherboard. With all energy-saving features or disable them completely. Load CPU 5G OC Profile - a profile for automatically overclocking K-series processors to a clock frequency of 5 GHz.
*Video was exported to H.264 format, the processor worked normally, no Module name with error: mc_enc_avc.dll in Adobe Premiere Pro CC 2020.1 did not appear during rendering. Those. Both the processor and its Noctua NH-D15S cooling system worked normally. CPU SVID Support – enable or disable the ability of the processor to communicate with the power system and control it. It's better to turn it off during overclocking. Dram Timing Control – setting memory timings. Digi+ VRM – advanced settings for voltage regulators of the processor, memory, PCH, etc.
Internal CPU Power Management – manages processor power saving functions and power consumption limits. Tweaker's Paradise - auxiliary settings for overclocking (VPPDDR Voltage, DMI Voltage, Internal PLL Voltage, GT PLL Voltage, Ring PLL Voltage, System Agent PLL Voltage, Memory Controller PLL Voltage). CPU Core/Cache Current Limit Max. – the maximum load on the processor is set by a conditional value. Ring Down Bin – bit parameter that controls the behavior of the processor with ring bus multipliers. You can leave it in the machine or set the maximum and minimum multiplier. Max CPU cache and Min are responsible for these multipliers.
BCLK Aware Adaptive Voltage is an auxiliary setting that helps improve stability when overclocking on the BCLK bus. CPU Core Voltage/Cache Control – setting the type of voltage setting for the processor (automatic, manual and additional mode. In the additional mode, the board independently sets the base voltage, and you either add relative to it or decrease it). The same parameter sets the voltage for the processor cache memory. Dram Voltage – memory voltage, divided into paired channels – from 1.0 V to 2.0 V in steps of 0.0066 V. CPU VCCIO Voltage – VCCIO voltage from 0.9 V to 1.8 V in steps of 0.0125 V CPU System Agent Voltage - voltage of the bus and processor bus controller - from 0.7 V to 1.8 V in increments of 0.0125 V. CPU Graphics Voltage - voltage of the integrated processor graphics - from 0.7 V to 1.8 V s in steps of 0.0125 V. PCH Core Voltage - south bridge voltage (PCH), from 0.7 V to 1.8 V in steps of 0.01 V. CPU Standby Voltage - from 0.8 V to 1.8 V in steps 0.01 V.
We look for the cause and fix the problem
So, if you are inclined to believe that your case is a malfunction, perform the steps below one by one until you find the node where the problem occurs. To expose the culprit, you will most likely need a set of known good devices that you will connect instead of the “suspects”:
- Video cable of the same type or a different type. For example, HDMI and VGA - depending on what interfaces your monitor and video have.
- A video card or processor with a built-in graphics core (if your system supports it).
- Another monitor or TV with suitable interfaces, another system unit or laptop.
Let's start simple
If the message “ Power saving mode ” appears when you turn on the computer, disconnect it from the power supply by pressing the key on the power supply or surge protector. Then press the power button on the system unit and hold it for 20-30 seconds. This simple technique discharges the capacitors and removes static charge from the system elements. If this was a temporary failure, the subsequent launch will most likely be successful.
However, if this situation occurs regularly, for example, after each PC shutdown, the symptom may indicate an approaching failure of the power supply.
If the monitor does not exit Power saving mode the first time it is connected to the system unit or after replacing the video card (installing a new one or connecting to another), reset the BIOS settings using the hardware method, after first making sure that all connections are secure.
If the power-saving mode is activated during work or a resource-intensive game, the video card is most likely overheating. Clean the PC case from dust, remove hanging wires and cables, and, if necessary, strengthen the cooling system with additional fans.
This is interesting: TP-LINK Archer C20 (AC 750): high-speed budget router with support for WI-FI 802.11AC
If the signal does not disappear immediately, but after Windows starts, boot the computer in safe mode, open the display settings (In Windows 10, they are located in the Settings application - section "System" - "Display") and set the minimum resolution. After the subsequent boot in normal mode, which will most likely be successful, change the resolution to a higher one. Its optimal value can be determined empirically.
Turn off Power Saving Mode
To begin with, a few words about what energy saving mode is. In this mode, the processor consumes energy at a minimum, which, on the one hand, allows you to save electricity (or battery power in the case of laptops), but on the other hand, it reduces the CPU power, which can cause slowdowns when performing complex operations. Also, the power saving mode must be disabled if you plan to overclock the processor.
Disable Power Saving
The actual procedure is quite simple: you need to go into the BIOS, find the power mode settings, and then disable power saving. The main difficulty lies in the variety of BIOS and UEFI interfaces - the necessary settings can be located in different places and have different names. It seems impractical to consider all this diversity within one article, so let’s focus on one example.
Attention! You carry out all further actions at your own peril and risk, we are not responsible for possible damage that may occur while following the instructions!
Overclocking Matisse or in search of the limit. Zen 2 Architecture Overview
Preface
Any manual overclocking is a waiver of the user's warranty on the product and all actions are performed at your own peril and risk.
One of the most important conditions for system stability during overclocking is correctly configured phases and compensation mode during load. Fortunately, most motherboards for Ryzen processors are not short on settings and allow the user to configure the system quite flexibly.
The main ingredients of this salad are:
CPU VRM switching frequency - enable automatic or manual control mode of the VRM frequency of the processor power module. Sets the operating frequency for the processor power supply voltage converter. The higher it is, the more stable the output voltage is. However, increasing the switching frequency of the transistors leads to additional heating of the VRM module components. In most cases, 400 kHz will be sufficient for the middle segment and 600–800 kHz for the top board segment.
CPU Power Duty Control is a component control module for each processor power phase (VRM). On ASUS boards it has two positions:
- T.Probe - the module focuses on the optimal temperature conditions of VRM components.
- Extreme - maintains optimal VRM phase balance.
In the first case, the number of working phases will be determined by the load on the processor and in most cases all phases will rarely be used at the same time. In the second mode, we forcefully use all phases for any load. In my opinion, the second mode will be optimal.
On boards from MSI and other vendors, the names may vary, but the essence will remain the same. For example, Thermal Balance and Current Balance .
CPU Current Capability - provides a wide range of total power and at the same time expands the range of overclocking frequencies. In ASUS motherboards, my preference is 120–130%.
Load line calibration (LLC) - control of the processor boost voltage during load. Exists to provide greater stability during overclocking and compensate for high and low voltage fluctuations (keep the voltage line on the CPU more stable).
Nothing ruins a PC component faster than instability. When your system is idling, it can handle the voltage set in UEFI just fine. However, under heavy load, your CPU voltage drops and rises while idle. A kind of swing that has Vdroop.
When overclocked, Vdroop can cause stability issues as the processor will require a certain voltage level to maintain the set/required frequency. Setting the correct load calibration values can correct this.
The key feature of LLC is to provide additional voltage as the load increases and only when needed, while maintaining the maximum Vcore value you have set. This will ensure that you are only compensating for the "lost" voltage and will not cause "overvoltage".
I cannot give a clear recommendation on what level to set, because each motherboard from each vendor is individual, but I will give a hint.
Read the review of your motherboard and look at the results of testing the LLC modes. We will be interested in the mode that makes Vdroop the smallest (negative), but in no case positive, because this will affect the service life of the processor and VRM of the motherboard.
CPU Over Voltage Protection , CPU Under Voltage Protection and CPU VRM Over Temperature Protection in automatic mode; this protects components from “burnout”.
Manual multiplier setting
Optimal mode for processors without the “X” suffix of the Zen and Zen+ generation. And this is probably the most commonplace way to overclock a processor, which in most cases does not require in-depth knowledge.
We set CPU Core Ratio, also known as a multiplier. For Zen generation processors, the recommended values are in the range of 38–40.
And we set the voltage for the processor called CPU Core voltage. There are no exact values due to the fact that each instance has different voltage-frequency characteristics. I’ll tell you the range of 1.3–1.4 V. Then we save and go to Windows to test. I prefer LinX, 5-10 runs, 6-8 GB memory. We monitor temperatures (Tdie) and CPU Core Voltage (SVI2 TFN) using HWInfo. The maximum safe temperatures are in the range of 70–80 degrees.
If the screen goes blank or the computer reboots, there is a lack of voltage, as is the case if LinX writes an error or there are discrepancies with a “+” sign.
Precision boost overdrive + BCLK + Offset voltage (Zen+ and Zen 2 processors with “X” suffix)
I want to make an important disclaimer. In most recent firmware, most of the settings that we need for this type of overclocking have disappeared. According to my observations, the recommended UEFIs are based on AGESA Pinnacle PI 1.0.0.0a–1.0.0.2c. If you find it now, great, let’s try it.
- We are looking for Precision Boost Overdrive in our UEFI, often it is in AMD CBS.
- We set the values for PPT, TDC and EDC to 1000 each. That is, we remove the restriction.
- Set Customized Precision Boost Overdrive Scalar in the range of 2x–6x. The minimum frequency for all cores will depend on this value, and the higher the scalar, the higher the frequency.
- We set CPU Core Voltage using CPU Offset Mode + with the lowest value. We save and go to Windows to test.
Linx package or game if you are not interested in AVX-related loads. We monitor frequencies, voltage and temperatures. If the system is frozen or unstable, go to UEFI and increase our offset from point 4 by a small step. We repeat the procedure until we get a satisfactory result or lower the Scalar and again select the appropriate voltage.
What does the BIOS Pre-Boot Mode XHCI setting do?
Based on the symptoms you describe, it sounds like your OS has USB 2.0 drivers but not USB 3.0 drivers.
I found a good summary of options for a similar BIOS 'XHCI Mode' setting in a post by user tonymac a6f691ac:
XHCI Mode = Disabled - Built-in USB 3.0 port acts as a 2.0 port
XHCI Mode = Enabled - Built-in USB 3.0 port acts as a 3.0 port
XHCI Mode = Auto - The built-in USB 3.0 port functions as a 2.0 port until the USB 3.0 OS driver is loaded. If you reboot the OS, the built-in USB 3.0 port will again function as a 2.0 port during this BIOS reboot phase before the USB 3.0 OS driver loads.
XHCI Mode = Smart Auto - The built-in USB 3.0 port functions as a 2.0 port until the USB 3.0 OS driver is loaded. If you are rebooting the OS, during this reboot phase the BIOS will be smart enough to avoid degrading the USB 3.0 port performance to 2.0 levels before loading the USB 3.0 OS driver. So Smart Auto is faster than Auto on 2nd boot and later, but Enabled is faster if you are sure the OS has a USB 3.0 driver installed because it avoids switching. Performing the function of a built-in USB 3.0 port, such as a 2.0 port, mainly to support OS installation or support an OS that does not have a built-in USB 3.0 driver, so that the USB keyboard will still work if the user plugs a USB keyboard or any other USB devices into the ports USB 3.0 prior to OS installation with a USB 3.0 driver supplied with the motherboard.
Background:
Each major version of USB usually uses a new interface on the computer side, requiring different drivers (1.x: UHCI/OHCI, 2.x: EHCI: 3.x: XHCI). The newer interfaces work just fine with older USB devices, so there's no reason to use anything other than the latest on a completely updated system. However, when installing an OS, even if the computer has available drivers for the latest standard USB hardware on the computer, you may encounter a "chicken and egg" problem if the drivers are not included in the OS. install, and the only way to install the OS and copy drivers is through a USB port. To get around this, systems either include dedicated older ports (such as dedicated USB 2 ports on a system that also has USB 3 ports) or some kind of choice in the BIOS, such as this one, that allows you to change which ports to use older interface standard on the computer side, and then once you have the OS and the updated USB driver installer copied to the system, change them back to get better USB performance.