Modified: June 4, 2020 at 12:30
Attention! The official version of Denver is very outdated and contains a package of outdated software: Apache2.2; PHP5; MySQL5;phpMyAdmin3.5. - modern engines require higher requirements. But since they are still looking for Denver and it is starting to come to life (the official website states that the 4th release will appear soon), I decided to update the article. In general, I recommend using a better alternative, which is constantly updated and improved: openserver.
Description
Denwer is a set of distributions (such as php, Apache, MySQL and others) used to develop websites locally (on a PC running Windows), even if the PC does not have Internet access, in other words, it is a local web server.
Pros:
- can be installed on a USB flash drive and then run from any PC;
- You can work on multiple projects in parallel.
Minuses:
- very difficult with updates - the last one was a couple of years ago, and the 4th version may still be out for another year;
- I think it works very poorly
- there is no way to select suitable modules as in openserver
How to run a website on Open Server
A special feature of Open Server is the ability to work without installing software on your computer. You can run the server from a USB drive.
Download the distribution from the official project website. Open Server is free to use. The developers offer to make a donation for the development of the project. Without payment, the download speed of the distribution is severely limited. It will take several hours to download the full package.
Activate the installer and specify the path to unpack the archive. By default, the program offers installation to the system drive, but you can change the settings.
Run the executable file in the Open Server folder and select the language.
If everything is done correctly, a red flag will appear in the tray. Click on it to start working with the server.
Enter the address https://localhost/ into the address bar of your browser. You will see a welcome page.
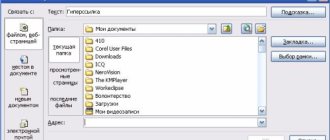
Now install the selected CMS on your local server. To do this, create a new folder in the Domains section. Unpack the archive with the engine distribution into it.
Restart Open Server using the tray menu.
Installing DENVERa
Instructions for the basic installer from the official website.
Launch the downloaded Denver distribution. The installer will ask you:
Select Yes. Next, the files are unpacked, after which you will see the following window:
And in the place with this window, the internet explorer browser will usually open, you need to close it (it also happens that an error like: don’t be alarmed, just click “OK”, then press “Enter”.
Next, specify the folder in which this local web server will be installed, or leave it at its default “C:\WebServers” and press “Enter”.
And to the question: about confidence in installation in the “C:\WebServers” directory, press (English) “y” and then “Enter”. Then the following comes out:
Press “Enter“.
Then you need to enter the name of the virtual disk. We agree with the value “Z:” (unless, of course, your system does not have a disk with this name) and press “Enter”. Then, you will see: “Press Enter to continue.” Press “Enter” again. The files will begin to be copied into the folder (if you did everything according to these instructions, then this folder is “C:\WebServers”). After the copying is complete, the installer will ask you to select an installation mode: 1-launch Denver along with Widows, 2-launch Denver manually (I always choose 2 launch type because I don’t like anything running on my computer without my knowledge )
There you enter the number “2” (or 1, if you want the virtual disk to be created when the OS boots) and press “Enter”.
Next, the installer will ask you to create shortcuts to launch DENVER on the Desktop. Enter “y” and press “Enter”. Next, the installer will close, and a browser window should open with the title “Denver installed successfully” (or another error window will pop up). You can close it.
This completes the installation of Denver.
Denver step by step installation
Step #1
Disable Skype, since the program usually occupies the ports that we will need now. Don't worry, there's nothing wrong with it. Run the installation file.
Double-click on the folder with the “exe” extension. Agree with the proposal by clicking the “Yes” button. A browser window will open with a message informing you that the installer is running.
Note:
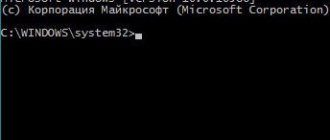
The installation process is different from the usual one. Allocating a virtual disk requires changes to be made to the system. The installer windows are presented on the command line. Don't let the color black scare you. That's how it should be.
As you continue with the installation, you will see a welcome window. It will take a few seconds to verify that everything necessary for the operation of the home server is available. At the end of the text there will be a hint: To continue, press Enter .
Click.
There will be a warning about rights changes. You must agree and press Enter .
Step #2
Now be careful, the installation process begins. There is nothing complicated here - don’t rush, then you won’t go wrong. In the next window you need to specify the Directory where the Server will be located. You can leave it as suggested: C\ WebServers .
but I advise you to first look at the amount of disk space on your computer.
For example, my drive is D:\
has more free space, so I install the Server on it.
You can also simplify the name of the folder, leaving only the word Servers
.
As a result, where the pointer is blinking, I write: D:\Servers
and press the
Enter .
It may be different for you.
Step #3
Next, the installer will ask you to confirm the Directory. Press the English letter “Y” from the word yes (yes). Enter again
and move on to the next window.
Step #4
We agree with the installer's proposal. Everything is clear from the text. So just press Enter.
Now you need to select the name of the virtual disk. This is a symbol for the place where Local Hosting files will be stored. In our case, this is part of the D:\ drive (or the one you chose). The installer suggests designating it with the letter Z. If you do not have such disks, leave this name (or designate it with any other letter). I'm writing Z
, press
Enter
.
Step #5
The next entry will not raise any questions. The installer gives a hint: To continue, press Enter
. This is what we do. Next, a quick process of copying files will occur.
Step #6
Select the download mode. I advise you to choose the first one so that the Server boots together with the OS when you turn on the PC. Those who do not want to have unnecessary elements in startup can choose the second option. But I warn you: not all systems will be able to work correctly in this mode. And so, I write the number 1
and press
Enter .
Step #7
Let's move on to the final stage. Whether or not we allow installation of shortcuts on the desktop. I think most will agree with this. Press the “ Y” and Enter .
Three shortcuts will appear on the desktop.
A browser will open and notify you that Denwer
has been successfully installed
.
Read the instructions on the page. That's it, installation is complete! Restart your computer. Check if the tray icons (envelope with hat and feather) are still in the tray. If not, then run the " Start "
and
" Restart"
, they should appear.
Launch and check the operation of denwer
After successful installation, 3 new shortcuts should appear on your desktop:
We launch Denwer by clicking on the “Start Denwer” shortcut (First of all, I recommend
turning OFF Skype and the firewall (if they are installed, of course). 2 icons should appear in the tray - a feather and an envelope with a hat: If they appear there, then you can start checking the functionality of Denver. To do this, in the address bar of the browser (Google chrome, Opera, IE, etc.) enter the address: localhost, the result should be the following page:
Scroll down to the following table:
And click one by one on all the links in the left column. You should see the following windows: The 1st link (top) usually writes that the ssl certificate is not valid or immediately displays the following 2: 3: 4: 5:
6:
7:
8:
9th:
Try sending a text message via mail() (sendmail): it should return OK, the message was sent successfully.
If you get the same pages, then everything is working fine for you.
And if it doesn’t work, read on!
Checking the operation of the local server
After clicking on the icon on the desktop Start/Restart Denwer
two icons appeared
in the tray
(in the lower right corner, where we adjust the sound) envelope with a hat”
and “
pink feather”
. Two black windows flashed on the desktop.
If so, then everything was done correctly. Now, open your browser. Paste localhost
, press
Enter.
A welcome page should open:
Hurray, it’s working!
Hooray! I learned how to install Denver on PC
If this does not happen, use the second verification method. Enter https://test1.ru/
, a page with the following entry will open:
This is the file /home/test1.ru/www/index.html.
Everything is fine. You did it!
If it doesn't work, change your browser. Perhaps some extensions or settings are interfering.
Nothing worked out again? Then remove Denver (all folders) from the PC and reinstall the program. Perhaps she stood up crookedly, or you made a mistake. Find out how to uninstall and solve problems that have arisen on a special page of the developer’s website: denwer.ru/faq/other.html
Advice:
Or simply remove drive Z. Don't worry, you won't do anything dangerous to the system. After this, if you have CCleaner, clean your PC from possible errors in files or the registry.
DENVER is not working. Troubleshooting.
Note! If you use Skype at the same time, then go to its settings: Tools -> Settings -> Connection -> Use ports 80 and 443 and uncheck the box there, then restart everything.
The Denver test page does not load: localhost/denwer/.
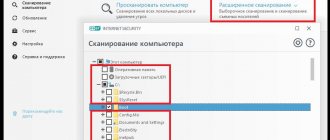
Check whether the proxy server is disabled in the IE browser settings.
Launch Internet Explorer, go to service -> Internet options
In the window that opens, open the connection tab and at the bottom of the window click on the “Network Settings” button.
The “Network settings settings” window will open, in it you need to uncheck the “Use automatic configuration scripts” checkbox (if it is checked).