Description and functions
Nvidia Inspector is a small program that will help you find out detailed information about the GPU, various characteristics and the status of your video card driver (all this is only possible on Nvidia-made cards).
The utility analyzes the following parameters:
- operation of the cooling system;
- frequency indicators;
- applied voltage;
- temperature.
But most users use Nvidia Inspector to overclock the GPU , change GPU power, adjust fan rotation, and edit driver profiles.
Important! Please note that all these operations require knowledge and maximum caution, because they affect the hardware.
conclusions
It is worth understanding that the above settings are only experimental. They may be suitable for your system or leave it in its original state. Therefore, you should not expect unprecedented changes in games from this process. This option is usually suitable for owners of weak PCs and laptops. When the user is fighting for every frame per second. As users note, this choice made it possible to reduce both the number and time of microfreezes and slightly increased the FPS indicators.
The same can be said about adjustments in Nvidia Inspector. In addition to the fact that you need to clearly understand what you are changing and how you are adjusting, you will have to spend a lot of time creating ideal system parameters. Otherwise, your system will crash or your drivers will be lost. Therefore, if you have no idea what exactly you are changing and what each adjustment parameter means, it is better not to overclock.
How to download and install?
Nvidia Inspector is distributed using a free model, so you can download it completely freely via the Internet from the official website in Russian. The program does not require installation:
- after unpacking, two files will be available to you - “nvidiaInspector.exe” and “nvidiaProfileInspector.exe”;
- the file “nvidiaInspector.exe” is the main utility through which the GPU is monitored and overclocked;
- the file “nvidiaProfileInspector.exe” is an additional editor of video driver profiles for simple and quick optimization of games.
Overclocking a GeForce video card
Before you start overclocking,
you need to find out the indicators of the above parameters of the video card in its normal state.
For this purpose, you can use the free utility GPU-Z
.
• GPU-Z
:
⇒
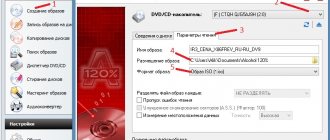
After installation and launch, the GPU-Z utility will show detailed information about the computer’s video card, including the data we need.
The image shows that the experimental GeForce GTS 450 in normal mode has the following parameters (circled in red): • graphics core frequency (GPU Clock) - 783 MHz;
• frequency of shader units (Shader) - 1566 MHz; • video card memory frequency (Memory) - 902 MHz (1804). Please also note that with these parameters, the GeForce GTS 450 video card demonstrates the following productivity (circled in green): • PixelFillrate - 6.3 GPixel/s • TextureFillrate - 25.1 GTexel/s • memory bandwidth (bandwidth) - 57, 7 GB/s. To change these parameters we will use the free program nVidia Inspektor
.
• nVidia Inspector
:
⇒
nVidia Inspektor does not require installation.
After downloading, just run it. A window will open, in the lower right corner of which there is a button called “Show Overclocking”. You need to click on it with the mouse and in the next dialog box confirm the opening of additional parameters (click the “Yes” button). After this, the video card overclocking
(see image).
First, let's raise the core frequency (GPU Clock) and shader unit frequency (Shader Clock). These parameters are interrelated. Therefore, increasing the frequency of shader units will automatically entail an increase in the frequency of the graphics core. To increase it, you need to move the Shader Clock slider to the right. I do not recommend increasing the frequency by more than 15% of the original one. If for our GeForce GTS 450 we raise the Shader Clock by 15% of the original (1566 MHz), we will get somewhere around 1800 MHz. In cases with other video cards, the performance will naturally be different. By increasing the Shader Clock, you can see that the graphics core frequency will also increase. For the GeForce GTS 450 Shader Clock was increased to 1800 MHz, the graphics core frequency automatically increased to 900 MHz (see screenshot). For the changes to take effect, you must click the “Apply Clock&Voltage” button.
Before you move on to increasing the frequency of the video card's memory, you need to make sure that it is stable with the new parameters of the core and shader units.
To this end, the video card needs to be tested to perform some task related to processing graphics data. An excellent stability test is the free program FurMark
.
•FurMark
:
⇒
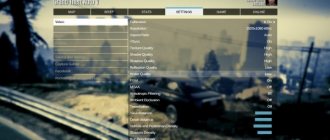
To check the video card, install and run FurMark. In the program window, press the “BURN-IN test” button and watch the picture (“rotating hairy donut”, see image). If for a long time (at least 10-15 minutes) no artifacts appear on the image (flickering, dots, blinking and other signs of instability), then the video card with the new parameters is working normally. In addition, during FurMark testing it is necessary to monitor the temperature of the video card. The temperature graph appears at the bottom of the FurMark window. The temperature should not exceed 90 degrees C. If artifacts appear or the temperature becomes too high, you need to stop the test (by pressing the Escape button), slightly reduce the frequency of the video core and shader units (in the nVidia Inspektor program) and then repeat the test.
When the optimal frequency for the core and shader units is found, you can continue overclocking the video card.
We return to the nVidia Inspektor program window and increase the video card memory frequency in the same way (move the Memory Clock slider to the right). After changing the parameters, do not forget to click the “Apply Clock&Voltage” button to take effect. The stability of the video card with overclocked memory
must also be checked using the FurMark test. If artifacts appear, the memory frequency must be reduced until stability is achieved. In the case of our experimental GeForce GTS 450, the memory frequency was increased by 15% from 1804 MHz to 2075 MHz. Determining the maximum operating frequencies for the video core, shader units and memory is the longest and most difficult stage of overclocking. After its completion, all that remains is to slightly increase the video card’s supply voltage to ensure higher stability of its operation. To do this, in the nVidia Inspektor program window you need to slightly (1 “step”) move the “Voltage” slider to the right. For the GeForce GTS 450, the voltage was increased from 1.075 V to 1.125 V. To make the changes take effect, do not forget to click the “Apply Clock&Voltage” button (see image above). The nVidia Inspektor program allows you to save the new video card settings to a separate file. In the future, in order to quickly transfer the video card from normal to overclocked state, it will be enough to simply run this file. Let's create such a file for the settings we have made. To do this, in the program window you need to click the “Creat Clocks Chortcut” button. A settings file will be created on your computer desktop.
If you want your graphics card to automatically overclock when you turn on your computer
, you need to add this file to a folder called “Startup”. Windows opens all the files in this folder during startup, so the video card will automatically overclock when you turn on the computer.
In Windows XP, Vista, 7, the Startup folder is located in the Start menu. You need to find it there, right-click on it and select “Open” in the menu that appears.
In Windows 8 and Windows 10, opening the Startup folder is a little more difficult. Detailed recommendations on this issue are located here.
The video card can also be overclocked “forever”, that is, it can be made to constantly operate at higher frequencies of the graphics core and video memory without using nVidia Inspektor or any other program. For this purpose, the increased frequencies suitable for it, which were determined in the manner described above, must be flashed into its BIOS. Instructions for flashing the BIOS of a video card are available here.
How to set up and use it correctly?
The utility offers a number of basic functions:
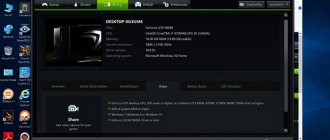
- Monitoring the GPU. After opening the program, the user will see a main window with all available information about the GPU. In the upper left corner there is a “Sensor Monitoring” button, which opens access to graphs, where you can always configure a separate display of any parameters of interest, including the load on the video card. The function of taking a screenshot and saving sensor indicators into a separate file for further use is available.
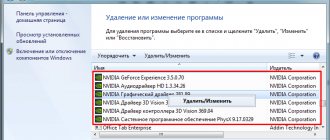
- Editing driver profiles. The function is available both through the main window (the button next to the version) and through a separate ProfileInspector executive file. Don’t be immediately intimidated by the abundant number of parameters, because it is in this menu that you can optimize games for your particular adapter. To set up games:
- select an application from the list (or add it through the “Add Application to current profile” button);
- we edit the necessary parameters, information about which can be found on the Internet (for most games Antialiasing, Anisotropic filtering and Texture filtering are of great importance).
- How to overclock a video card? The process of increasing performance by overclocking a graphics adapter is simple, but quite dangerous, so be sure to think twice before doing something like this. If you still decide, then launch the utility and in the main window click on the “Show Overclocking” button. There are several options here:
- GPU Clock (graphics processor frequency), access to which is closed by default, and therefore you need to edit it through another slider, which will be discussed below.
- Memory Clock (memory frequency) is one of the main sliders used when overclocking a video card, so increase it very carefully (no more than 5-10% of the initial value, depending on the adapter model).
- Shader Clock (shader frequency) is the second of the main parameters that needs to be increased (no more than 5-10% of the initial value, as in the case of memory) and this will automatically affect the GPU Clock.
- Voltage (voltage) – add one or two steps of the slider for stable operation of the adapter.
- The Fan parameter allows you to set a fixed fan rotation value in percentage, but it is better to always check the Auto box, because otherwise it will create additional noise unnecessarily.
During overclocking, you must constantly test the video card using a special program (3D Mark, FurMark or similar), and in case of errors, distortions, or the adapter temperature rises above 90 degrees, reduce the value of either Memory Clock or Shader Clock and try again.
Carefully monitor the results of all tests and try not to push the maximum out of the video card, because this can greatly reduce its service life.
Since overclocking occurs at the driver level, and not directly through the hardware, after all operations you can save the template as a separate file so that the user does not have to move the sliders every time. To do this, just click the “Creator Clocks Shortcut” button and the corresponding shortcut will appear on the desktop, and using the right mouse button (Create Clock Startup Task) you can add the function to startup.
Video on overclocking an Nvidia video card using Nvidia Inspector:
RQNR
NVIDIA
Inspector
is a utility designed primarily for configuring a video card.
But in this guide we will learn how to use it to increase FPS in any game. Of course, if you have a video card from NVIDIA. Unfortunately, there is nothing like this for AMD and you can only suffer. But don’t worry, we have optimizations for many games that are not tied to the graphics accelerator model. Watch here
1. First of all, you need to directly download this utility. Current version - here
2. Having unpacked the archive, we will see two files - “nvidiaInspector.exe” and “nvidiaProfileInspector.exe”
3. The article is divided into 2 parts. If you do not need a description of the program and its capabilities, then skip straight to the second part.
Part 1. Opening nvidiaInspector.exe we will see:
The main window of the program where you can see all the information about your graphics accelerator. Design very similar to GPU-Z
By clicking the “sensor monitoring” button in the upper left corner of the program. A window will open with load graphs and information on your graphics adapter. By right-clicking on the window with graphs, you can configure individual parameters that will be displayed in this window. And this window can also be superimposed on top of any windows and be a good widget for monitoring.
Using the button above, you can take an automatic screenshot of the main window and download it from the photo hosting site Techpowerup.
Let's move on to something more interesting and hot. By clicking on the button located in the lower right corner, namely “Show Overclocking”. We will be presented with a window with which you can overclock your graphics adapter. Just do this at your own risk. Although modern video cards are almost impossible to break using this method, because... they provide many protection measures and, if something happens, they themselves reset all settings and reboot your PC in special cases. But we warned you.
Now that we've sorted this out, let's move on to the second part.
Part 2. Game optimization.
Open the file - “nvidiaProfileInspector.exe”.
nvidia Profile Inspector main window
Do not be alarmed by such a large number of incomprehensible parameters. In this case, we are interested in the profile selection line in the upper left corner. We select any desired game there and begin setting up the parameters.
Note:
If your game is not in this list, then you should add it by clicking on the “Add Application to current profile” button.
And select the game executable file. In this case, “FarCry5.exe”.
Well, that's all, you're almost gorgeous. Now all that remains is to select the parameters. For the vast majority of games, these values will be optimal:
Note:
- The higher the LOD Bias value, the worse the texture. LOD bias +3.0000 - maximum value.
After you have set all the values that are marked in red, do not forget to click the Apply changes button so that your values are saved.
Congratulations, you are awesome and have just learned how to use NVIDIA Inspector. But wait, run away. That's not all. Sometimes some games require a unique selection of values. And we will share this information here, let's go:
The game name is a clickable link and it leads to the NVIDIA Inspector profile for that game.
Far Cry 5
Fortnite
If your game is not on the list, then follow all the steps from “Part 2” of this article.
FPS Boost
An outdated graphics adapter is a real problem for a computer game lover. In the event that it is impossible to buy a new card, every FPS will become a valuable addition. Nvidia Inspector will help us with this:
- overclocking the GPU will increase the number of frames by 10-15%;
- competent configuration of the game profile via ProfileInspector will add another 4-5%.
Be sure to experiment with the advanced anti-aliasing, texture filtering, synchronization, and anti-aliasing features.
Owners of weak PCs, for example, should disable “Antialiasing – Transparency Supersampling”, and to regulate texture detail, you can use “Texture Filtering – LOD Bias”, reducing the load on the system.
As a result, the user will receive a significant increase in FPS and the opportunity to try previously unavailable games.
Using NVIDIA Profile Inspector
The Profile Inspector software is a bit like the NVIDIA Control Panel. But it is more suitable for fine-tuning games. You can run it from the downloaded archive or in the NVIDIA Inspector program, click Start Profile Inspector (opposite the driver version).
It contains many parameters for image management, divided into sections: Compatibility , Synchronization and update , Anti-aliasing , Texture filtering , General , SLI , Stereo and others.
You can experiment with all the graphics options at your leisure. In the Profiles , specify the desired application, otherwise all settings will be applied globally. Having selected the desired parameter, change its value and click Apply changes .
Conclusion
The NVIDIA Inspector utility allows you to monitor data from sensors and actually perform overclocking. Previously, we overclocked the video card using MSI Afterburner. The archive contains the program and the NVIDIA Profile Inspector add-on. With its help, you can fine-tune the graphic parameters of games.
What to do if the video card does not work or does not see?
If you have problems starting or detecting the adapter, do the following:
- Download the latest version of the program and make sure it is installed correctly.
- Check your Nvidia driver version. If necessary, remove them manually and download fresh ones from the manufacturer’s official website.
- Install the .NET FrameWork library package version 2.0.
The utility will be useful to all owners of Nvidia video cards. Fresh products require careful attention, but with old graphics adapters you can always experiment and achieve amazing results. The main thing is to follow the instructions and act carefully.
NVIDIA Inspector - This utility is a very powerful software package that is used to change various characteristics of a video card. Nowadays a very popular topic is video card overclocking. In this article we will talk about overclocking an NVidia video card.
A program for NVIDIA video cards that has a number of useful features: - obtaining brief information about the characteristics of an NVIDIA-based video card; — monitoring of frequencies, GPU voltage, temperature and operation of the cooling system, with the possibility of logging; — independent overclocking for each performance level; — change in GPU supply voltage; — setting a fixed fan speed on the card; — NVIDIA driver profile editor versions 256.XX and later; — managing the performance level of the video card depending on the application;
As we can see, with the help of this thing you can efficiently overclock your video card. ; The program works without installation, you just need to download and unzip the nvdiainspector folder to any location.
Let's start with the most IMPORTANT! Ignorant use of a program to overclock a video card can lead to damage. Increasing the operating frequencies of the video card leads to an increase in the temperature of the chip and to an increased load on the cooling system. When you control all the important parameters, the risk of breaking the card is negligible, so let’s dive into this topic headlong.
So, let's begin:
1. Launch the nvdiainspector program. The main window appears in front of us:
1) The name of your video card 2) The name of the core 3) Shader version 4) Memory bus width 5) Memory type 6) CPU voltage 7) Amount of internal memory Video card driver version 9) Video card processor temperature 10) Cooling system cooler rotation speed % 11) Cooler rotation speed (rpm) 12) Settings obtained during overclocking 13) Recommended settings 14) Settings set by the manufacturer
2. Before we start overclocking our video card, we will need to run 'Sensor Monitoring'. It is located in the main menu, in the upper left corner - .
* The lowest indicator is Real Time Temperature. For us, an important factor is core temperature. At high temperatures, our video card may simply burn out, so we will not close the Sensor Monitoring window for now, but on the contrary, we will monitor the temperature. In each window there is the word 'Max: (degrees)', we make sure that our temperature does not exceed these indicators.
3. Next, open the main menu of Nvidia Inspector, and click on the Show Overclocking button; when clicked, a danger warning will appear. We need to click "Yes".
4. Now we have all the capabilities to overclock our video card. First, let’s make sure that we are not in energy-saving mode:
We must have (P0) , Level can be any..
5. Let's start overclocking our video card. The GPU Clock , Memory Clock and Chader Clock parameters are used to overclock it. We could increase the acceleration using the slider or the “-1”, “-10”, “-20”, “+1”, “+10”, “+20” . I recommend adding +10 (+7, +5) to each, no more! There is a high risk of fever! To test the operation of a video card with a new frequency, you can use the programs: FurMark or SpeedFan. If your temperature rises above the maximum, then reduce the acceleration to +5 and so on until we reach the desired result. Personally, I increased each parameter by +5; I’m simply afraid to put it higher on my weak video card. Once we have configured each frequency, click the “Apply Clocks & Voltage” button to save our new settings. If you messed something up, or want to return the default settings, then click on the button to the left “Apply Defaults”.
6. Using this program we can increase the rotation speed of the video card fan. To do this, you need to change the “Fan” parameter, which is located in the center of the window. If you increase it to 100%, you can hear a quiet noise in the system unit - this is the work of the video card fan. BUT, I categorically do not recommend saving settings with 100% magnification! It is advisable to check the “Auto” box, this is the best option. In this case, the video card driver will independently adjust the fan speed depending on the temperature and load level on the video card.
7. The last point will be saving. Overclocking a video card using the NVIDIA Inspector program is carried out at the driver level. This means that after restarting the computer, all changed values will be reset to their original level. You can correctly save all our settings as follows: After we have overclocked and are confident in our settings, click on the “Create Clocks Shortcut” button, it is located at the bottom of the window. Now it will appear on the desktop with our settings. After restarting your computer, just double-click on the shortcut and all your settings will return. If you want the new settings to be installed automatically, and this is the best option, then right-click on the same button and then click on “Create Clock Startup Task”.
We remind you that you need to use this program with caution. That's all, I hope I helped you in some way. (c)HONSAW