Extra paragraphs
First of all, before talking about how to remove large spaces between paragraphs in Word, it’s worth talking about a slightly different problem. Sometimes the culprit for such breaks is the negligence and inattention of the user himself. He can press the ENTER key twice instead of once. Thus, making two paragraphs. Now we will figure out how to remove spaces between paragraphs in Word if they are caused by double pressing ENTER.
Of course, you won’t see the number of paragraphs visually unless you activate a special option in Word. We'll talk about it now.
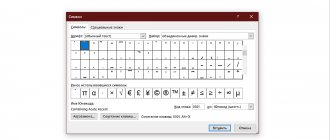
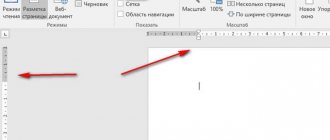
First you need to visualize non-printable characters. This is done by clicking the corresponding button on the toolbar. You can easily see its location in the picture below.
After clicking the button, all non-printable characters will become visible in the article. We are only interested in one thing - the paragraph. Its sign is the same as on the button that we pressed - “¶”.
Now, all you have to do is look through the entire text for double paragraphs. And if such are found, one of them can simply be deleted.
How to remove blank lines in Word | Small business
Since its introduction in 1983, Microsoft Word has revolutionized the way we work. With each passing update it only becomes easier to use and more complex in terms of features. However, formatting has often been an issue with the software, as the slightest changes to a document can result in large amounts of empty space.
Removing white space in a Word document is as much a part of working in Word as creating the documents themselves. While small sections are easy to manage, finding all the white space in a large document can take a significant amount of time if you don't know what to do. Luckily, there are steps you can take built into the software that make organizing your documents quick and easy.
Compact a Word Document
When creating a Word document, you'll want to keep it simple. Too much white space will make the text less readable. However, line breaks, page breaks, and spaces have their purpose. They define where new sentences, paragraphs, and pages begin, but too much white space in a Word document is not necessary and should be avoided.
White space increases the time it takes to read documents and increases the number of pages printed. Condensing documents so they only contain necessary breaks is more environmentally friendly since you'll use less paper and ink to print them. When Word documents are used digitally, spaces are less of an issue, but formatting them correctly makes them easier to read and allows for a better flow of information.
Use Word's Find and Replace tool
For smaller Word documents, you can remove individual blank spaces using the Delete button on your keyboard. For a row of spaces, double-click the empty area to select the entire row and click the Delete button. To remove blank spaces at the end of a document, select those areas by clicking and dragging, and then click the Remove button.
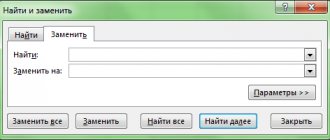
For large documents, Techwalla.com suggests using the software's Find and Replace feature, which will allow you to remove all unnecessary spaces between paragraphs, leaving the ones you need untouched. To do this, go to the Home tab in the toolbar, find Editing Options ", scroll down to "Find" and click "Replace" in the submenu. In the dialog box, select More in the lower left corner and select Paragraph Mark. Its symbol will appear in the “Find” field; Leave the Replace With field blank and click Replace All.
Removing double spaces between sentences
Find and Replace is also useful for removing double spaces. According to LaptopMag.com, you should select all the text in the document by pressing CTRL+A and open the Find and Replace window. Then enter two spaces in the Find box using the Spacebar. In the Replace With field, enter just one space using the spacebar and click Replace All. Any additional double spaces will be removed.
When removing extra spaces in Word documents, it's important to remember that every action you take will affect the appearance of the entire document. For example, if a section starts at the top of the page, any whitespace you remove will pull that section's title onto the page before it. When you remove whitespace, you'll need to realign any affected areas.
.
Applying styles
Now, moving on to more serious problems, we will talk about how to remove spaces between paragraphs in Word 2007, if the reason for their appearance was incorrect formatting. We will analyze the simplest way, we will change the style of the text itself. Why exactly 2007? The answer is simple. The fact is that it was in this version of the program that these same styles appeared. But if you have a later version, then you will have them too.
So, the point is simple. Initially, you need to select the text itself. If all of it will be subject to change, you can use the CTRL+A keys. Having selected the desired fragment, you need to go to the “Home” tab, if you are not already on it. There, pay attention to the “Styles” area. You can scroll through them using the arrow in the center or open the entire list using the bottom one.
By hovering your mouse over a style, you will see how your text changes after applying it. Finally, having found what you like, apply the changes.
Setting paragraph spacing
Thanks to more advanced settings, you can set breaks between paragraphs of different types and set specific values for indents. To do this, you need to repeat the following steps:
- Select the desired part of the text;
- Open the “Home” tab, click on the “Change Styles” button;
- In the drop-down window, hover your mouse over “Paragraph Spacing”;
- Smoothly navigate to the new Inline pop-up window and select the type of indentation you want.
Please note that each paragraph spacing option presented has built-in line spacing values.
For advanced settings, go to the “Custom paragraph spacing” line.
In the “Manage Styles” window, open the “Default” section, set the exact values in the “Spacing” and “Paragraph Position” subsections. Save the changes by clicking the “Ok” button.
Using Paragraph settings
If among all the styles you have not found a suitable one, then it is better to use full customization. Now we will tell you how to remove large spaces between paragraphs in Word through the “Paragraph” settings menu.
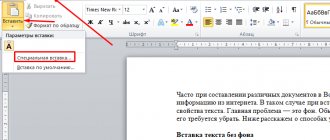
Initially, you need to get into this very menu. To do this, click the corresponding button on the toolbar. It is located on the “Home” tab, and its exact location can be seen in the picture below.
Once in the settings, make sure that the first tab is selected - “Indents and spacing”. As you might guess, among all the parameters we are interested in only one - “Interval”. You can see the exact location of the distance settings between paragraphs in the picture.
In order to change the amount of space between paragraphs, you need to change the value of these two counters. In the case when you want to completely remove the gap, set the value to “0”.
Once you have entered all the parameters, you should click the “OK” button to apply them. If you want to set the entered parameters to default, click the “Default” button, and in the window that appears, select for which document you want to save the settings.
Changing the distance between paragraphs
When the distance between paragraphs is large, you can easily reduce it, and vice versa, increase it. The “Paragraph” window will help you make the necessary settings. Select the text and open the “Paragraph” window by clicking on the arrow button in the “Paragraph” area in the main tab.
In the new window, in the “Interval” subsection, enter the required values in the “Before” and “After” fields. A small value in the “After” column will help reduce the indentation size if an indentation is necessary after the paragraph.
In the “Sample” subsection you can see the changes being made. By changing the values in the “Before” and “After” items, you can either increase or decrease the distance between paragraphs.
Note. You can open the “Paragraph” dialog box by right-clicking and selecting “Paragraph” from the list. Initially, select the required fragment in the text accordingly.
Change it in a couple of mouse clicks (first method)
It should immediately be noted that using the previous method, you could make the most flexible adjustment of the spacing between paragraphs. Well, now we’ll talk about how to remove spaces between paragraphs in Word so that they don’t exist at all.
This is done quite simply, you just need to find the desired button on the toolbar. It is located, as usual, on the “Home” tab, and you can see its exact location in the picture.
Click on it to open a drop-down menu. In it we are interested in only one line - “Remove space after paragraph.” Of course, you can add space before the paragraph here, as well as set line spacing, but this is done at will.
This was not the last way to remove spaces between paragraphs in Word; there is one more, which we will now move on to.
Word 2020: Line and Paragraph Spacing
Lesson 9: Spacing Between Lines and Paragraphs
/ru/word2016/indents-and-tabs/content/
Introduction
When designing a document and making formatting decisions, you need to consider lines and paragraph spacing . You can increase the spacing to improve readability and decrease it to fit more text on the page.
Optional: Download our practice document.
Watch the video below to learn how to adjust line spacing and paragraph spacing in documents.
About line spacing
Line spacing is the space between each line of a paragraph. Word allows you to customize the line spacing: single-spaced (one line high), double-spaced (two lines high), or any other amount you want. The default spacing in Word is , 1.08 lines, which is slightly larger than single spacing.
In the images below you can compare different types of line spacing. From left to right, these images show default, single and double spacing.
Line spacing is also known as leading (pronounced to rhyme with wedding ).
To format line spacing
- Select the text you want to format.
- On the tab Homepage click command Spacing between lines and paragraphs , then select the desired line spacing.
- The line spacing in the document will change.
Fine-tuning line spacing
Your line spacing options are not limited to the options in the Line and Paragraph Spacing . To adjust spacing more precisely, select Line Spacing Options from the menu to open the Paragraph . You will then have several additional options that you can use to adjust the interval.
- At least : Like the Exact , here you can choose how many interval points you want. However, if you have text of different sizes on the same line, the spacing will increase to accommodate the larger text.
- Some : This option allows you to enter the required number of spaced lines. For example, by choosing Multiple and changing the interval to 1.2 will make the text slightly wider than single-spaced text. If you want the lines to be closer together you can choose a smaller value, for example 0,9 .
Spacing between paragraphs
Just as you can format the spacing between lines in a document, you can adjust the spacing before and after paragraphs. This is useful for separating paragraphs, headings, and subheadings.
To format spacing between paragraphs:
In our example, we'll increase the space before each paragraph to separate them a little more. This will make it easier to read.
- Select the paragraph or paragraphs you want to format.
- On the tab Homepage click command Spacing between lines and paragraphs . From the drop-down menu, select Add a space before a paragraph or Remove space after paragraph . In our example we will choose Add a space before a paragraph .
- The spacing between paragraphs in your document will change.
From the drop-down menu, you can also select Line Spacing Options to open the Paragraph dialog box. From here, you can control how much space there should be before and after a paragraph.
You can use Word's handy Set as Default feature to save all the formatting changes you've made and automatically apply them to new documents. To learn how to do this, read our article on changing default settings in Word.
Challenge!
- Open our practice document.
- Select a date and address block. This starts with April 13, 2016 and ends with Trenton, NJ 08601 .
- Change distance
.
Change in a couple of mouse clicks (second method)
Now we will look at a way to remove spaces between paragraphs in Word 2010 and older. The fact is that earlier versions of the program do not have this function.
So, initially you need to go to the “Page Layout” tab. There, look for an area called “Paragraph”. Now look for the fields that have “Interval” written above them. They are responsible for the distance between paragraphs. To remove spaces completely, enter values of "0". If you want to adjust the distance, then set the parameters manually.
Deleting a paragraph from the first line
Any text from the left side of the field is automatically set to an indent value. But this meaning is not always appropriate. To remove paragraph indentation in a certain section of text, you need to use this method.
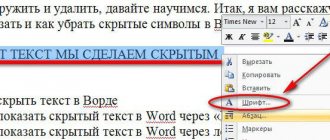
Place the mouse cursor before the beginning of the text in which you want to remove the red line. The ruler will display the first line indent icon.
Click on this icon and drag it to the very beginning of the ruler, connecting it with the other signs: “Protrusion” and “Left indent”.
Note. To remove unnecessary indentation, you can use the “Backspace” button. Placed at the beginning of the line.