Introduction
Mikrotik routerboard routers have been on the market for a long time, but have still not gained much popularity. Although they have occupied their niche. Personally, I think that this is an excellent router for the home; it has no competitors in terms of reliability. This is truly a router that you can set up once and forget about. Personally, I have never come across a device that had to be forced to reboot in order to bring it out of a coma, as is often the case with other budget hardware.
Distribution among home users is limited primarily by the complexity of setup. And although it may seem to a more or less advanced user that there is nothing complicated here. But in fact there is. And I often came across requests to set up a router at home to distribute the Internet via wifi, since users who bought it on someone’s recommendation could not fully configure the required functionality themselves, although there are enough instructions on the Internet.
I want to fill this gap and write detailed step-by-step instructions for setting up Mikrotik from scratch for dummies, using the example of the most suitable model for home use, the RB951G-2HnD. I have long ago prepared a personal cheat sheet in the form of a text file. Using it, I literally set up a router in 10 minutes and give it to the user. That is, there is really nothing complicated if you know what you are doing. I will write material based on this cheat sheet.
Perhaps an experienced user will have nothing to learn here, or maybe I myself am doing something not quite correctly or not optimally. Please give a hint or remark in the comment if this is indeed the case. I write articles also in order to learn something new myself. As one Eastern wisdom says, to gain new knowledge, you need to share what you have with others. This is exactly what I do on the pages of this site.
Next, I offer a short list of what we will do in the article so that you understand what will be discussed.
Short list of actions
Time required: 2 hours.
Setting up a Mikrotik router.
- Reset router settings.
I suggest starting to configure Mikrotik from scratch, without factory settings. This allows you to better understand and understand the principles of operation of the device. - Firmware update.
I’ll tell you how to download and upload the latest firmware to Mikrotik. - Combining ports into a bridge.
Since we are analyzing the basic setup of Mikrotik, all ports along with wifi will be combined into a single network bridge so that devices connected to them can interact with each other. - Setting up an IP address.
As an example, I will show you how to set up a static IP address in a router. This is not such a trivial and obvious task as in some home devices. - Internet connection.
I show you what needs to be done to get the Internet working on the router itself. - Setting up a dhcp server.
I'm setting up a dhcp server on Mikrotik so that it distributes network settings to all devices on the local network. - Setting up NAT.
Mandatory setting for the Internet to work for devices connected to mikrotik. - Wifi setup.
I show you the basic wifi setup in Mikrotik. Only the minimum necessary settings so that you can connect and access the Internet via wifi. - Changing the administrator password.
I show you how to set or change the router access password. - Setting the time.
Optional setting. With the wrong time, everything will also work, but when it is set correctly and synchronized, it is more convenient and practical.
MikroTik routers
MikroTik is a Latvian company established in 1995. Official name – Mikrotikls Ltd. And MikroTik is a brand under which network equipment is sold, including routers, as well as operating systems for such devices. Yes, this manufacturer has powerful software - RouterOS based on Linux. This operating system expands the capabilities of the router, allows you to configure it for various tasks and puts MikroTik on par with equipment from Cisco and Juniper . But is it worth purchasing such a router for use on a home network? Let's see what advantages MikriTik routers have in comparison with other routers. And what are their disadvantages.
Description Mikrotik RB951G-2HnD
Here it is, the hero of today’s article - Mikrotik RB951G-2HnD. Its description, reviews and cost can be quickly checked on Yandex.Market. Judging by the number of reviews, we can already conclude that this router is somewhat popular.
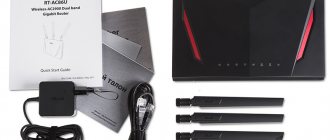
Appearance of the device.
An important feature of this router, which I personally actively use, is the ability to power it using a special poe adapter.
He is on the right in the image. Take a standard power supply from the router and a poe adapter. The power supply is connected to the adapter, and a patch cord is already sent from the adapter to the first port of the routerboard. The router can be hung on the wall anywhere, there is no need to be tied to an outlet. I should immediately note that the router can only be powered with a Mikrotik poe adapter. It has a different standard and the usual 802.3af poe switches will not work.
There is a similar model RB951Ui-2HnD. It differs from the one I’m describing only in that it has a 100Mb port, while the RB951G-2HnD has 1Gb . If these differences are not fundamental for you, then you can buy a cheaper model. Otherwise they are identical.
We will slowly move on. What is the easiest way to set up Mikrotik? I use the standard winbox utility for this. You can also use the web interface, but personally I find winbox much more convenient. So to continue setting up, download it to your computer.
Resetting the router
We connect the router to the network, supply power and launch winbox on the computer. Go to the Neighbors and wait for the utility to find our Mikrotik. This may take some time. Just in case, you can click Refresh if the router is not detected for a long time.
Click on the Mac address of the device, it should be copied into the Connect To . The default password for logging into mikrotik routers is empty, and the user is admin . Enter your username and leave the password field blank. Click connect. We are greeted by an information window that provides a description of the standard settings.
Here you can either leave them or delete them. I always delete it, since the standard settings most often do not suit a specific situation. Let me give you a few examples why this is so:
- I powered my router via the first port via a poe adapter and therefore am forced to use this port as a local one. In the default settings, this port is used as a wan port to receive Internet from the provider.
- The default settings are to automatically receive settings from the provider via dhcp. If you have a different type of connection, then the standard setting is not suitable for you.
- By default, the address space is set to 192.168.88.0/24. I personally don’t like default networks, because if you accidentally plug a new device into them, where the default address is also clogged, then problems will begin on the network. This may not be relevant at home, but in commercial organizations I had to deal with this. That's why I always change the grid just in case.
So we click Remove Configuration to remove the settings. After this, the router will reboot. We wait about a minute and connect to it again.
If for some reason you did not delete the presets immediately, you can reset mikrotik to factory settings later. To do this, you need to first type system , and then reset . You will be asked for confirmation and after that the routerboard will reboot with factory settings.
Resetting RouterOS installed on x86
To reset passwords and settings of the RouterOS operating system installed on an x86 computer, you must boot from the RouterOS installation disk. When the package selection window appears, press i
and answer
n
to the question
Do you want to keep old configuration?
Confirm the reset by pressing
y
.
Let's configure the pptp client on mikrotik. All settings made below can also be applied to setting up the l2tp client. Select menu PPP(1)→plus(2)→PPTP Client(3)→Dial Out(4)→fill in the IP address of the server provided by the provider in the Connect To(5)→enter login(6) and password(6)→set check the Add default route(7) box. Click OK to complete this setting.
Let's move on to the Firewall settings. To do this, go to IP(1)→Firewall(2)→Filter Rules(3)→here you need to change the rules where In. Interface is set to ether1(4)(5) on pptp-out1.
Select the required rule and double-click with the left mouse button (1), going into the settings in the General tab (2) in the In field. Interface(3) select pptp-out1.
The same procedure must be followed for the second rule. After this, you can move on to the next setup section.
Let's configure NAT Mikrotik rb951g 2hnd. Select the menu IP(1)→Firewall(2)→NAT(3)→double-click on the mascaquerade(4) rule→set the Out Interface(5) field to pptp-out1→apply the Apply(6) settings.
This completes the setup. All that remains is to check the functionality.
I decided to open a section on this site with articles on MikroTik routers. And I decided to start with instructions for entering the settings of the MikroTik router. Let's take a closer look at how to log into RouterOS (on which these network devices run) at 192.168.88.1, and we'll deal with possible problems. When the page at 192.168.88.1 does not open and does not go into the router settings.
Many people avoid MikroTik routers. For the reason that they have a very complex web interface, and they are very difficult to configure. The RouterOS operating system on which these routers run is a bit complex and heavily loaded with different settings. On the one hand, this is bad, since it will be difficult for a simple user who is not well versed in these features to find and configure any function. But on the other hand, it is possible to very finely customize your MikroTik. In addition, these routers are very reliable and productive. And the price for them is good.
This is my first instruction on MikroTik, and my first acquaintance with the brand itself and the RouterOS system as well. And I want to say that there is nothing complicated there. All basic settings can be set on the main page (Wi-Fi setup, Internet connection, changing the web interface password). All you need is to connect to the MikroTik router via a Wi-Fi network or network cable, go to the IP address 192.168.88.1 through a browser, set the necessary parameters and save.
Firmware update
After clearing the settings, I recommend immediately updating the firmware of the Mikrotik router. To do this, go to the Download section of the official website and download the required file. In this case it is the mipsbe the Main package download package . Download it to your computer and connect to the router using winbox. Select the Files . Then open two windows side by side - one with the firmware file, the second with winbox and drag the file from the folder in winbox to the list of files with the mouse.
We wait for the firmware to finish downloading and reboot Mikrotik through the menu section System -> Reboot . The firmware will be updated while the router is booting. You will have to wait about 3 minutes. After this, we connect to the device again. After updating the firmware, you need to update the bootloader. This is done in the menu item System - RouterBoard . Go there, check the Current Firmware and Upgrade Firmware lines. If they are different, then click the Upgrade . If they are the same, then you can do nothing. The changes will take effect after a reboot.
You can check the installed firmware version in the System - Packages .
In my case, the firmware version is 6.43.4. In the future, when the Internet is configured on the router, you can update automatically in this section by clicking on Check For Updates .
The firmware has been updated, you can start setting up.
Configuring basic router settings
The Mikrotik router has a lot of settings, but in order for it to perform its main functions, it is enough to know the main ones. Therefore, do not be intimidated by the abundance of tabs, sections and parameters. Their purpose can be studied in more detail later. First you need to learn how to make basic device settings. More on this below.
Connecting to a router using Winbox
The Winbox utility, which is used to configure Mikrotik devices, is an executable EXE file. It does not require installation and is ready to use immediately after downloading. Initially, the utility is designed to work on Windows, but practice shows that it also works perfectly on the Linux platform under Wine.
After opening Winbox, its start window opens. There you need to enter the IP address of the router, login (standard - admin) and click on “Connect”.
If you can’t connect by IP address or it is unknown, it’s not a problem. Winbox provides the user with the ability to connect to the router using the MAC address. To do this you need:
- At the bottom of the window, go to the “Neighbors” tab.
- The program will analyze the connections and find the MAC address of the connected Mikrotik device, which will be displayed below.
- After this, you must first click on it with the mouse, and then, as in the previous case, click on “Connect”.
The connection to the router will be established and the user will be able to proceed to its direct configuration.
Combining ports into a bridge
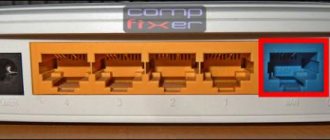
One of the features of mikrotik routerboard routers is the lack of preset port settings. I explain in my fingers what it is. When buying a regular budget router, you will see labels for the ports. One of them will definitely say WAN, the others will either say nothing or LAN. That is, you will already have one port configured in a certain way for connecting the Internet and the remaining ports will be combined into a switch for the convenience of connecting equipment.
This is not the case with Mikrotik. There, all ports are equal and absolutely any WAN port you want can become. Since I use the 1st port to connect power, I will use the 5th port as the WAN. And I will combine all the rest into a single network using a bridge and add a wifi interface to them. To do this, go to the Bridge and create a new bridge1.
We leave all the settings as default. We now have bridge1. Go to the ports tab and click the plus sign. Add all ports to brdige1 except WAN. In my case this is port 5.
We have combined all the necessary interfaces into a bridge to organize a single space for all connected devices.
Setting up a static IP
Before this, we connected to the router using the MAC address. Now you can assign it a static local IP address, at which it will be accessible on the network. To do this, go to the IP -> Addresses and click the plus sign.
Specify any subnet in the Address section. I chose 192.168.9.0. Accordingly, we assign the address 192.168.9.1/24 to Mikrotik. Select bridge1 as the interface. The Network field can be left blank; it will be filled in automatically. Now our router is accessible both via local interfaces and via wifi (which still needs to be configured) at 192.168.9.1.
Internet setup in Mikrotik
Now is the time to connect to your provider and set up the Internet. It is difficult to cover all possible connection options. There can be many of them. I will look at the two most popular methods:
- You receive settings from the provider automatically via dhcp.
- The provider gave you ready-made settings and you enter them manually.
As I wrote earlier, we will use port 5 to connect to the provider. Connect the provider's wire.
To get settings for dhcp, go to winbox in the IP -> DHCP Client and press the plus sign. Select the ether5 interface and click OK.
If you did everything correctly, you will see what IP address you received. In the IP -> Addresses there will be information about the settings.
Let's consider the option when the provider has provided all the settings and you need to set them yourself. Let's assume that our Internet settings are as follows:
| IP address | 192.168.1.104 |
| Mask | 255.255.255.0 |
| Gateway | 192.168.1.1 |
| DNS | 192.168.1.1 |
First, let's specify the IP address. We do the same as in the previous paragraph when setting up a static IP. Only now, instead of the bridge1 interface, we indicate ether5 and enter the corresponding address - 192.168.1.104/24. Here we immediately indicated both the address and the subnet mask.
Next we need to set the default gateway. Without this mandatory step, the Internet will not work. Go to the IP -> Routes and click the plus sign to add a default gateway. In Dst. Leave the Address as is 0.0.0.0/0, and enter the provider’s gateway in the Gateway field and click OK.
The Internet should be working now, but without specifying a DNS server, you can only access direct IP addresses. For example, you can ping the IP address of Google servers. Open New Terminal and check.
Now let's install the DNS server. To do this, go to IP -> DNS , in the Servers field enter the address of the provider's DNS server. If you have two of them, then by clicking on the triangle with its vertex pointing down, you can enter another value. Be sure to check the box next to Allow Remote Requests.
If you have an external IP address and have allowed remote DNS queries, be sure to configure your firewall and block all incoming connections. If this is not done, then your router may become a victim of fake DNS requests that are used for DDoS attacks.
That's all, we have completely installed the Internet provider settings. You can check and ping the usual site address.
The router itself already has Internet access. We need to configure it for users. To do this, we continue setting up mikrotik.
Setting up a local network
- IP Address: 192.168.88.1 (this is the address of your router, you can change it if you wish, or leave the default one)
- Netmask: 255.255.255.0
- DHCP: enable
- DHCP Server Range: 192.168.88.10 – 192.168.88.100 (the number of addresses that will be available on your local network)
- NAT: enable
- UPnP: enable
Setting up a dhcp server
In order for connected devices to receive network settings automatically from the router, a DHCP server must be configured on it. This is not difficult to do, I will now describe everything step by step. Go to IP -> DHCP , go to the DHCP tab and click DHCP Setup. We are asked to select the interface on which the server will run. Select bridge1.
Click next. Now you need to select the address space from which IP addresses will be issued. By default, the subnet that includes the router's IP address is specified. This is fine, leave the default value 192.168.9.0/24.
Next you need to specify the gateway address that clients will receive. Since Mikrotik itself will act as a gateway for them, we leave its address, which has already been proposed.
Now you need to specify the range of addresses that will be issued to clients. If it is not important to you and you do not know why it needs to be changed, then leave it as is. All free subnet addresses will be used.
At the last stage, enter the DNS server address that will be issued to clients. This can be either Mikrotik itself or the provider’s DNS server. This is not important, but it is better to indicate the router itself. So we write there the local address 192.168.9.1.
Leave the next parameter as default and click Next. This completes the setup of the dhcp server for the local network.
If we now connect any client to mikrotik by wire, it will receive network settings, but will not be able to access the Internet. Another important setting is missing - NAT.
Quick setup
After entering the router settings using the Winbox utility, the Mikrotik standard configuration window opens in front of the user. He is asked to delete it or leave it unchanged. If you need to configure the router as quickly as possible, you need to leave the factory configuration unchanged by clicking on “OK”.
To get to quick settings, you need to follow two simple steps:
- In the left column of the Winbox utility window, go to the “Quick Set” tab.
- In the drop-down list in the window that opens, select the operating mode of the router. In our case, “Home AP” is most suitable.
The Quick Set window contains all the basic settings of the router.
All information in it is grouped into sections dedicated to Wi-Fi, Internet, local network and VPN settings. Let's take a closer look at them. Wireless network
Wireless network settings are located on the left side of the Quick Set window. The parameters that are available for editing there are the same as when configuring routers of other models.
Here the user needs:
- Enter the name of your network;
- Specify the network frequency or select automatic detection;
- Select the broadcast mode of the wireless network module;
- Select your country (optional);
- Select the encryption type and set a password to access the wireless network. WPA2 is usually chosen, but it is better to check all types in case devices on the network do not support it.
Almost all settings are made by selecting from a drop-down list or checking a checkbox, so you don’t need to invent anything.
Internet
Internet settings are located at the top right of the Quick Set window. The user is offered 3 options, depending on the type of connection used by the provider:
- DHCP. It is present in the factory configuration by default, so there is no need to configure anything additional. Unless you need to check the MAC address if the provider uses a binding to it.
- Static IP address. Here you will have to enter the parameters received from the provider manually.
- PPPoE connection. Here you will also have to manually enter your username and password, as well as come up with a name for your connection. After this, click on “Reconnect”, and if the parameters are configured correctly, the parameters of the established connection will be displayed in the fields below.
As you can see, there is nothing difficult about changing the Internet connection parameters in the Mikrotik router.
The local network
Immediately below the network settings in the Quick Set window is the local network configuration. Here you can change the router's IP address and configure a DHCP server.
In order for the Internet to work normally, it is also necessary to enable NAT translation by ticking the corresponding checkbox.
After changing all the parameters one by one in the Quick Set window, click on the “Apply” button. The connection to the router will be lost. Restart your computer or simply disable and then re-enable your network connection. Everything should work.
Setting the administrator password
There is no password in the factory settings of Mikrotik routers. It is strictly forbidden to leave it in this state for safety reasons. Therefore, after completing the basic setup of your device, you should be sure to set an administrator password. For this:
- In the left column of the Winbox utility window, open the “System” tab and go to the “Users” subsection.
- In the list of users that opens, double-click to open the properties of the admin user.
- Go to setting the user password by clicking on “Password”.
- Set the administrator password, confirm it and apply the changes by alternately clicking on “Apply” and “OK”.
This completes setting the administrator password. If necessary, in the same section you can add other users or groups of users with different levels of access to the router.
NAT setup
NAT is a transformation, or as they also say, network address translation. I won’t tell you what it is, you can read it yourself on the Internet. All modern routers have a NAT function to provide subscribers with access to the Internet. So we will also configure NAT in mikrotik.
Go to the IP -> Firewall , open the NAT tab and click the plus sign. On the General tab we specify only one Out parameter. Interface - ether5 (interface for connecting to the provider), we do not touch everything else.
Go to the Action tab, select masquerade from the drop-down list. Leave the rest alone and click OK.
That's it, NAT is configured. Now if you connect a client by wire to one of the ports, it will receive network settings via DHCP and will have access to the Internet. All we have left is to configure wifi to connect wireless clients.
Setting up PPPoE
When connecting to the Internet using an ADSL modem to which a MikroTik router is connected via a network cable, you must first configure the ADSL modem in Bridge mode - transparent transfer of packets between physical interfaces.
Let's set up a client PPPoE connection on the MikroTik router:
- On the left select the PPP menu
- Using the blue plus, select PPPoE Client from the list
- We write the name ProviderInternet
- Interface, using
Configuring MikroTik PPPoE connection parameters:
Selecting a PPPoE MikroTik interface
- Name we indicate the name of the connection, in my case it is ProviderInternet
- In the Interfaces list, select the first WAN port ether1, which is connected to the provider
- Go to the Dial Out tab
- For User, specify the username
- enter the password
- Select the Use Peer DNS option
- Click the OK button.
After creating a PPPoE connection, the letter R should appear opposite it, indicating that the connection is established.
PPPoE connection on MikroTik established
It is necessary to check the operation of the PPPoE communication channel with the Internet
Using the command line, we check the availability via PPPoE connection of the WEB server on which this site 14bytes.ru is located - in the terminal, enter the command ping 14bytes.ru
ICMP packets reach the WEB server and are returned. The packet turnover rate round–trip time, RTT is 40ms. After sending 5 packets, it was clear that there was connectivity; I stopped the command by pressing Ctrl+C.
Without setting up a local network and converting NAT network addresses on the MikroTik router, the Internet will not work on client computers.
Setting up a wifi access point in mikrotik
Our router is almost ready to go. All that remains is to set up a wi-fi access point and you can forget about it :). Setting up wifi in Mikrotik deserves a separate article. There are a lot of nuances and possibilities there. We will now make the simplest setup that will suit and fully satisfy the needs of a home wifi router. And for deeper knowledge, you can use separate material on this topic.
First of all, we activate the wireless interface. By default it is disabled. Go to the Wireless , select wlan1 and click the blue checkmark.
The interface will change from gray to light. Go to the Security profiles tab, double-click on the line with the default profile. In the Mode field, select dynamic keys. Check the boxes next to WPA PSK and WPA2 PSK and aes ccm. In the WPA Pre-Shared Key and WPA2 Pre-Shares Key fields, enter the password for the future wireless network. I recommend using a long password (at least 12 characters) with numbers and special characters. Yes, it’s not very convenient to enter, but after I myself brute-forced hashes of simple passwords without any problems, I was convinced that it’s better to set a complex password if you don’t want anyone to connect to your wifi.
Save the settings. We return to the Interfaces and double-click on wlan1, the Mikrotik wifi interface settings open. Go to the Wireless tab. We set the settings as in my screenshot.
I draw your attention to the following settings:
- SSID is the name of your wireless network. Write what you want.
- Frequency - frequency corresponding to one of 12 channels. The very first value is the first channel and so on. Here it is recommended to select the channel that in your particular case is least occupied by other access points. If you don’t know what these channels are and how to check them, then don’t pay attention, you can select any value from the list.
Save the settings by clicking OK. That's it, the wifi access point on mikrotik is configured, you can check it. Launch any device, search for your network, enter your access password and check the Internet. Everything should work.
This completes the basic setup of Mikrotik, but I recommend making a few more settings for convenience and security.
Manual setting
Configuring a Mikrotik router manually requires the user to have certain knowledge and patience, since you will have to enter many different parameters. But the undeniable advantage of this method is the ability to configure the router as finely as possible, taking into account your own needs. In addition, a side effect of such work will be a significant expansion of the user’s knowledge in the field of network technologies, which can also be attributed to positive aspects.
Removing Factory Configuration
Removing the standard configuration of the router is the first step from which manual configuration begins. You just need to click on “Remove Configuration” in the window that appears when you first start the device.
If such a window does not appear, it means you have already connected to the router before. The same situation will occur when setting up a used device configured for a different network. In this case, the current configuration must be deleted as follows:
- In Winbox, go to the “System” section and select “Reset Configuration” from the drop-down list.
- In the window that appears, click on the “Reset Configuration” button.
After this, the router will reboot and will be ready for further configuration. It is recommended to immediately change the administrator name and set a password using the method described in the previous section.
Renaming network interfaces
Many consider the monotonous names of its ports to be one of the inconveniences of setting up Mikrotik routers. You can view them in the “Interfaces Winbox” section:
By default, the functions of the WAN port in Mikrotik devices are performed by ether1. The remaining interfaces are LAN ports. To avoid confusion during further configuration, they can be renamed in a way that is more familiar to the user. To do this you will need:
- Double-click on the port name to open its properties.
- In the “Name” field, enter the desired port name and click “OK”.
The remaining ports can be renamed LAN or left unchanged. If the user is not annoyed by the default names, there is no need to change anything. This procedure does not affect the operation of the device in any way and is optional.
Internet setup
Setting up a connection to the global network has its own options. It all depends on the type of connection the provider uses. Let's look at this in more detail.
DHCP
This type of setup is the simplest. Simply creating a new DHCP client is enough. For this:
- In the “IP” section, go to the “DHCP Client” tab.
- Create a new client by clicking on the plus in the window that appears. You don’t need to change anything additional, just click “OK”.
- The “Use Peer DNS” parameter means that the DNS server from the provider will be used.
- The Use Peer NTP parameter is responsible for using time synchronization with the provider.
- The value “yes” in the “Add Default Route” parameter means that this route will be added to the routing table and will have priority over others.
Connection with static IP
In this case, you must first obtain all the necessary connection parameters from the provider. Then you will need to do the following:
- Enter the “IP” - “Addresses” section and assign the required IP address to the WAN port.
- Go to the “Routes” tab and add a default route.
- Add DNS server address.
This completes the setup.
Connection requiring authorization
If the provider uses a PPPoE or L2TP connection, the settings are made in the “PPP” section of Winbox. After going to this section, you must perform the following steps:
- By clicking on the plus, select your connection type from the drop-down list (for example, PPPoE).
- In the window that opens, enter your own name for the connection to be created (optional).
- Go to the “Dial Out” tab and enter the login and password received from the provider. The values of the remaining parameters have already been described above.
Setting up L2TP and PPTP connections follows the same scenario. The only difference is that on the “Dial Out” tab there is an additional “Connect To” field where you need to enter the VPN server address.
If the provider uses MAC address binding
In this situation, you should change the MAC address of the WAN port to the one required by the provider. In Mikrotik devices, this can only be done from the command line. This is done like this:
- In Winbox, select the “New Terminal” menu item and after opening the console, press “Enter”.
- Enter the command /interface ethernet set WAN mac-address=00:00:00:00:00:00 in the terminal
- Go to the “Interfaces” section, open the properties of the WAN interface and make sure that the MAC address has changed.
This completes the Internet setup, but home network clients will not be able to use it until the local network is configured.
Setting up a wireless network
You can set up your wireless network on your Mikrotik router by going to the “Wireless” section. Similar to the Interfaces section, a list of wireless interfaces designated wlan will open here (depending on the router model, there may be one or more of them).
The setup is as follows:
- Creates a security profile for your wireless connection. To do this, you need to go to the appropriate tab in the wireless interface table window and click on the plus. In the window that opens, all you have to do is enter Wi-Fi passwords and set the necessary encryption types.
- Next, double-click on the name of the wireless interface to open its properties and directly configure it on the “Wireless” tab.
The parameters indicated in the screenshot are quite sufficient for the normal operation of the wireless network.
The local network
After deleting the factory configuration, the LAN ports and Wi-Fi module of the router remain unconfigured. In order for traffic exchange to begin between them, you need to combine them into a bridge. The sequence of settings made is as follows:
- Go to the “Bridge” section and create a new bridge.
- Assign an IP address to the created bridge.
- Assign the created bridge as a DHCP server so that it can distribute addresses to devices on the network. It is best to use the wizard for this purpose by clicking on the “DHCP Setup” button and then simply select the necessary parameters by clicking on “Next” until the server configuration is completed.
- Add network interfaces to the bridge. To do this, you need to return to the “Bridge” section again, go to the “Ports” tab, and click on the plus sign to add the required ports. You can simply select “all” and add everything at once.
This completes the local network setup.
The article touched upon only the most basic aspects of setting up Mikrotik routers. Their capabilities are incomparably greater. But these first steps can be the starting point from which you can begin to dive into the wonderful world of computer networks.
We are glad that we were able to help you solve the problem. Add the Lumpics.ru website to your bookmarks and we will be useful to you. Thank the author and share the article on social networks.
Describe what didn't work for you. Our specialists will try to answer as quickly as possible.
Changing the default administrator password
As I wrote earlier, the default administrator password in mikrotik is not set, it is empty. Username - admin. Let's set our own password to restrict third-party access to your settings. To do this, go to the System -> Users . Select the only user admin, right-click and select the very last item password.
In the window that opens, enter your password 2 times and save it. Now, to connect via winbox, you will need to specify not only the admin user, but also the set password.
In light of the recent Mikrotik hacks, I strongly recommend not just setting a complex password for the administrative account, but creating a completely new one, with a username other than admin. To do this, in the list of users, press the plus sign and create a new user.
After this, the admin user can be disabled.
Setting the time
I recommend setting the correct time and enabling automatic synchronization. This can be useful if you need to look at some logs and compare times. If it is not installed, then it is difficult to do. So let's set it up. Go to System -> Clock , manually set the time, date and time zone.
We will make sure that the time is automatically updated via the Internet. Go to the section System -> SNTP Client . Check the Enabled box and enter 193.171.23.163 and 85.114.26.194 in the field with server addresses. Click Apply and observe the result of synchronization.
Now the router clock will always have the current time.
This completes the basic setup of the mikrotik router for home use. You can install it in place and use it. Just in case, I recommend looking at the article with an analysis of the main errors in Mikrotik.
Online courses on Mikrotik
If you have a desire to learn how to work with Mikrotik routers and become a specialist in this field, I recommend taking courses in a program based on information from the official MikroTik Certified Network Associate . In addition to the official program, the courses will include laboratory work in which you will be able to test and consolidate your acquired knowledge in practice. All details on the website. The cost of training is very affordable, a good opportunity to gain new knowledge in a subject area that is relevant today. Course Features:
- Practice-oriented knowledge;
- Real situations and tasks;
- The best of international programs.