The most accurate way to diagnose hard drives is to check them through DOS using the MHDD program.
In this case, the HDD will not be loaded with third-party programs and processes, only one program will access it, this will reduce response time and produce reliable results. The same cannot be said about the Victoria program, which, when running under Windows, may not produce entirely correct results. This is due to the fact that while the utility is running, third-party services and processes are running that access the hard drive, increasing response time.
This means that if you run the test and continue to use your computer at this moment, you will see a large number of slow or inaccessible sectors in the test results. And we don’t need this at all.
What is this program
MHDD is a professional free solution for checking hard drives for errors and defects. It boasts very wide functionality, allowing you to carry out not only basic and advanced scanning, but also perform HDD recovery.
Since installation takes place not on a computer, but on a USB drive, MHDD is suitable for all operating systems, including Windows 7 and 10 (32 and 64 bit). It is distributed absolutely free of charge, the interface is quite simple, although entirely in English.
And now, I propose to move on to detailed instructions on how to use it.
Starting the program
The first step is to download the installation files to your computer. The program is easy to find on the Internet; there is no need to send SMS, register or other suspicious actions. It is better to use the developer's official website.
The folder ". zip " which you should open and unpack the files to the desired location.
Important! The computer controller must be switched to IDE mode. The MHDD program does not work with others. Therefore, it will not see SATA hard drives whose controller mode is also SATA.
After launching, use the up/down arrows to go to the second item of the proposed menu, confirm with the “ Enter ” button.
The screen will display a list of available drives that you can work with.
Creating a bootable USB flash drive with MHDD
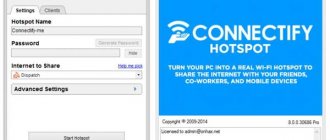
To record to a flash drive, we will use a special free program “UltraISO”. It is free and distributed in Russian. Therefore, download and install it first.
Next, we carry out everything step by step:
- Right-click on the downloaded file in .iso format, point to “Open with” and select “UltraIso”.
- In the top menu, click on the “Bootboot” section and select “Burn image ...”.
- In the window that opens, for the “Disk Drive” item we indicate our flash drive, the recording method is set to “USB - HDD”, all other options can be left as default. Click “Record” and wait for the process to complete.
- In order to launch MHDD from a flash drive, you need to restart the computer, enter the BIOS and change the device boot priority, putting the USB flash drive in first place. Usually the boot order is changed in the "Boot" section.
Save the settings and restart the computer again.
Instructions for use
Now let's talk about how to use the MHDD program correctly.
After loading from a flash drive or disk is completed, use the arrows to select the item under the number “2” and press “Enter”.
Next, all hard drives connected to the computer will be displayed. Each HDD will have a serial number located to the left of its name. Enter the required number and press “Enter”. In my case, this is the number “2”. To redefine the disk with which you plan to start working, you need to press the combination “SHIFT + F3”.
Now you can start working with the hard drive. The MHDD program by default will offer to familiarize itself with all the commands that are available to us. To open a list of commands, press the "F1" key.
Let's look at the most popular of them:
- SCAN – start scanning. You can also use the "F4" key.
- ERASE – each sector will be overwritten, and all information on the drive will be deleted. Used to eliminate software bads (errors).
- SMART ATT – used to view SMART parameters. You can also open the smart phone using the “F8” key.
As an example, I will run a regular surface scan for bad blocks. To do this, enter the command “SCAN” and press “Enter”.
In the window that opens, I leave all the values as default and press “F4” to start scanning. In this case, all information will be saved, and ultimately I will receive a report on the existing problems.
I would like to immediately draw your attention to the fact that there are other functions:
- Start LBA – the starting point from which the scan will start.
- End LBA – final point.
- Remap - used in cases where it is necessary to perform a scan with automatic reassignment of damaged sectors (used to restore the functionality of the hard drive). Accepts the value “ OFF ” and “ ON ”, that is, turn on - turn off.
- Timeout – delay time for reading the sector. Upon expiration, a transition will be made to the next area.
- Spindown after scan – stops the HDD after the scanning procedure is completed.
- Loop test/repair – cyclic check.
- Erase Delays – used to completely overwrite slow or inaccessible sectors. In this case, some of the information located on the drive will be deleted. Accepts the value "OFF" and "ON".
To change parameters in the MHDD program, use the "Enter" key, to move to another parameter, you can use the arrow keys on the keyboard.
How to scan a device?
To begin, in the list that opens, you should select the device that you are going to scan. Once the device is selected, you can press the F1 and begin using any commands you need from this program. Once again, it is worth noting that when working with the MHDD program you should be as careful as possible, especially if you are working with the utility for the first time - check once again the correctness of the written command, as well as whether you really know how it should be used and what result it will give you ultimately.
If you are currently still a novice user of this program, we recommend that you first familiarize yourself with commands such as SCAN, STOP, EID , CX AND TOF . It is worth noting that some of them can be called by key combinations or are simply assigned to certain hot keys. Thus, for example, using the F4 button you can immediately start scanning the system for errors. Special attention should be paid to the registers, the status of which is constantly displayed at the top of the screen. Any SATA or IDE device must display the DRIVE SEEK COMPLETE ( DRSC ) and DRIVE READY ( DRDY ) indicators during operation.
BUSY flag indicates that the drive is currently performing a certain operation (reading or writing some data). Some flags, like T0 NF or WRFT, are obsolete, so you should not see them while working with this utility. They also include the INDX , but in some situations the program still displays it. When the DREQ , you can determine that the drive is requesting permission to transmit some information.
ERR flag appears during operation , then you should carefully analyze the error register, and at the same time you should understand what type of error can occur when working with a hard drive. Look at the documentation for this program to understand what commands can be used, how to work with registers, and also identify the main types of errors.
To view detailed information about your hard drive, you can use the ID and EID . Using these commands, you can view detailed information about the operation of this drive, that is, its brand and serial number.
You can scan the hard drive only if it is detected using the above commands or after pressing the F2 . To carry out a full scanning procedure, you should press the SCAN ENTER button (default hotkey F4 ). It is worth noting that a menu initially opens in which, if desired, you can change certain settings, since by default the initial sector is zero, while the final sector is equal to the maximum possible. Any functions that may be destructive to information on the drive are initially disabled.
Analysis of scan results
After the check is completed, you will see a window with detailed information in the form of multi-colored squares and letters.
What does each of them mean:
- Gray squares (3-50 ms ) - show the total number of the fastest sectors with which no problems are observed.
- Green (<150 ms) – indicate the presence of slow sectors. A large number of them (above 500) can reduce the speed of the hard drive. However, the presence of green squares is inherent in every drive and is the norm (in reasonable values).
- Orange (<500 ms) – very slow sectors, significantly reducing the speed of the drive. Ideally, they should not exist at all. The presence of at least one indicates the beginning of problems in the hard drive.
- Red (>500 ms) – bad sectors (bad blocks). They significantly slow down the operation of the hard drive and cause various malfunctions in Windows and programs.
- UNC is a failed area that cannot be restored. Most likely this is a “logical bad block”. Usually eliminated by overwriting with the “ERASE” function.
- AMNF – missing address label. Most often it occurs due to a malfunction of the hard drive hardware. You can try ERASE or REMAP, but in most cases this does not work.
- ABTR - Read request rejected. It may appear as a result of a hardware malfunction, or due to the incompatibility of the MHDD program with a specific hard drive.
- IDNF – identification number not found. Indicates a malfunction or an unsuccessful attempt to access the area.
- T0NF – zero track was not found, recalibration failed. Indicates a HDD failure.
How to use the MHDD program?
First, we need to write the MHDD boot image onto a flash drive, since the program runs under DOS.
Download MHDD from the link below.
Next, we need any USB flash drive with a capacity of 32MB or more. We will record the MHDD image onto it.
We insert the flash drive into the USB connector of a computer or laptop and, using the UltraIso program or any other program known to you, write the downloaded MHDD image, thereby creating a bootable flash drive.
After the flash drive is written, you need to boot the computer from it, having first switched the hard drive operating mode from ACHI to IDE in the BIOS. If this is not done, then MHDD will not see your hard drive.
If you did everything correctly and booted from a flash drive, then you will see a window like this:
MHDD Initial Boot Window
In it you need to press “Enter”, after which the main window of the MHDD program will appear:
Main window of the MHDD program
Next, you need to press the number on the keyboard, opposite which the model of your hard drive is written in MHDD.
Select a hard drive by entering the corresponding number
Type the number and press “Enter”.
To display a window with hard drive scan settings, press F4 on the keyboard.
Here, use the arrows to go down to the “Remap” line, press “Enter” and select “On”. With this we enabled the reassignment of bad sectors. So that MHDD not only finds them, but also marks them as unused.
F4 again and then the hard drive check for bad sectors will start.
The check lasts from 20 minutes to 4 hours, depending on the volume and speed of the hard drive. A 1TB disk is scanned for about 2-3 hours.
The window on the right displays the scan results. Sectors with a response time of 500MS or more (brown and red) are considered to be bad, and the more of them, the worse. UNC (red crosses) are bads - unreadable sectors.
Check results - BAD sectors
Since at the beginning of the scan the Remap - reassigning BAD sides from the reserve area, it is possible that after a complete scan of the hard drive by the MHDD program, the bads will be removed and the hard drive will work for some time.
If, at the end of the check, there is not a single sector below 150MS (green) at the top right, this means that the surface of your hard drive is in perfect order and there are no BAD sectors on it.
Now you know how easy it is to use MHDD and how to use it to check your hard drive for bad sectors and bad blocks.
Recovery procedure
Now, judging by the received report, we can proceed further according to the instructions.
- If UNC, AMNF, IDNF sectors were found, then it is necessary to scan with the “Erase Delays” function. Most likely this will help get rid of the faulty area. If the problem persists, then perform “ERASE”.
- In the case of orange and brown blocks, we perform “REMAP”. The combination “ERASE” - “REMAP” or “Erase Delays” can also help.
It is important to remember that the Erase Delays command will only delete some of your files, while the ERASE command will completely delete all files. Therefore, I first recommend saving all important files to another medium.
Then we re-check. If some bad blocks remain, then it is obvious that they are caused by a physical malfunction of the hard drive. In this case, only the “REMAP” option or replacing the drive will help. Otherwise, such a HDD may fail at any time.
Now about how I do it. First, I start a regular scan with the Remap function. Then I start Windows and save all the information to another medium. Then, using the MHDD utility, I overwrite the damaged areas with the “ERASE” function. This approach increases the chances of effectively restoring the HDD and saves time.
Scanning and checking Hard Drive for errors
To open the window with a scanning parameter, use the “SCAN” command. Confirmation of the selection of one of the commands is performed with the “F4” button. After this, scanning begins. Let's get acquainted with the main scanning functions.
- Start LBA and End LBA – allows you to set scanning limits. We indicate the required sector, after which MHDD begins diagnostics.
- Remap – this function, during the scanning process, independently reassigns erroneous sectors.
- Erase Delays – this parameter erases bad sectors during scanning. Thanks to this, the disk is freed from system errors and “soft-bad” blocks.
During the first diagnostic, we scan the hard drive without turning on the Erase Delays and Remap functions. Enabling these options will result in data loss on your computer. If serious problems are detected during the first scan, you need to move important information to another drive and rescan by activating Erase Delays.
After the second Hard Drive diagnosis, we perform a second scan to determine the remaining bad sectors. If MHDD shows that they exist, we run the scan with the Remap function enabled. If the program again shows erroneous sectors, you should think about replacing the hard drive. The latest scan shows physical damage to the hard drive that cannot be fixed using MHDD.
SMART Analysis
In theory, this is the topic of a separate article, but I would like to touch on some values that in one way or another affect the result of the test and generally show the current state of the hard drive.
The F8 key or the “SMART ATT” command will help you open SMART in the MHDD program. Pay attention to the “RAW” column.
The most significant attributes:
- Reallocated sectors count – total number of automatically reassigned sectors (bads).
- Current pending sectors – sectors that are in queue for reassignment.
- Ultra ATA CRC – the number of errors that occurred when transmitting data via a SATA cable. The value should be reduced to zero. Eliminated by replacing the cable or SATA connector.
Read what actions to take in this or that case in the previous section.
How does MHDD work?
Let's imagine how the MSDOS operating system works when it needs to read a sector from a drive. MSDOS will simply "ask" the BIOS to do this. Then, the BIOS looks in its tables for the port addresses of the desired drive, performs the necessary checks, and then begins communicating with the drive. After everything is finished, the BIOS returns the result to the operating system.
Let's look at the diagram. Here's how a regular DOS program works with a drive:
Program <—> MSDOS <—> BIOS <—> IDE/SATA controller <—> Drive
Now let's take a look at how MHDD works:
MHDD <—> IDE/SATA Controller <—> Drive
The main difference: MHDD does not use BIOS functions or interrupts. Thus, you don't even need to define the drive in BIOS Setup. You can even turn on the drive after MSDOS and MHDD have loaded, since MHDD works directly with the drive's registers and does not pay attention to such “little things” as, for example, partitions, file systems and BIOS restrictions.
Attention: Never run MHDD from a drive that is located on the same physical IDE channel (cable) to which the drive under test is connected (cable, channel). You will have significant data corruption on both drives! In this regard, by default, MHDD does not work with the PRIMARY , since most users have MHDD there. To unblock the Primary channel, run MHDD, then exit, then edit the MHDD.CFG . Or use the /ENABLEPRIMARY .
MHDD uses a DOS ASPI driver to access SCSI devices. If you do not plan to work with SCSI drives, then you do not need any drivers.
Problems you may encounter
It happens that the MHDD utility does not see the connected hard drive, even though it is displayed in Windows. Most likely it's a physical problem. Try connecting the device to a different connector using a new SATA cable or remove oxides on the board.
If the device makes extraneous noise, then most likely the problem is in the internal mechanism, then only replacement will help.
A freeze at the testing stage may also indicate a faulty mechanism. Or the HDD dump in the main menu with the message “driver has been disconnected”.
Introduction
If SMART shows problems, most often this means one thing: the disk is about to start crumbling, and even an extra OS load can have an effect. The next thing you need to understand is whether it is software or hardware. If there are not so many hardware ones, then you can still try to bring the disk back to life.
I think you've heard of products like MHDD and Victoria. They are indispensable for low-level hard drive work and will help you achieve great feats in recovery and diagnostics. “Hacker” already wrote about Victoria a couple of issues ago, now it’s time to deal with the second - archaic, but still mega-useful utility.
MHDD is a small but powerful free program that is designed to work with storage devices at the lowest level (as possible). The first version was released by Dmitry Postrigan in 2000. It could scan the surface of an IDE drive in CHS mode. Now MHDD is much more than a diagnosis. With MHDD you can do anything: diagnose drives, read and write random sectors, manage the SMART system, password system, noise management system, and also change the size of the drive.
Despite the fact that working with MHDD is also possible through installed Windows, I highly recommend burning the image to a flash drive or external (or second boot) disk and loading bare DOS from there. Believe me, in a hardware issue it is better to eliminate as much as possible all links in the chain that can lead to glitches or freezing of the computer during operation.