Sometimes some 5-10 frames per second are not enough for a comfortable game, but your graphics adapter cannot provide more. What to do in this case? This is exactly what our article will discuss. Today we will tell you how to use the program for overclocking MSI Afterburner video cards, which has earned a lot of positive reviews. Well, in the process, you can download the new version of MSI Afterburner for Windows XP, 7, 8 or 10 x32/64 Bit for free in Russian from its official website.
Read our instructions carefully; if you do something wrong, there is a high risk of damaging the graphics adapter and, as a result, take it to a service center or throw it away altogether.
Installing MSI Afterburner
We will start with installing the program, since this process contains a number of important points that should be emphasized.
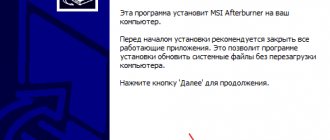
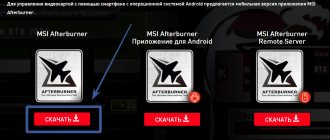
- Go to the official website of the application and download the latest Russian version of MSI Afterburner, then launch MSIAfterburnerS
- We select the language that is most convenient for us and click the “OK” button.
- We begin the installation by clicking on the “Next” button.
- Accept the MSI Afterburner license agreement and click the circled button.
- Leave both checkboxes active and click the “Next” button.
- If necessary, change the installation path. In our case, it will remain by default. Then click the button to move to the next step.
- Create shortcuts in the Start menu and move on.
- After this, the installation itself will begin. We are waiting for the process to complete.
- Next, we will begin installing an additional utility in the form of RivaTuner Remote Statistics Server. Select Russian language and click “OK”.
- Continue the installation by clicking on the highlighted button.
- Set the license acceptance checkbox to the first position and confirm the choice.
- Specify the target directory for installing the program, then proceed to the next step.
- We are waiting for the installation to finish.
- If your computer or laptop does not have Microsoft DirectX, it will be installed automatically after downloading the latest versions of the libraries from the official website.
- After this, the installation process can be completed.
Next, we move on to an overview of MSI Afterburner and instructions on how to use the program.
Installation
Download the program, double-click with the left mouse button on MSIAfterburnerSetup410.exe. Check the box next to the language you need. Accept the license agreement. You will see the component installation menu. It’s better not to uncheck the boxes, but immediately click “Next”.
Decide. where you will install the utility, select whether you need a shortcut on the desktop or not. After that, press the “OK” key. The installation process will start. After its completion, you will be able to use the program in Russian.
How to overclock an nVidia video card
Now that the MSI Afterburner application has been reviewed in detail, we move on to instructions for working with it.
Carefully follow what the author is doing; the slightest deviation from the given algorithm can cause the failure of your adapter.
Before we get into the manual, take a look at a number of MSI Afterburner controls.
Power limit
This slider only works if your video card supports this technology. The essence of the regulator is to set the maximum power supplied by the graphics adapter. For example, we can set it to 90%. What does this give? It's simple - this is how we insure the chip against overheating and failure during overclocking.
Temperature limit
The second regulator is responsible for adjusting the temperature limit. As in the first case, we can set a maximum heating limit, after which the temperature will be limited by reducing performance.
Don't forget that there is such a thing as temperature hysteresis. That is, heating occurs with some delay and you need to increase it gradually.
Core frequency
This is a parameter that directly affects the overclocking itself. We'll talk a bit about how to work with it below.
Attention: if the program resets frequencies, it means you are doing something wrong.
Memory Clock
The parameter sets the frequency of video memory, which, accordingly, affects its performance, leading to a systematic increase in FPS in the game.
Attention: if the program does not see your video card and no devices are accessible, try restarting the software.
Fan Speed
One of the most important parameters in MSI Afterburner. It is the intensity of the cooling system that affects high-quality acceleration. Set the slider so that the temperature on the adapter chip does not exceed the recommended values.
Incorrect use of this parameter can lead to instant damage to your video card. Be careful, we recommend using automatic mode!
Settings profiles
We can create several operating configurations for our video card and save each of them separately in its own profile. This can be useful, for example, for different applications or games.
The program settings are stored in the Windows user directory.
Reset button to default settings
This function will definitely be useful to every beginner in overclocking a video card. If you have configured something incorrectly and don’t know how to reset all settings to their original positions, just press the designated button and enjoy the stock settings.
Apply button
This virtual key applies any changes made using the sliders. It must be pressed every time after we have changed something.
Procedure for overclocking graphics adapter in MSI Afterburner
So, that's enough introductory information for us. Let's proceed directly to overclocking:
- Download and install the FurMark program. We will use it to test the stability of the video card and check the frame rate. Run the test on a non-overclocked adapter to see the rated performance.
Translated, the word Afterburner sounds like afterburner, so be careful!
- In our case it is 68 FPS. Let’s remember and move on to increasing productivity.
- We add the frequency of the graphics adapter by about 10 units.
- Click the “Apply changes” button.
- We run the test again and see that the number of frames per second has increased by 1. Well, we continue to “play around” with the settings.
- We add a little more chip frequency and apply the changes.
- We run a run in FurMark and see that the increase is already 4 FPS.
In exactly the same way, we gradually add the memory frequency, ultimately achieving a combination that will achieve maximum performance, stability of the graphics adapter and the absence of any overheating.
Attention: add chip and memory frequencies little by little, remembering the last stable values. Run the stress test to the end to check the stability of the video card over time.
How to enable monitoring in the game
So, you already know how to use Gigabyte Afterburner, but it has one more useful function. Right in the game, we can display a special overlay or counter that will display a number of useful parameters. This is done like this:
- Let's move on to the program settings.
- Switch to the “Monitoring” tab, then select the parameters that should be displayed and activate the function. Finally, click “OK”.
- We go into the game and see our indicators in its upper left corner.
- By configuring the application we can add many other parameters, including even frametime graphs.
Now you know how to enable in-game monitoring on MSI Afterburning.
How to unlock Core Voltage
By default, core voltage adjustment is locked and inactive, and the sliders do not move. To fix this, go to settings and in the “Basic” tab, check the box next to the marked item.
If the program does not save settings, try running it as an administrator.
MSI Afterburner 4.6.0 Final (2019) PC
Includes full RVII support, including overclocking (which was missing in the previous early b15 build). You can now use the and + keys to select the next/previous point on the curve. This feature is useful for those who prefer to use the / keys on the keyboard to fine-tune the frequency offset of a selected point instead of adjusting the point using the mouse cursor. I'm not sure many of you know this, but I'll remind you that you can also hold down while fine-tuning the frequency offset using the / keys to jump to the nearest frequency value, rounded to the nearest 10 MHz.
You can now press a key to edit the frequency offset of the selected point from the keyboard. You can also click + to specify the absolute value of the target frequency so that the editor will automatically calculate the desired offset
Slightly modified keyboard control interface for AMD's implementation of the V/F curve editor. Previously, you could select P-state and frequency fine-tuning using the / or + / + keys, or to fine-tune the voltage / or + / + keys. Both frequency and voltage are now adjusted using the / or + / + keys, and the focus of voltage or frequency input from the keyboard is selected using the keys / . The focus of voltage or frequency input from the keyboard is now highlighted by the brightness of the selected point on the curve. Keyboard input focus also affects the new /+ functions, allowing you to enter a target voltage or frequency in both offset and absolute form.
Similar to NVIDIA's implementation, you can now also hold while dragging V/F curve points on AMD systems. This will move the entire curve up/down while maintaining the offset of each point
Added support for undo/redo in the voltage/frequency curve editor:
The voltage/frequency curve editor now saves up to 1024 last curve states during editing and allows you to undo/redo changes using the + or +/++ key
The undo history is discarded when you apply a curve, force it to be re-read from the hardware using a key, or switch to a different GPU on a multi-GPU system.
The number of recorded undo/redo steps is displayed in square brackets in the title bar of the editor window.
The application properties dialog now displays in a top style when properties are activated from a separate monitoring window and it has Always on Top enabled
NVIDIA scanner components have been updated to the latest version, NVML.dll issue should be resolved now
Video instruction
Our author is overclocking his nVidia GeForce GTX 1050 ti graphics adapter. We recommend watching how he does it and drawing your own conclusions. In the future, the information will definitely be useful to you and the question of how to use MSI Afterburner will become much more clear.
Attention, if you get the error “The application could not start because its parallel configuration is incorrect,” try reinstalling C++ Redistributable.
Watch the video
subscribe
Before we begin, remember that overclocking is not without risk and there is a risk of causing irreparable damage when tuning your graphics card.
MSI Afterburner makes overclocking easy, but using a fair amount of common sense is highly recommended.
If you feel like you've gone too far with overclocking, stop immediately and seek advice from competent sources before continuing.
The benefits of overclocking
In turn, overclocking a video card using MSI Afterburner can give a significant increase in performance in computer games (with the right approach). And in order to understand and analyze what effect overclocking gives and how it affects system performance, you can use the information overlay, which is displayed in the corner of the monitor screen directly during the game, displaying in real time such parameters as temperature and frequency of the graphics processor / video memory , voltage, FPS, etc.