Creating a fully customized image of an operating system with installed applications is often necessary in a corporate environment, and home users will not refuse an installation disk containing their favorite set of programs and tweaks. In modern Windows operating systems, creating such an image is much easier than in Windows XP, and you can use the automatic installation package.
This article explains how to prepare and deploy a fully customized system image, and also covers how to back up your operating system to a WIM image.
[+] On this page
- You will need
- Advantages and disadvantages of using a custom image
- Steps to create a custom image
- A note about customizing settings
- Importing registry settings
- Copy a profile using a response file
You will need
- Deployment Tools from the Windows Assessment and Deployment Kit (ADK)
- Windows PE boot disk with ImageX utility
Of course, you will need a computer to install and configure the OS, as well as a place to save the system image. The installation computer can be a virtual machine (for example, Hyper-V from Windows or VirtualBox). You can save the customized image on a non-system partition of this computer.
For example, during system installation, you can create two partitions - install the OS on one, and subsequently save the image on the second. Also, you can always connect another virtual disk in a virtual machine. Finally, the customized image can be saved to a network share or USB drive. As you can see, there are many options - there is plenty to choose from.
How to create a Windows XP disk image
You already know how to create a Windows 7 disk image using the operating system itself. This feature has been available since Windows Vista. But what about those users who have Windows XP? What should they do?
Third-party programs come to their aid, in particular, COMODO BackUp program .
This is a very powerful and convenient program that will make you feel more confident in working with your computer. In the COMODO BackUp program, you can create both a Windows XP disk image and disk images of other operating systems, as well as images of any logical drives, files and folders, files and registry entries.
So, download the program:
After downloading, unzip and install it. Installation is very simple. Select the Russian language, click Continue , accept the license agreement, and click the Install .
After installation, you can find the program in the Start menu - All programs - COMODO - COMODO BackUp . If you wish, you can make a shortcut to it on your desktop.
Since the entire disk with the operating system is copied, it is advisable to lighten it as much as possible before backing it up. Remove everything unnecessary from it: videos, books, films.
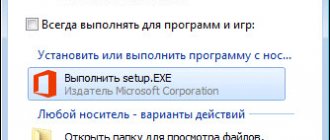
To create a Windows XP disk image , run the program. Click the Reserve now . Select the item Disks, partitions and MBR , and on the right is the disk on which your Windows is installed.
Click the Next . After this, you have a choice: save your image in the COMODO Cloud , or on your computer.
You can get up to 5 GB of cloud storage space for free. To use it, you must first register with it.
Or you can go to the My Computer and select a location on it to store the disk image. If you want to save the image on a remote hard drive , connect it in advance, it will appear in the list of drives.
You can also upload the image to the Internet via FTP . Some file hosting services provide data for FTP access.
After selecting a location for the image, click Next to get to the backup settings, or the Backup Now if you want to leave the default settings.
To reinstall the system, run the program and go to the Recovery . Select the previously created Windows XP disk image and start the reinstallation process.
You can get more detailed information in the “All courses” and “Utilities” sections, which can be accessed through the top menu of the site. In these sections, articles are grouped by topic into blocks containing the most detailed (as far as possible) information on various topics.
You can also subscribe to the blog and learn about all new articles. It does not take a lot of time. Just click on the link below: Subscribe to the blog: The Road to Computer Business
Advantages and disadvantages of using a custom image
In my opinion, the advantages of a fully customized image outweigh the disadvantages.
Advantages
- Quick installation of a system with a set of applications, since no time is spent on installing them. However, compared to a standard image, the customized image takes a little longer to unpack.
- You can further customize the operating system by using a response file used in conjunction with a customized image.
- It becomes possible to deploy an image using the ImageX . The standard image can only be used in combination with the installer because not all settings are configured (for example, language).
Flaws
- The image size increases. The final size depends on the number and volume of installed applications. If you plan to continue installing from a DVD, you must be aware of the 32-bit versions' WIM file size limitation of 4 GB (2^32 bytes).
- Versions of applications included in the image may become outdated. To maintain the latest versions of applications, you will have to rebuild the image. Regularly updated applications most likely do not make sense to include in the image. They can be installed separately, automating this process.
Creating an operating system image
Once upon a time, our department finally bought 12 brand new computers, and two programmers needed to install on each an operating system, drivers, office software, specialized software and something for the soul (a music player, a program for viewing photos and etc.).
Having spent about 3 or 4 hours of time on just one computer, my colleague and I seriously thought about how to transfer everything installed on one computer to another hard drive in one fell swoop. Don’t repeat this entire installation procedure and fully configure the system 11 more times!
A little history...
While we were installing the most advanced Windows NT operating system, in order to solve the problem of quickly installing and configuring the system and software, we used the Norton Ghost program. The Norton Ghost program developed by Symantec was able to archive and then restore data from one hard drive to another. By the way, this program still exists today and performs its functions remarkably well.
So, having created an image of the configured operating system, installed drivers and all software using this program, we easily transferred it to other computers, completing the task in one working day. Essentially, an operating system image is an archive of a hard drive partition or the entire hard drive. And in order to restore this image on another computer, you just needed to deploy this archive.
Later, this image came in handy more than once when we had to restore Windows that had crashed as a result of various reasons.
Windows 7 system recovery options.
And finally, among other features of Windows 7, built-in tools for creating an operating system image have appeared. Now you already know that having such an image, you can quickly restore Windows in the event of a system crash.
This option for restoring Windows 7 is much preferable to restoring a full factory reset. And along with the capabilities of data archiving, you will be able to sleep completely peacefully, even if the atmosphere is not quite suitable for this (but it is still better to use split systems for rooms - it is much more comfortable).
Advantages and disadvantages of restoring the system using the created image.
Let us emphasize once again that having a fully customized image, you can quickly reinstall the system and the entire set of programs you use, since unpacking the image will take less time than the time spent on installation and configuration.
But you need to keep in mind that this increases the size of the image. The final size depends on the number and volume of applications installed.
Additionally, versions of applications included in the image may become outdated. In this case, you will have to decide whether to include in the image those applications that are updated frequently, or whether you will install them later. Maybe this is not such a significant drawback.
And further. This is not a disadvantage, but you need to know! If you take the image that you created on your computer and give it to a friend, it is possible that he will have problems with the drivers, since the hardware on his friend’s computer and yours may be very different. So don’t be so quick to do your friends a disservice!
Steps to create a custom image
Creating your own WIM image can be divided into the following steps:
- Starting the operating system installation from the installation disk and entering audit mode
- Installing applications and setting up the system
- Preparing the system using the sysprep
- Booting into Windows PE and saving the image using the ImageX
The resulting image can then be included in the installation disk, installed from a network share, or deployed using ImageX .
Creating a system image
You can also record a system image using special software. There are quite a lot of such programs, although most of them are not free, but they are reliable. Such programs include Norton Ghost, DriveImage XML, GParted. But the most effective is the Acronis system image. When using this software product, you first need to create a boot disk. After this, the “Start Page” tab is selected in the program, and the “Backup” section appears in it. There we indicate with a tick which disk will need to be copied. After that, in the next section “Archive storage” we indicate the path where our image will be recorded. It is worth saying that it will be written in iso format, the operating system image will be placed in this file. And then all you have to do is click on the “Proceed” button.
A note about customizing settings
In addition to installing applications, audit mode allows you to configure user settings. There are two ways to apply settings to an image.
You can:
- Configure only system parameters, and import custom ones using REG files into the configured WIM image (or into the source image before starting the installation described here).
- Configure both user and system settings, and then use a response file to copy the built-in Administrator to the standard user profile.
Copy a profile using a response file
To copy a customized account profile to a standard user profile, you can use a response file that contains the parameter
Microsoft-Windows-Shell-Setup | CopyProfile
If this parameter is set to true , the profile is copied.
You need to use this feature when installing a customized image by including this parameter in the answer file. In this case, the profile will be copied on pass 4 Specialize .
Example of a universal answer file for 32-bit and 64-bit OS
true true
Why does this article recommend copying the profile during installation rather than pointing sysprep to the answer file when generalizing the image?
This article recommends using a method that works regardless of the deployment method.
In any case, the profile is copied during installation at the Specialize stage. If you use the /unattend option in sysprep, the answer file is cached and then used during installation. At the time of writing the first version of the article, this did not work, despite the documentation.
If you are using MDT or SCCM, the method described in this article is required for the reasons outlined in KB973289:
Considerations when using automated image build and deployment systems
When using tools such as the Microsoft Deployment Toolkit or System Center Configuration Manager, the CopyProfile parameter is not required to run the Sysprep command. Typically, these tools replace or modify the Unattend.xml file after the image is deployed to disk, but before the operating system first starts after running the Sysprep command. Therefore, the Unattend.xml file used during deployment using the Microsoft Deployment Toolkit or System Center Configuration Manager must contain a CopyProfile parameter.
Now let's talk about everything in order.
Starting the operating system installation from the installation disk and entering audit mode
The first step in preparing a customized image is to launch the OS from the installation disk. You can perform the installation manually, or you can automate the process using a response file.
Manual installation
Manual installation is not fraught with any tricks. If you plan to save the customized image on a non-system disk partition, use Windows Setup to create the partitions.
Advice . When installing the system on a virtual machine, you can connect a second virtual disk and subsequently use it to save the image. This will make it easier to copy the image into your production environment since the VHD(X) can always be mounted on a physical machine.
Continue the installation until the OOBE stage. It is easy to recognize by the prompt to choose an account name and a picture for it.
At this point, without selecting the account name, press CTRL + SHIFT + F3 . Administrator account .
Automatic installation
Using an answer file, you can automate all steps of Windows installation, including managing hard drive partitions, entering audit mode, and even installing applications in it, as discussed in Installing applications in audit mode. You can follow the instructions given in it up to the section “Transferring the system to oobe mode” (the article discusses complete automation of the installation).
osvirtual.net: virtual images of operating systems
Origins and reasons
In my free time, I sometimes find it very pleasant to dig into some old operating system. Either relatively old, or simply specific. Of course, it is best to install these operating systems on a real computer (which is what I initially did), but gradually there is less and less time - and there is less desire to tinker with old hardware or with the next repartition of disks on the desktop with a parallel search for drivers for hardware that is not supported by the operating system. And at some stage we had to switch to virtual machines. The installation process, even on a standard virtual machine, is often non-trivial or simply insanely lengthy; its own difficulties with virtual hardware support. After some time, a certain number of operating system images accumulated on my home computer, some of them quite rare.
OSvirtual: from NextStep to aGNUla
Therefore, I posted this collection - for myself and for those interested (probably for a few ) on the network in the form of the OSvirtual website (there is also an English version, albeit made on a residual basis). The OS posted here are either very old OSs
that can be launch only as nostalgic toys (and which are not currently sold, but are often freely available for download from the official website), or OS, for some reason interesting to me (multimedia-oriented Linux distributions, for example, or 5-7 year old Linux old and older) I was not particularly interested in many modern mainstream Linux distributions, which are located on VMPlanet or Linhost without problems... All images are compressed 7z, work mainly in the free and cross-platform VMWare Player, some in the free Microsoft Virtual PC 2007 (OS/2, for example, which VMWare does not officially support), part in more specialized emulators (DosBox, Mini vMac, etc.).
Among the operating systems already released are OS/2 4 warp, NextStep 3.3, SCO UnixWare, various old Windows, MacOS 7.0.1&7.5.3
, if possible, everything is installed in the maximum configuration. The collection, naturally, is incomplete and will be expanded. If anyone wants to help with filling - please
What's next
While the site looks just like a set of images, gradually (if I get around to it) I’ll select/write texts about the posted operating systems.
Although the resource was made just for the soul, I will be glad if it is useful to someone UPD:
thanks for the karma, moved to the “Operating Systems” blog
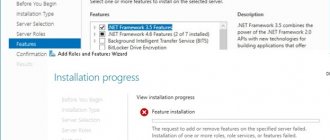
Installing updates, applications and system configuration
Once you enter audit mode, you can begin installing updates, applications, and configuring operating system settings. sysprep utility window ; you will need it at the end of the setup phase.
In Windows 8.1, audit mode disabled the installation of updates using Windows Update. If you encounter this issue, read How to Install Windows 8.1 Updates in Audit Mode Using PowerShell or Savvy.
If installing an application or update requires a system reboot, you can do so. After rebooting, the system will return to audit mode. As mentioned above, the application installation process can be automated using an answer file. You can configure any system and user settings in the Windows GUI. You can also import registry settings from pre-prepared REG files.
On Windows 8 and later, do not update apps from the Windows Store as this will cause problems when generalizing the image. There is also a science to uninstalling modern applications. See TechNet warning and KB2769827.
Once you've finished installing applications and configuring your system, you should prepare it for further use.
Boot Windows 10 or Windows 8.1 using Fido script
There is a fairly simple way to obtain an image of the Windows 10 or Windows 8.1 operating system using the PowerShell script - Fido. This script is used in the popular Rufus program to obtain an ISO image, from which a bootable USB flash drive is then created.
You will need to complete the following steps:
- Open the script's developer page on GitHub.
- Click on the "Fido.ps1" file.
- In a new browser tab, highlight and then copy the contents of the script.
- Paste the contents of the script into Notepad.
- Click on the "File" menu, select "Save As...".
- In the “File Type:” field, select “All Files”, and in the “File Name:” field, name it “Fido.ps1” (without quotes).
- Right-click on the “Fido.ps1” file and select “Run with PowerShell” from the context menu.
- In the “Windows PowerShell” window you will be prompted to press the “Y” key to execute the script.
- The command shell window will close and the “Fido - Retail Windows ISO Downloader” script interface window will open.
- In the “Version” field, you must select the OS: Windows 10 or Windows 8.1. Click on the "Continue" button.
- Select the system release in the "Release" field, and then click on the "Continue" button again.
- In the “Edition” field, select the “Home/Pro” or “Education” system edition, click on the “Continue” button.
- Select the operating system language in the “Language” field, click on “Continue”.
- In the “Architecture” field, select the system bit depth: “x64” (64-bit) or “x86” (32-bit).
- Click on the "Download" button.
- Windows will start loading in your computer's default browser.
Preparing the system using the sysprep utility
After installing applications and configuring the system, preparation is performed using the sysprep . Depending on which installation method you chose, the steps will be slightly different.
Manual installation
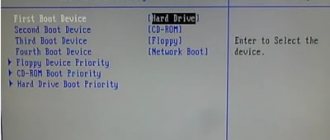
When installing a system manually, the sysprep runs when you enter audit mode. To prepare the system for further use (in this case, for creating a customized image), you need to set the utility parameters, as shown in the figure below.
With the specified parameters the following is produced (in parentheses are the equivalent sysprep command line parameters):
- System preparation (/generalize) - remove unique system parameters, clear event logs, reset security identifier (SID), etc. This option is absolutely necessary to create a customized image.
- Putting the system into OOBE mode (/oobe) - this mode will be activated the next time the system starts.
- Shut down the system (/shutdown).
The utility also removes installed drivers. They can be saved using the PersistAllDeviceInstalls answer file option. This makes sense if you are cloning a system for deployment on the same hardware configuration. Otherwise, saving drivers may lead to problems (read more in the article from the TechNet library).
To save the drivers, you must run sysprep from the command line, specifying the /unattend: the path to the answer file.
An example of a universal answer file for saving 32- and 64-bit OS drivers
true true
Automatic installation
If you automate entry into audit mode and installation of applications using a response file, as described in Installing applications in audit mode, you must add the following highest-numbered synchronous command. This command can also be used during manual installation, after first closing the sysperp .
%SystemRoot%\system32\sysprep\sysprep.exe /generalize /oobe /shutdown /quiet
The first three command line parameters are specified in the same order as the utility GUI parameters described above. /quiet parameter ensures operation in quiet mode and is required for automation.
After sysprep completes, the system will be shut down. Now it is fully configured, and you can create its image using the ImageX .
Booting into Windows PE and saving the image using the ImageX utility
Creating a basic Windows PE boot disk takes 10-15 minutes, or you can do without it at all. If you are preparing a customized image on a virtual machine, just connect the Windows PE ISO image to it and boot into the preinstallation environment. Capturing and saving the image is done with one command.
imagex.exe /capture C: D:\custom.wim “Windows 10 Pro Custom” “My best Windows image” /compress maximum
Note : If you did not include the ImageX in the Windows PE image (for example, by placing it in the system32 ), but only placed it on the boot disk, you must specify the full path to the utility or first navigate to its folder in the command line with the command cd /d < "path> .
This command uses the following parameters:
- /capture C: - capture partition C:
- D:\custom.wim - location and name of the saved WIM file. Specify the drive letter corresponding to the non-system partition or USB drive.
- “Windows 10 Pro Custom” is the name of the image. The name must be enclosed in quotation marks.
- “My best Windows image” is a description of the image. The description must be enclosed in quotation marks.
- /compress maximum - (optional) compression type for files in the image. /compress parameter allows values of maximum (maximum compression), fast (fast compression), and none (no compression). If the parameter is not specified, fast compression is used. Maximum compression reduces the image size, but capture takes longer than fast compression. The speed of image decompression is practically independent of the compression type.
- /flags “Ultimate” - a flag indicating the edition of Windows Vista (it does not work in other operating systems and is not needed). Setting the flag is required if you plan to install the image later using the setup program ( setup.exe ). In other words, use this option if you are going to replace the original Install.wim with your own and install the OS from an installation disk or network share. To deploy an image using the ImageX setting the flag is optional. The following flags are valid for Windows Vista: HomeBasic, HomePremium, Starter, Ultimate, Business, and Enterprise.
With maximum compression, capturing the image can take quite a long time. If the operation completes successfully, the command line will look something like this:
If you saved the image on a virtual machine, for further work you need to transfer it to the physical OS. If you saved the image on a separate virtual disk, you just need to connect the VHD(X) on the physical system.
I hope that in all other cases you will not have any problems accessing the saved image.
The need and advantages of a bootable USB flash drive
You can create a bootable USB flash drive with Windows XP even if you have a disk drive, since installing the OS from a flash drive is much faster, which is sometimes necessary. A CD/DVD drive in a computer is a rather unreliable thing that cannot be completely relied upon. Many drives do not want to read some brands of discs, scratched or old discs. A flash drive is the most reliable information carrier, taking into account that it is resistant to repeated overwriting, unlike a recordable disk.
When using any operating system, crashes and unexpected problems can occur. Suddenly it may refuse to start at all. No one is immune from such problems with the OS, neither an experienced user nor a beginner; it is impossible to predict this in advance.
Often problems with Windows XP can be fixed by running the recovery function and returning the system back some time.
If you cannot start recovery using the standard operating system method, you can restore the system using a boot disk or flash drive.
Almost all serious problems can be solved only by reinstalling the operating system. The exception is if you have backed up Windows. Therefore, you just need to have a boot disk or flash drive on hand. At any time they can be used to install a new or restore an existing operating system.
Most often, the distribution is recorded on a regular DVD disc, but such storage media is susceptible to mechanical damage. This means that just one deep scratch will render it unusable.
The problem is solved by using a bootable flash drive on which you need to write an image of your operating system. Installing an operating system from a USB drive is practically no different from the installation process from a DVD.
A bootable flash drive containing an operating system can have virtually no mechanical damage. In addition, it has a small physical size and can be easily carried without any damage to it.
Many people may not realize that creating a bootable USB flash drive is quite easy. The only thing that needs to be taken into account is that simply copying files by the operating system to the selected flash drive does not make it bootable - the computer will not boot from it, Windows will not install. Below we described how to correctly make and burn an operating system image to a flash drive so that the media becomes bootable.
Further actions with the image
So, the customized image is at your disposal. What can you do with it next? Yes, anything!
You can now take advantage of one of the major advantages of the new Windows OS deployment architecture over Windows XP or third-party system "cloning" tools. Simply put, you can work with a customized image in the same way as with a standard one. You can change the image - add files to it, as well as integrate drivers and updates.
You can customize the installation process to suit your needs. For example, you can completely automate Windows installation by using an answer file. At the same time, you can set parameters for all passes in it. For example, you can manage hard drive partitions in Windows PE stage 1 , override language settings, create accounts, install applications on first login, etc.
Installing a custom image using Windows Setup
The customized image can be included in the installation disk by copying it to the sources with the name install.wim , i.e. overwriting the standard image. If you immediately create a bootable Windows disk and run the installation, it will proceed manually. However, after installation, the system will appear to the end user in the form in which you configured it in audit mode - with all applications and settings installed (unless, of course, the user overrides those that can be set during the installation process).
Of course, you can use an answer file that automates all steps of the installation. The settings required to minimally automate the installation are described in the article Create an answer file for Windows.
Note : The size of the install.wim included in the installation disk of a 32-bit operating system should not exceed 4 GB (2^32 bytes). Otherwise, the installation will fail. This limitation does not apply to image deployment using the Imagex .
If the Windows installation files are hosted on a network share, you can copy the customized image and response file there, and then boot into Windows PE and connect to the network share and run the installation from the command line.
net use y:\\network_share\distrib y:\setup.exe /unattend:unattend.xml
Deploying a customized image using the ImageX utility
Using Windows PE and the ImageX , you can deploy a customized image to your computer.
The sequence of actions is as follows:
- Boot to Windows PE
- Formatting a volume using the Diskpart
- Apply a customized image to a volume using the ImageX
Note : Deploying an image using ImageX is only possible on a volume that has the same drive letter as the volume saved in the image. Additionally, ImageX Install.wim image .
Let's look at an example of deploying a customized image. It is assumed that the computer's hard drive is not formatted. After booting into Windows PE, you need to use the Diskpart to create a partition on your hard drive and format it. I will demonstrate creating one partition on a disk.
diskpart select disk 0 create partition primary select partition 1 active format fs=NTFS label="System" quick assign letter=c exit
You can get Diskpart utility commands /? , or from the article Description of the Diskpart program with a command line interface. If desired, the process of creating a partition can be automated.
All that remains is to apply the image.
imagex /apply E:\custom.wim 1 c:
In this team:
- /apply - applying the image
- E:\custom.wim - path to the image. When placing it on a network drive, you must first connect it with the command net use E: \\network_share\images .
- 1 — index of the image saved in the WIM file.
- c: is the letter of the volume to which the image is applied.
After applying the image, you can make sure (with the dir ) that the files unpacked from the image appear C. Now this partition contains the operating system in the state in which it was at the time the image was created. If the image was saved after performing settings in audit mode, the next time the computer is turned on, the system will enter OOBE mode, giving the user the opportunity to perform initial settings.
If you copied the configured account profile when you prepared the image, all new accounts will have exactly the same settings.
Deploying a Customized Image Using WDS
As with a standard image, you can use Windows Deployment Services (WDS) to deploy a custom image. A detailed description of this method is beyond the scope of the article, so I will limit myself to linking to the WDS manual posted on Microsoft Technet.
Ultra ISO
UltraISO is a program for creating, converting and editing images. The utility supports more than 30 file formats: iso, nrg, cue, ima, etc. An optical drive emulation function is available, and the created images can be burned to CD/DVD drives.
The program is fully compatible with the Windows operating system (32/64 bit). For the utility to work correctly, Windows 98 and later is required. On the official website of the developers, users can download the completely Russian version of the software. UltraISO is distributed using a shareware model. To get the full version of the utility with all the functionality, you need to purchase a license. The cost of an electronic key for one user is 2,756 rubles. To test the application's capabilities, you can install a free trial version with limited functionality.
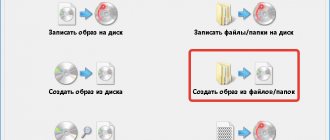
The utility allows users to create images in two ways:
- From disk.
- From folders and files that are stored on the computer.
To create a Windows image from a disk, you need to launch the Create CD Image tool from the toolbar.
In the window that opens, select the drive that contains the files to create the image. Next, you need to specify the disk reading settings, select a folder to save the source file, set the desired output format (ISO, MDF, IMG, CCD, etc.).
To start the process of creating a new Windows image from the disk, you must click the “Make” button.
To create an image from files and folders, you need to go to the top menu section “Actions” - “Add files”. In a new window, you need to select the files and folders from which you want to create an image of the Windows operating system. The added files will be displayed in the main window of the utility.
Unlike similar applications, UltraISO allows you to create an image of your hard drive. In this case, all files and system data will be added to the source file. To start this process, you need to go to the menu section “Boot” - “Create a hard disk image”.
Advantages of the UltraISO program:
- simple and convenient interface with Russian language support;
- function of creating a hard disk image;
- the ability to burn images to disk;
- creating images from files and folders;
- support for more than 30 formats;
- integration with Daemon Tools and Alcohol 120.
Flaws:
- The program does not have Russian-language technical support.
Backing up the operating system to a WIM image
The article focuses on installing applications and configuring the system in audit mode and saving the image at this stage of installation. The advantage of this approach is that the saved image is neutral - it does not contain any accounts (except built-in ones), personal files and confidential data.
You may be wondering whether it is possible to save the system image after completing a full installation, that is, after the OOBE stage, the first login and subsequent configuration. This question is relevant if you want to install a system, work in it for a while - install applications, configure various parameters, etc., and then create an image.
Theoretically, to save the current installation to a WIM image, you just need to follow the instructions in the section of the article Booting into Windows PE and saving the image using the ImageX utility.
Restrictions
Microsoft does not support using an image that has not been sysprep-processed. The company recommends using a built-in backup mechanism that allows you to create a complete copy of the system. I share this recommendation, except when the system is cloned from one disk to another within the same PC .
The technical limitations are set out in KB935467, and below I will outline them in my free translation with explanations. Interestingly, this knowledge base article has undergone changes over time. In particular, there was no mention of the fact that imagex cannot use hard links (I checked - it can).
So, after applying the image:
- Extended file attributes are lost. These are NTFS attributes that are needed only for backward compatibility with OS/2 applications.
- Sparse files are captured, but after being applied they are no longer sparse files.
- Symbolic links and connections are automatically updated. In some scenarios (eg SIS) this causes links to go to the wrong places.
In my opinion, in typical scenarios for using a client OS at home, these restrictions can be neglected. But restoring such an image on another PC (even with the same hardware configuration) can lead to serious hardware conflicts.
Recommendations
That being said, there are several points that I would like to draw your attention to.
- Installed programs and personal files can take up a lot of disk space, which will affect the size of the backup WIM image. To store the image, you may need a dual-layer DVD or a high-capacity USB drive.
- You can reduce the size of a WIM image by excluding files and folders from it when capturing the volume with the ImageX . To do this, use the Wimscript.ini , which is briefly discussed in the article on creating a Windows PE boot disk. Its detailed description is in the help file “Windows PE User Guide”, included in the ADK.
Recovery
Restoring from a backup WIM image is performed as described in the section of the article Deploying a customized image using the ImageX utility. Diskpart utility commands given there needs to be adjusted.
For example, if there are several partitions on a disk and the system is installed on the first one, the sequence of commands to prepare this partition for recovery will be as follows:
diskpart select disk 0 select partition 1 active format fs=NTFS label="System" quick assign letter=c exit
You can include a customized WIM image as part of a boot disk with Windows PE, thereby creating a universal system recovery solution - a recovery environment and a backup image.
Daemon Tools Lite
Daemon Tools Lite is a program for creating disk images and emulating virtual CD/DVD drives. The utility can mount files in b6t, iso, mdf, ape, isz formats to virtual drives. The application is equipped with tools to bypass copy protection systems: SafeDisc, StarForce, Protect CD, etc.
The program is fully compatible with the Windows operating system (32/64 bit). Windows XP and newer are required to install and run the software. Full Russian version available. You can download the Daemon Tools Lite utility for free. The free license includes built-in third-party advertising offers from the software developer’s partners. Also, owners of the free version receive limited technical support. To remove advertising from the software interface, you need to buy a license. The price of the Daemon Tools Lite activation key is 5 euros (forever). Users can install the application on 3 computers at the same time.
After starting the program, the main window will open. To create an image of the Windows operating system, you need to go to the “Image Editor” section.
The next stage is choosing a method to create an image. The first available option is to create an image from the disk.
In this case, you need to insert the Windows disc into the disk drive of your computer or laptop. After launching this tool, you need to perform basic settings:
- Select the drive that contains the data disk.
- Set the folder to save the source file.
- Select image format: MDX, MDS or ISO.
- Protect the image with a password. This item for setting up the process of creating an image from a disk is optional.
- To start the process, you need to click the “Start” button.
The second available method is to create an image from folders or files. After running this tool, you need to set the following parameters:
- Add files to create an image.
- Select drive size. Users can choose a template option or set their own size.
- Select a folder to save the source file on your computer or removable storage device.
- Set the desired image format.
- After this, you need to start the process of creating an image with data from files and folders.
Benefits of Daemon Tools Lite:
- the ability to create and edit images;
- simple and convenient interface with Russian language support;
- function for creating virtual drives.
Flaws:
- You cannot save backup copies of images to cloud storage.