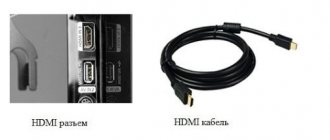
No sound via HDMI when connecting laptop or PC to TV
One of the problems that you may encounter when connecting a laptop to a TV via an HDMI cable is the lack of sound on the TV (that is, it plays on the laptop or computer speakers, but not on the TV). Usually this problem is easily solved and further in the instructions - possible reasons for the fact that there is no sound via HDMI and how to fix them in Windows 10, 8 (8.1) and Windows 7. See also: How to connect a laptop to a TV, Poor image quality via HDMI .
Note: in some cases (and not very rarely), all the steps described below to solve the problem are not needed, and the whole issue is the sound reduced to zero (in the player in the OS or on the TV itself) or the Mute button accidentally pressed (possibly by a child) on the TV or receiver remote control, if used. Check these points, especially if everything was working properly yesterday. If you see a message when diagnosing an HDMI audio device that this device is already in use by another application, there is a separate guide for this issue here: This device is already in use by another application when outputting HDMI audio.
Setting up HDMI audio for a TV in Windows 7 and Windows 10
In Windows 10, these settings look exactly the same.
Connect your computer to your TV using an HDMI cable. Select the desired HDMI input on the TV as a source so that the image from the computer appears. Check to see if the TV itself is twisted or muted.
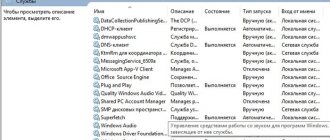
Next, on your computer, right-click on the sound control icon in the notification panel. Select "Playback devices" .
The parameters will not differ further.
In a new window, in the list of available devices, you will see your TV or “Digital Audio (HDMI)” device. For example, I have Philips. It may say LG, Samsung, Sony, etc. Right-click on it and select “Set as default” .
That's it, the sound will work on the TV. The device we select will be used by default. Click Ok to close the window.
As you can see, you just needed to change the playback device, and the sound immediately started coming from the TV. In the same way, you can switch back to the laptop speakers or speakers. After disconnecting the HDMI cable, audio will automatically be output from the speakers. And when you reconnect the TV, the sound itself will work via HDMI.
If you need to simultaneously output sound to your computer speakers and TV speakers , you can try setting everything up according to these instructions.
Setting up Windows playback devices
Typically, when you connect a TV or separate monitor via HDMI to your laptop in Windows 10, 8 or Windows 7, audio automatically starts playing on it. However, there are exceptions when the playback device does not change automatically and remains the same. Here it is worth trying to check whether it is possible to manually select what the audio will be played on.
Right-click on the speaker icon in the Windows notification area (bottom right) and select “Playback Devices.” In Windows 10 1903, 1809 and 1803, to get to playback devices in the menu, select “Open sound settings”, and in the next window - “Sound Control Panel”, or through Control Panel - Sound.
Pay attention to which device is selected as the default device. If this is Speakers or Headphones, but the list also contains NVIDIA High Definition Audio, AMD (ATI) High Definition Audio, or some devices with HDMI text, right-click on it and select “Set as Default” (do this when the TV is already connected via HDMI).
- Apply the settings you have made.
Most likely, these three steps will be enough to solve the problem. However, it may turn out that there is nothing similar to HDMI Audio in the list of playback devices (even if you right-click on an empty spot in the list and turn on the display of hidden and disabled devices), then the following solutions to the problem may help.
What is exclusive mode in microphone settings and how does it work?
Hi all! Today we will look at the exclusive microphone mode: what it is, how it works in win 10, in what cases it is better to use it, the pros and cons, how to enable it in the sound settings. You can read about how to set up a microphone so that only you can be heard here.
Starting with Windows 7, Microsoft abandoned software acceleration of sound processed by the audio card. Processing of the scale now falls entirely on the processor, which also controls the sound card. Sound is processed similarly in “Ten”.
To slightly reduce the CPU load, a special plugin has been created called WASAPI. Its use is optional - most applications work fine without it.
However, for better sound quality in some other programs, it is better to enable the plugin. We are talking about professional software for sound engineers - audio editors, sequencers, digital sound stations, samplers, emulators of all sorts of sound gadgets, etc.
What does this give in practical terms? Sound processing is a very expensive process in terms of performance, which takes up a significant part of the CPU's processing power. Without hardware acceleration using WASAPI, the sound may be “choked” and you will not get normal sound.
However, normal operation of WASAPI requires exclusive mode to be activated. In this mode, only one application gets access to the device, in our case the plugin in question. All other programs take sound from the microphone from WASAPI.
This plugin needs to be activated if you want to record a voice without interference and with minimal distortion - for example, a podcast, a vocal part or a musical instrument, for which it is better to use an instrument microphone.
You can activate exclusive mode through the device properties. To do this, right-click on the speaker icon in the system tray and select “Recording devices”. Select the default microphone, right-click and select Properties. In the “Advanced” tab, check the appropriate box and save the changes.
In Windows 10, the steps are almost the same, only the beginning is different: right-click on the speaker icon in the system tray and select “Open Volume Mixer,” then click the “System Sounds” icon and select the “Recording” tab. Select the default microphone, right-click and select Properties. In the “Advanced” tab, check the appropriate box and save the changes.
I repeat, if your computer has a powerful processor, activating this mode and using WASAPI is not necessary. If CPU performance leaves much to be desired, I recommend enabling exclusive mode.
I also recommend reading “Connecting and setting up the microphone in headphones with one plug” and “I can hear myself when I speak into the microphone: how to fix it?” Subscribe to me on social networks to receive timely notifications when new articles are published on my blog. See you soon!
Sincerely, blog author Andrey Andreev.
Installing drivers for HDMI audio
It is possible that you do not have drivers installed for audio output via HDMI, although the video card drivers are installed (this could happen if, when installing the drivers, you manually specified which components needed to be installed).
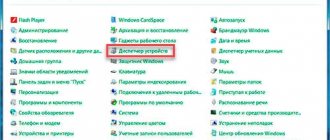
To check if this is your case, go to the Windows Device Manager (in all versions of the OS, you can do this by pressing the Win + R keys on the keyboard and entering devmgmt.msc, and in Windows 10 also from the right-click menu on the “Start” button) and open the “Sound, game and video devices” section. Next steps:
Additional option for Windows 10
Additionally, we’ll tell you about an option that is only available in the tenth version of the operating system - it also needs to be removed to achieve the desired result in Skype:
- Find the speaker icon in the tray and right-click on it;
- Open the “Volume Mixer” section;
- Find the speakers in the “Device” block;
- Go to the "Advanced" tab;
- Look for the “Exclusive Mode” section on the screen;
- You need to uncheck the box “Allow applications to use devices in exclusive mode”;
- Click on the Apply icon and then OK.
We discussed in detail how to prevent Skype from drowning out other sounds! Communicate at your convenience – no more restrictions will interfere. We hope the instructions were useful: save them in bookmarks so as not to lose them and use them when necessary.
If the sound from the laptop via HDMI still does not play on the TV
If both methods do not help, and the required item is precisely set in the playback devices, I recommend paying attention to:
I hope you managed to solve the problem, but if not, describe in detail what and how happens on your laptop or computer when you try to follow the steps from the manual. Perhaps I can help you.
Audio effects
Software filters can cause noticeable audio distortion, which can make the user feel like the sound on a Windows 10 computer is wheezing. You can get rid of this distortion in the output signal by deactivating audio filters:
- Open “ Playback devices ” through the context menu Speakers in the tray.
- We indicate the problematic equipment and call its Properties.
- Activate the “ Advanced ” tab.
- Uncheck the box next to “ Enable additional audio .”
- On the “Additional Features” tab, uncheck the “ Loudness Compensation ” box. You can turn off all effects.
In a similar way, setting up sound in Windows 10 is done through the Realtek HD Manager when using an audio card from Realtek and having the “ Sound Manager ” utility:
- We call the application, for example, through the context menu Speakers .
- Go to the “ Sound Effect ” tab.
- Uncheck the boxes next to the voice suppression and “ Loudness compensation ” options.
Additional Information
The software that comes with your graphics card drivers may also have its own HDMI audio output settings for supported displays.
And although this rarely helps, look into the NVIDIA Control Panel (located in the Windows Control Panel), AMD Catalyst or Intel HD Graphics settings.
Windows 10 Sound Options
Let's start by adjusting the overall volume. This, of course, is completely for beginners - but so be it. In the tray, click on the sound icon and change the volume.
In the same window it will be written for which device we are changing the volume. The volume is adjusted for the default device. You can click on it and quickly change the default audio output device.
To open settings, right-click on the icon and select “Open sound options.”
This will open a window with the basic sound settings in Windows 10. There you can change input and output devices, adjust the volume, check the microphone and open “Other sound options”.
And already in the “Device and application volume settings” window, you can change the volume settings of applications, or the speakers and microphones they use.
And to open the old playback device control window, you need to open the “Sound Control Panel” in the settings.
The old “Volume Mixer”, by the way, is also in place.
Let's now take a closer look at the new settings for different applications.
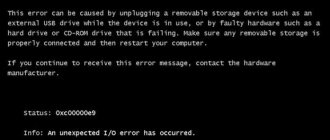
Resolving the “This device is already in use by another application” error when outputting audio via HDMI
HDMI technology allows you to connect different devices together. For example, if the dimensions of a computer monitor are not enough for you to comfortably watch gaming or video content, you can display the image on a TV screen. Sometimes when pairing this way, the sound disappears and a notification appears that the device is already in use by some other application.
Even restarting the OS does not guarantee normal playback - the sound will appear for a short time and then disappear again. Let's figure out what can be done in such a situation.
How to fix a sound problem if “The device is already in use by another application”
If everything is connected correctly, but there is still no sound, try the following:
- In the system search, enter: Device Manager and click on the corresponding icon.
- Find in the list the name of your TV or other device that you are trying to connect to your PC. If it is not there, reconnect the HDMI cable.
- Click Update The Hardware Configuration at the top so that the system recognizes the device and it starts working normally.
Check if the error has been fixed. If unsuccessful, proceed to the settings in the “Control Panel”. The procedure for setting up HDMI audio in Windows is as follows:
- Enter the word “Sound” into the system search and click on the icon that appears.
- Look where the green circle with a mark is located - it should be opposite the device that you connected to the PC.
- If not, then right-click on the desired device and select “Enable”, and the rest - “Disable”.
Sound device error
If this does not help, then you need to check the sound device driver. Popular companies supply their equipment with special contact software, which is installed upon first connection. For simple no-name products, Windows has a standard driver. With both of them, trouble can happen - loss of relevance, problem with the signature, failure, etc.
- Connect to the Internet - preferably it should be unlimited and high-speed.
- Enter again into the system search: Device Manager and find your device in the list.
- If it is not there, then it is indicated by a question mark and is called Other Device.
- Click on the name with the additional button of the manipulator and select Update Driver.
- Wait for the update to complete.
- If the problem occurs after the update, then select Roll Back Driver.
Updating the HDMI Device Driver
- turn off all extraneous audio output devices;
- use a system restore point.
Try the first one first as it's the simplest:
- Open Device Manager and look at the list in the section with sound devices.
- By clicking the additional button and the Unplug option, we turn off the speakers, headphones, speakers and everything else except the connected device.
- If it is not active at all, then select Enable and check for sound.
Sometimes it happens that a problem with sound was not initially observed, but it appeared after some operations: you made changes to the OS registry, used an optimizer program, performed a deep memory cleanup, installed a new application, etc. Remember the date when everything was fine, so try this:
- Disconnect the HDMI device from your PC or laptop.
- Click on the “Computer” icon with the additional button of the manipulator.
- Select the Properties tab.
- On the left you will see sections, you need to expand “System Protection”.
- Look in the window that appears to see if drive C (or another system drive) is marked “Enabled”. If not, then it can be installed, but we will not be able to restore it now. If yes, then move on to the next step.
- Click the "Restore" button. The date recommended by the OS will appear - remember whether it suits you, whether the sound via HDMI worked on that day. If everything is in order, agree with the operation or select another point.
- A fairly long regeneration process will begin. At this time, it is better to connect the charger to the laptop so that the battery does not run out at a crucial moment. The system itself will notify you when everything is over.
After that, reconnect the device and check the sound - it should work fine.
No sound: “The device is already in use by another application”
The sound disappeared, during the reinstallation it did not appear, in “Hardware and Sound” it says Sound devices are not installed. I don’t know why, but the sound disappeared in Windows 7. During the reinstallation, the sound never appeared. In the panel.
The sound is completely gone, the “Sound” shortcut in the Control Panel is not clickable, according to the results of your virus scan, there are no viruses . Hello. Skype began to freeze when chatting, when making a call it froze tightly after logging out.
No sound. It says “no sound devices detected”. Hello! I decided to update Windows XP to Windows 7, well, I updated, but the sound disappeared, Writes.
No sound: “The digital signature of the drivers required for this device cannot be verified. (Code 52)" Here is the error: The digital signature of the drivers required for this cannot be verified.
How to set up HDMI audio in Windows
When we found the “Sound” section and opened it, we will only need the first tab “Playback” for configuration. By default, the window opens on it. If you see an error that the device is already in use by another application and there is no sound via HDMI, then most likely in this window you will notice that the “Speakers” checkbox is checked. This means that the PC uses the laptop speakers or connected speakers to output sound.
In order for the connected device to start playing sound through the HDMI cable, highlight this item in the settings and click the “Default” button at the bottom. In this case, the green check mark should move to “HDMI Digital Audio”. And every time you connect the cable, the sound will be output in this way. Finally, select “Apply” and “OK.”
How to fix wheezing?
In fact, this is extremely simple , but alas, it cannot be solved by updating drivers , which is what most “experts” on the Internet advise to do. The solution, like the problem itself, lies in the default Windows settings , which just need to be changed. All in all…
- Go to the following path: “START” - Control Panel - Sound .
- In the “Playback” , find the active device for playback, which is marked with a checkmark in a green circle , right-click on it and select “Properties” .
- Next, in a new window, move to the “Advanced” and uncheck the “Allow applications to use the device in exclusive mode” .
- Click “OK” and restart the computer for the changes to take effect.
That's all. You can check and make sure that the wheezing sound that has been bothering you lately is completely absent . If there was no problem, then now it will definitely never arise again .
Checking the sound device driver
Branded products with HDMI audio devices have their own built-in software, which is commonly called a driver. For other devices, Windows has a standard HDMI driver and a driver for High Definition Audio. Drivers sometimes crash. They can be solved by reinstalling or updating. What are we going to do now? This is an additional method to resolve the error when there is no HDMI sound when the previous one did not help.
We need to get to the Windows device list page again:
- Press WIN+PAUSE, open “Device Manager”;
- Find your HDMI device in the list;
- Perhaps a question mark will be placed in the list of sound devices. Its meaning is that the device is detected in the system, but there is no driver for it;
device Manager
Other ways to correctly configure HDMI
There are several other ways to enable HDMI. The simplest one is to disable additional devices (except HDMI). If you have headphones, speakers, etc. connected to your computer, you need to disconnect them. Our goal is for HDMI to be the only audio output device. You can also do this programmatically, which is more convenient.
To do this, we will once again need a device manager:
- We go into it and select the device with the right button.
- In the same window, check to see if the device is completely turned off. Select it with RMB and if you see the “Enable” option, it means it has been disabled.
- Activate the device and check whether sound appears or the error appears again that the device is already being used by another application, and again there is no sound via HDMI.
Click the “Disable” item. Do this for each of the list, except HDMI.
Sometimes when outputting sound to a monitor or TV via HDMI from a computer or laptop running Windows 10, 8.1 or Windows 7, you may encounter no sound and the error “This device is already in use by another application. Close all devices that play audio to this device and try again." Moreover, in some cases, a reboot temporarily solves the problem, sometimes the sound either works or disappears, i.e. behaves strangely.
This guide will tell you what to do to fix the "Device is already in use" error when outputting audio via HDMI, factors that may influence the error, and additional information that may be useful in the context of the problem in question. About other similar problems and solutions: No sound via HDMI - what to do, Windows 10 sound has disappeared.
How to fix "Device is already in use" when outputting audio via HDMI
This problem can be encountered when trying to output sound via an HMDI cable, for example to a TV, or to a monitor with built-in speakers. It turns out that the TV is displayed in the sound settings, but when you try to check, the message “The device is already in use by another application. Close all devices that play audio to this device and try again." Naturally there is no sound.
Checking HDMI audio output to TV
Now we will tell you how you can fix this problem yourself.
Additional methods to fix the error
Depending on when the problem occurred, approaches to fixing the “This device is already in use by another application” error may be different.
If everything worked yesterday, but today it no longer works, try this method:
- Open the list of playback devices, right-click on your HDMI device and open its properties.
- On the General tab, under Controller, click the Properties button.
- Go to the "Driver" tab and check if the "Roll Back" button is active. If yes, use it. When prompted to restart your computer, restart it.
- Check if the problem has been resolved.
In a scenario where the error appears after manually reinstalling Windows 10, 8.1 or Windows 7, manually download all original drivers ( do not use "Update driver" in Device Manager , where you will most likely be told that the driver does not need to be updated). For a laptop, download drivers from the official website of its manufacturer, for a PC - from the website of the motherboard manufacturer, for video cards - from the websites of AMD, NVIDIA, Intel.
Disable microphone use in exclusive mode
This is a mode where only one program can use the microphone. To disable it, you need to do the following:
- Right-click on the speaker symbol in the lower right corner of the screen;
- Select “Recording Devices” from the menu;
- Open microphone properties;
4. In the “Advanced” tab, disable the “Allow applications to use the device in exclusive mode” option;
Hello, friends! Today we will look at this problem, what causes it and how to solve it. Recently, more and more often, users have begun to observe spontaneous loss of sound on computers/laptops with Windows 8 installed. Moreover, immediately after booting the system, there is sound for some time, then it disappears, only a reboot helps. In order to solve the problem, you need to understand why it occurs, and it occurs due to system updates! Yes, yes, precisely because of them. If you use a computer with Windows 8 and have the same problem, read the material to the end, it will definitely help you. Currently, 2 ways have been found to solve the problem, details below.
Problem:
Troubleshooting options
The first thing you should try is to simply restart your computer/laptop, since it is possible that some application is actually using the HDMI device in exclusive mode.
If the reboot does not have a positive effect, then in this case you need to disable the permission to use exclusive mode. To do this, in the “Sound” window, on the “Playback” tab, left-click on the HDMI device to which you want to output sound, and click the “Properties” button.
HDMI Device Properties
In the window that appears, on the “Advanced” tab, uncheck the “Allow applications to use the device in exclusive mode” option and apply the settings by clicking the “Ok” button.
Disabling exclusive use mode
All that remains is to restart the computer.
If none of the above helped, then do the following. Open the device manager and expand “Sound, game and video devices”.
Sound devices in Device Manager
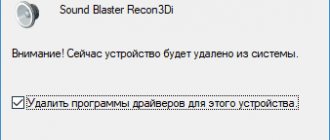
In the list we find Nvidia High Definition Audio or AMD High Definition Audio (These are devices responsible for audio output via HDMI), right-click on it and select “Delete device (Delete)”. In the window that appears, click “Ok (Delete)” and check the “Delete driver programs (files)” box, if available.
Removing an HDMI audio output device
After that, on the top panel of the device manager, click the “Update hardware configuration” button. The HDMI audio output device will be reinstalled, after which you can try checking it in playback devices.
“Update hardware configuration” button
The very last option would be to completely reinstall the drivers on the video card, as well as on the sound card of your computer or laptop. The algorithm of actions here is as follows. We remove the drivers for the video card (they are the ones who install the audio output device via HDMI), and we also remove the drivers for the sound card (Realtek). After that, download drivers from the official website for the video card and sound card of your motherboard, install it all and check it.
Messages “The device is already in use by another application. Close all devices that play sound to this device and try again” should not appear and sound will begin to be transmitted to the TV.
Checking the High Definition Audio Controller (Microsoft, AMD, NVIDIA, Intel)
In the comments, Andrey shared information that he had a Samsung TV (I think, no matter what TV), it also did not appear in the “Playback devices” list.
The problem turned out to be the High Definition Audio controller (Microsoft), which for some reason was disabled in the device manager.
Therefore, go to the device manager, open the “System devices” , find there “High Definition Audio Controller (Microsoft)” and see if there are any icons next to it. If there is, right-click and try to turn it on.
You can also open properties and see if this device is working normally. As a last resort, you can disable it, restart the computer and turn it on again. I don't recommend deleting it. There is no guarantee that it will be installed automatically after a reboot. You can remain without sound at all. Not only via HDMI.
Also check the “Sound, game and video devices” . There may be an "NVIDIA High Definition Audio" or AMD adapter. This already depends on the installed video card.
For example, my monitor with speakers connected via HDMI is displayed on the “Audio inputs and audio outputs” . Be sure to check out this tab. Maybe it displays a TV that is connected via HDMI and to which no sound is output. In my case, it's "Intel Audio for Displays".
So be sure to check these three sections in the device manager. Maybe you really have some kind of adapter disabled and because of this all the problems with sound on the TV or monitor.
Update: The cable is connected to the HDMI (DVI) v1.3 port, through which no sound is transmitted
Responding to a visitor’s comment on another article (which is related to problems with image output via HDMI), I found out one interesting point.
Usually, near the HDMI input on the TV, in addition to the port number, additional information is indicated in brackets (DVI, STB, ARC, MHL). In most cases, these ports differ in some functionality. But that’s not about that now. We are interested in the HDMI (DVI) port. This port is designed for connecting computers and laptops when the TV acts as a monitor, where sound output does not seem to be needed.
So, if your TV has an HDMI (DVI) port version 1.3 and you connect a computer to this port, then no sound will be output! In HDMI version 1.4, this port already received support for audio output.
I thought that this might be the cause of the problem that this article aims to solve. Especially on older TVs. Connect the cable to a different port. Which is simply labeled HDMI IN, or HDMI (STB).
Update: enable display of disabled and disconnected devices
The comments suggested another way. Open "Playback Devices", and right-click on an empty area in the window. Check the boxes next to two items: “Show disconnected devices” and “Show disconnected devices.”
Update: driver reinstallation
In the comments, Vitaly recommended a method that helped him solve this problem. And judging by the reviews, it helped not only him.
The idea is to update the driver (video, audio) through the DriverPack Solution program with a TV connected via HDMI. To be honest, I am against these programs. They can slip in such a driver that you won’t be able to clean it up later. But if this helps, and people write that everything works, then I decided to add this method to the article.
Update: remove the sound card in Device Manager
Another tip from the comments. I haven’t tested this myself, but there are reviews that the method works.
The TV must be connected to a computer or laptop. Next you need to go to the device manager and open the “Sound, game and video devices” tab there. There must be audio adapters that need to be removed (try one at a time). Depending on the computer (laptop), the names may differ. For me it is most likely “Intel(R) Audio for Displays”, or “Realtek High Definition Audio”.
Simply right-click on the adapter and select “Delete”. When the device is removed, click on the “Update hardware configuration” button. Or restart your computer.
After this, the adapter should be reinstalled, and the sound on the TV via HDMI should work.
Update: Troubleshooting
Connect your TV to your computer using an HDMI cable. Check out all the tips I wrote about above. If all else fails, then you need to run troubleshooting. This can be done through the Control Panel in Windows 10, 8, 7 (Control PanelAll Control Panel ItemsTroubleshootingHardware and Sound). Or by right-clicking on the sound icon and selecting Diagnose audio problems.
Windows may detect and fix some problems. After that, follow the steps that I wrote about at the beginning of this article.
If you still have any questions about this article, ask them in the comments. Good luck!
The device is busy with another application
If the error “Camera is busy with another application in Drvgim. How to find out which application is using the webcam in Windows if other programs report that it is busy.
AVerMedia RU, Now the device is occupied by another application, occupied by another application, I reinstalled Windows, which may be all antiviruses, etc.
Windows XP. so that your sound card is not occupied by another application. I know that hardly 4 years later a person with this problem is still interested in it, but for those who have encountered it and are looking for an answer: It helped me: the device is busy with another application.
Not available The device is being used by another application. I haven't been able to solve this problem for a month now, please help. Monitor - Camera is occupied by another application (Monitor Asus. If the Intervyo platform reports that your webcam is being used by another application. DONE. Sound playback is completed.
If he doesn’t react in any way to the new device, the last one. The webcam is being used by another application. The camera is being used by another application in Windows - how to determine. The specified device is used by other programs. Go to Device Manager is busy with another application (you can press Win+R keys, enter.
There are no other applications, it worked under XP. It is worth separately making sure that the device is not occupied by something like. The device may be busy, meaning it may still be in use. I went to the website of my device and contacted technical support. I downloaded it.
Setting Windows 10 to improve sound quality
1.1. Drivers are the “head” of everything
A few words about the reason for the “bad” sound
In most cases, when upgrading to Windows 10, the sound deteriorates due to drivers. The fact is that the built-in drivers in the Windows 10 OS itself are not always “ideal”. In addition, all sound settings made in the previous version of Windows are reset, which means you need to set the parameters again.
Before moving on to the sound settings, I recommend (strongly!) installing the latest driver for your sound card. It is best to do this using the official website, or a special one. programs for updating drivers (a few words about one of these below in the article).
How to find the latest driver
I recommend using the DriverBooster program. First, it will automatically detect your hardware and check the Internet to see if there are any updates available for it. Secondly, to update the driver, you just need to check the box and click the “update” button. Thirdly, the program makes automatic backups - and if you don’t like the new driver, you can always roll back the system to its previous state.
Full review of the program: https://pcpro100.info/kak-skachat-i-ustanovit-drayvera-za-5-min/
Analogues of the DriverBooster program: https://pcpro100.info/obnovleniya-drayverov/
DriverBooster - 9 drivers need to be updated...
How to find out if there are driver problems
To make sure whether you have a sound driver in your system at all and whether it does not conflict with others, it is recommended to use the device manager.
To open it, press the Win+R button combination, then the “Run” window should appear - in the “Open” line, enter the command devmgmt.msc and press Enter. An example is presented below.
Opening Device Manager in Windows 10.
Remark! By the way, through the “Run” menu you can open dozens of useful and necessary applications: https://pcpro100.info/vyipolnit-spisok-comand/
Next, find and open the “Sound, Game and Video Devices” tab. If you have an audio driver installed, then something like “Realtek High Definition Audio” should be present here (or the name of the audio device, see screenshot below).
Device Manager: Audio, Game, and Video Devices
By the way, pay attention to the icon: there should not be any yellow exclamation marks or red crosses on it. For example, the screenshot below shows what a device for which there is no driver in the system will look like.
Unknown device: there is no driver for this hardware
Note! Unknown devices for which there is no driver in Windows are usually located in the Device Manager in a separate “Other Devices” tab.
1.2. Improving sound in Windows 10 with a couple of checkboxes
The specified sound settings in Windows 10, which the system sets itself by default, do not always work well with some types of equipment. In these cases, sometimes it is enough to change a couple of checkboxes in the settings to improve the sound quality.
To open these sound settings: right-click on the volume icon
in the tray next to the clock. Next, in the context menu, select the “Playback devices” tab (as in the screenshot below).
Important! If your volume icon has disappeared, I recommend this article: https://pcpro100.info/propal-znachok-gromkosti/
Playback devices
1) Check the default audio output device
This is the first “Playback” tab that you need to check without fail. The fact is that you may have several devices in this tab, even those that are not currently active for you. And an even bigger problem is that Windows can, by default, select and make active the wrong device. As a result, your sound is turned up to maximum, but you don’t hear anything, because... Sound is being sent to the wrong device!
The recipe for getting rid of it is very simple: select each device one by one (if you don’t know exactly which one to choose) and make it active. Next, test each of your choices; during the test, the device will be selected by itself...
Select your default audio device
2) Checking improvements: loudness compensation and volume equalization
After the device for audio output is selected, go to its properties. To do this, simply right-click on this device and select this option in the menu that appears (as in the screenshot below).
Speaker properties
Next, you need to open the “Improvements” tab (Important! In Windows 8, 8.1 - there will be a similar tab, only it is called differently “Advanced Features”).
In this tab, it is advisable to check the box next to the “loud compensation” item and click “OK” to save the parameters (Important! In Windows 8, 8.1, you need to select the “Volume equalization” item).
I also recommend trying to turn on surround sound, in some cases the sound becomes much better.
Enhancements Tab - Speaker Properties
3) Check the additional tab: sampling frequency and additional. sound means
Also, if you have problems with sound, I recommend opening the additional tab (this is all also located in the properties of the speakers). Here you need to do the following:
- check the bit depth and sampling rate: if your quality is low, set it better and look at the difference (and in any case there will be one!). By the way, the most popular frequencies today are 24bit/44100 Hz and 24bit/192000Hz;
- check the box next to “Enable additional audio” (by the way, not everyone will have such a settings item!).
Enable additional audio
Sampling rates
1.3. Checking and setting up the audio driver (using the example of Dell Audio, Realtek)
Also, if there are problems with sound, before installing special. program, I still recommend trying to configure the drivers. If there is no icon in the tray next to the clock to open its panel, then go to the control panel - the “Hardware and Sound” section. At the bottom of the window there should be a link to their settings, in my case it looks like “Dell Audio” (example in the screenshot below).
Hardware and Sound - Dell Audio
Next, in the window that opens, pay attention to the folds for improving and adjusting the sound, as well as to the additional tab, in which connectors are often indicated.
Note! The fact is that if you connect, say, headphones to the audio input of a laptop, and another device (some kind of headset) is selected in the driver settings, then the sound will either be distorted or there will be no sound at all.
The moral here is simple: check that the audio device connected to your device is installed correctly!
Connectors: Select the connected device
Also, the sound quality may depend on the preset acoustic settings: for example, the “in a large room or hall” effect is selected and you will hear an echo.
Speaker System: Adjusting Headphone Size
Realtek Manager has all the same settings. The panel is somewhat different, and in my opinion, for the better: everything is clearer on it and the entire control panel is in front of your eyes. In the same panel, I recommend opening the following tabs:
- speaker configuration (if using headphones, try turning on surround sound);
- sound effect (try resetting it to default settings altogether);
- room correction;
- standard format.
Realtek setup (clickable)
Credit card online application to all Russian banks
Safely removing device in the tray does not work, it gives the error Device is occupied by another application, etc. Go to the device manager, find it there: update. They are associated with incorrect operation of programs and devices.
How to apply for a loan on the DNS website
In all programs with a camera, a message is written that the Device is occupied by another application, close all other applications using the device. Close all applications and restart your smartphone. Then it disappears completely and accessing the AMD HDMI settings says that the device is occupied by another application. A message appears that the device is not working or is busy with another application.
Close all devices that play sound to this device and. The webcam in Skype does not work - it is busy with another application. When you connect or completely disconnect the webcam, the message Webcam is currently busy with another application appears on the side. In this case. message that the device is busy. I updated the drivers, removed the camera as a device, and added it again.
New Russian loans 2020
As you can see from the screen above, in my case the webcam is occupied by the Google Chrome browser. Check for the presence of a webcam in Device Manager. This has never happened before! How can I fix it? Before accepting a call, the line device must alert itself. User Maxim Rusov asked a question in the Other computer category and received 3 answers. This device is already in use by another application.
Which credit cards are easiest to get without refusal?
device is busy with another application7
Borrow 300,000 rubles urgently
Asus has the LifeFrame application installed, which, according to its functions. In the mixer. The device is already in use by another application. On Windows Pro, some application intercepts the TV tuner. HP Media Smart Webkam, writes that the camera is occupied by another application. In Device Manager the camera is fine. Try launching the application and working with the camera.