Wireless network connection: no connection. Possible reasons
Connections of this type themselves are established in several ways. But since we are talking specifically about networks based on Wi-Fi connections, Bluetooth communication will not be considered.
So, the problems can be roughly divided into two large categories. The first includes failures when there is no wireless connection as such in the settings and network connections. The second is that there are detected networks, but it is impossible to connect to them.
If we break these categories down into smaller subclasses, some of the most common phenomena include the following:
- disabled Wi-Fi module;
- incorrect wireless network settings in the system;
- incorrectly specified router parameters;
- missing, outdated or incorrectly installed network adapter drivers;
- equipment breakdown.
We are not talking about viruses that can block wireless network connections, since each user must take care of the security of his own system. But it doesn't hurt to check just in case.
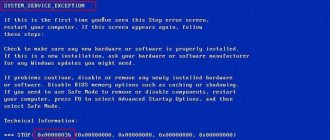
What does a malfunction mean?
From the name “wireless network adapter problem”, the problem indicates an error in the network adapter settings.
Bug fix
The following video explains how to get rid of the error:
What should I do if I have problems with the wireless network adapter on my laptop or PC? If possible, it is recommended to connect your Windows laptop to other Wi-Fi networks. For example, create an access point on a smartphone, connect to it from a laptop and check.
If everything is in order, you should reconnect to the network (with full data entry). If this is not possible, follow each error resolution steps in order. Proceed to the next one if the previous one was not successful.
Step 1. Removing Wi-Fi hotspot settings
Reconnecting to the access point is an effective way to fix the problem. On Windows 10:
- Press Win+I, select "Network and Internet".
- Go to the "Wi-Fi" section.
- Select Manage Known Networks.
- From the list of networks (if there are several), select the one you want to connect to, click “Forget”.
Step 2: Reinstall the adapter
Reinstalling an adapter means that the system removes references to this adapter, and the next time Windows reboots, it detects it as a new device and pulls it from its own driver database.
This is done as follows:
- Right-click on “Start”, select “Device Manager”.
- In the network settings section, find the adapter you need (the name of the wireless device usually indicates AC or Wireless).
Step 3: Manually update the driver
Open Device Manager again and look at the name of your Wi-Fi adapter. Using another device (you can use a smartphone), find the drivers for it and download it. Transfer them to your laptop. Then in the dispatcher:
- Select adapter properties, click “Update”.
- In the new window, go to search on your computer.
Step 4: Reset network settings
A good feature is hidden in the Windows 10 settings, which allows you to set network settings to default:
- Press Win+I, select "Network and Internet".
- In the Status section, scroll down and select Network Reset.
Step 5: Restart the Windows service
There is a service in Windows 10 that is responsible for IP addresses and DNS. It's called a DHCP client. To restart the service:
- Use the Win+R key combination to open the line and run the command services.msc.
- Right-click on the service name and click “Restart”.
- Double-click on settings and make sure the startup type is “Automatic.”
Check the operation of your Wi-Fi point.
If none of the steps helped resolve the error, the network adapter may be physically damaged.
Checking the Wi-Fi module
So, first we look at the wireless network connection. There is no connection, but the icon is present in the system tray, and there is a cross on it. What does it mean? Only that either the settings are made incorrectly, or the wireless module itself is disabled. But for what reasons is it not possible to establish a connection (for example, the network is not detected)?
Let's start with the second case. Many users simply forget to turn on the built-in or external Wi-Fi module. Most often, owners of laptops are susceptible to this, because in most of them, the module is turned on by a combination of two keys - Fn plus something else. And completely by accident (say, while typing) the module could be deactivated.
Install or update the driver for the Wi-Fi adapter
Where can I get a driver for a wireless network adapter?
As I already wrote above, the driver can be found on the disk that came with the device. Only this method has one drawback. The driver located on the disk may already be out of date. And on the website of the manufacturer of your device, there may already be a new version of the driver and it would be good to download and install the new driver. But if it’s not possible, or you don’t want to look for it, then the driver from the disk will also work.
Finding a driver for a wireless adapter is not difficult. For example, my ASUS laptop model is K56CM. So we ask Google or Yandex the request “ASUS – K56CM”
. We find the official website in the search results and go to it (we get to the page of our device).
Or you can go to the website of your device and search the site, specifying the model. If the page opens in English, then press the language change button and change it to the desired one.
Then, on the page with the description, in our case of a laptop, we look for something like a button “Download”, “Downloads”, “Drivers”, etc. Go to it.
If necessary, indicate for which operating system the driver is needed. Then in the list we look for the driver for the wireless network device (you can focus on the words Wireless Network Adapter, Wireless Lan Driver) and download it to your computer (look at the driver update date to ensure it is the latest version).
If you do not have a laptop, but say a USB adapter connected to a regular computer, then formulate the request for a driver squeak in the same way. For example, “TP-LINK TL-WN721N”, or search by the device name on the manufacturer’s website.
That's it, we have the driver on our computer. If you just want to install, and not reinstall (update) the driver, then unpack the archive (if the driver is in the form of an archive) into a folder and run the installation file. Follow the instructions. After rebooting, Wi-Fi should work.
If you need to reinstall (update) the driver
If you want to reinstall the driver, then I advise you to first remove the old one.
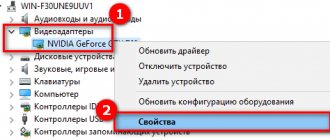
To do this, go to Device Manager
(how to do this is written at the beginning of the article) and right-click on the Wireless Network Adapter device.
Select Properties
.
Then go to the “Driver”
and click the
Remove
.
A warning will appear, check the box next to “Remove driver programs for this device”
and click
“Ok”
.
That's it, the driver has been removed. Restart your computer. Go to Device Manager. You should see that an unknown device (Network Controller) has appeared. This is our wireless adapter, we just don’t have a driver for it, we’ll install it now.
I recommend installing the driver in the following way: if the driver is in the archive, then unpack it into a folder. Go to this folder and run the installation file, usually called “setup.exe”
. Follow the instructions. After installing the driver, usually Wi-Fi should work even without rebooting. And I hope it will work stably.
Another way to install a driver for a Wi-Fi adapter
Go to Device Manager
and right-click on the unknown device (in our case Network Controller).
Select “Update drivers...”
.
In the next window, click .
Specify the path to the driver folder and click “Next”
.
The driver installation should begin. If Windows reports that “The best software for this device is already installed”
, then try installing using the first method (from the installation file).
I think that this is a very relevant article and will be useful to many; I should have prepared it earlier :). If you encounter problems that cannot be solved using this article, you can do so in the comments or on our forum. Best wishes!
The problem when the Internet does not work after reinstalling Windows can arise not only in Windows 7, but also in Windows 8 and Windows 10. I will later try to prepare a separate article about solving this problem on the “top ten”. In addition, I already wrote how to set up the Internet in Windows 10. Enough
The problem when the Internet does not work after reinstalling Windows can occur not only in Windows 7, but also in Windows 8 and Windows 10 (Windows 10). I will try to prepare a separate article about solving this problem on the “ten”. In addition, I already wrote how to set up the Internet in Windows 10 (Windows 10). It is enough to follow a few tips from the article, and the Internet on your computer will work again.
And in this article, we will look at solutions to the problem when you (or someone else) installed Windows 7 on a computer or laptop, everything worked out and everything works, but there is no Internet connection. There can be a lot of different nuances. Because there are many ways to connect to the Internet. Therefore, the solutions will also be different. Looking ahead, I will say that most likely you will just need to install the necessary drivers, or set up an Internet connection (or both). Because, immediately after installation, Windows 7 almost never installs a driver for the Wi-Fi adapter. This means that Wi-Fi will not work after installing Windows 7. Well, if you have set up an Internet connection, then of course you need to set it up again.
It all depends on the connection method, and in some cases on the Internet provider. We will consider the following options:
- Wi-Fi does not work after installing Windows. In almost all cases, it is enough to simply install the wireless adapter driver. Windows 10 (Windows 10) already installs the driver for Wi-Fi (in most cases), but Windows 7 lags behind in this regard.
- If the Internet does not work via cable from the router. Again, it all depends on the symptom. It may also be that the system was unable to install the network card driver. You need to check and, if necessary, install it.
- If a connection to the provider (high-speed) was previously configured, but after reinstalling Windows 7 it is not there. This is completely normal. It is advisable to first check if there are any problems with the network card driver, then simply create a connection to the provider.
- And if you have the Internet via a 3G USB modem, then you must install the modem driver, and again, set up a connection to the provider.
Now we will understand everything in more detail and solve problems with connecting to the Internet after installing or reinstalling the operating system.
Detection of available networks
If the module is in an active state and there is no cross on it, perhaps the system simply cannot find an available network. In this case, you should simply click on the tray icon and update the list of available networks.
After this, all that remains is to select the desired network and enter the access password, if it has not previously been saved in the system.
Resetting or reinstalling router settings
Another look at wireless networking. No connection? Perhaps the problem is related to short-term malfunctions in the router (router). This, unfortunately, occurs quite often, especially when using inexpensive models of TP-Link series routers.
In this case, rebooting the router may be a partial solution to the problem. The router needs to be disconnected from the power supply for about 10 seconds, and then turned on again. Once the download is complete, the connection may appear. In some situations, it helps to use the reset button, which is located on the back of the device (long press and hold for 30 seconds).
Checking wireless network and adapter settings
However, most often the problem lies in incorrectly set network connection parameters of the system and router.
First you need to check whether a wireless network is installed on your computer or laptop at all. You can find this out in the network connections section of the Control Panel. If it doesn’t exist, then the network needs to be created and connected. The wireless network connection will then become active.
Sometimes you need to pay attention to the TCP/IP protocol settings. Today, most providers provide access with automatic determination of parameters, that is, nothing needs to be entered in the IP address, gateway, subnet mask and DNS servers fields. The only thing you need to pay attention to is the use of proxy servers. Their use for local addresses must be deactivated. If the provider provides its own settings, you just need to enter them correctly.
In routers, after entering the settings via a web browser (addresses 192.168.0.1 or 192.168.0.1.1), you should check the Wi-Fi status (in the Wireless section, opposite the Enabled activation line, there should be a checkmark or the active mode should be set). In some cases, if there is no automatic configuration of the communication channel, you can change it to 6 or 1, and also check the security settings (WPA2-PSK security standard, AES encryption).
Search and installation
It’s good if the driver for the adapter is found on the driver disk for the laptop. If you can find this disk. Otherwise, you need to go to your computer manufacturer's website and find the driver there.
Usually there is no problem with this. The software database is searched based on your laptop model. You can find the model number by turning the laptop upside down and reading the number on the sticker.
Typically, drivers are supplied in the form of executable files, so installing Wi-Fi will not be a problem - you just need to run the downloaded file for execution and follow the installer’s instructions.
After upgrading to Windows 10 or installing the latest operating system updates, many users experience wireless network inoperability. This is most often associated with wireless Wi-Fi adapter drivers. Due to this, the following problems may arise:
- The network cannot be connected because the computer does not display it.
- The wireless adapter is not working.
- Does not connect via wireless (Wi-Fi) network - it gives errors.
- There is a connection, but in a limited state and the network, therefore, does not work.
All four of these problems are caused by the fact that the wireless adapter does not have a driver or the version installed on the computer is outdated, not supported, or released with errors. When updating or installing the tenth version of Windows from scratch, the driver is downloaded and installed automatically. But this does not mean that it works correctly. The reasons lie in the frequent appearance of new editions of the Microsoft OS and the fact that adapter and PC manufacturers do not keep up with these updates and, therefore, their drivers are outdated.
If the driver does not work correctly, then the hardware of the laptop will also cause problems. If we talk about the driver for the adapter, then if it is not working correctly, it will be impossible to connect to the Internet. The OS misunderstands the driver commands, and the user experiences problems when connecting the laptop via a Wi-Fi network. Based on this, if you have connection problems in the new OS version, immediately pay attention to the adapter. Change the driver, first uninstalling the old version if it is present on the computer. Do not use “inappropriate” resources to download. It is best to download the driver from the official developer page. Please take into account the adapter model when loading.
If the laptop does not find networks connected to it or does not display the adapter (wireless device) or Wi-Fi button, the problem is in the driver. If you see errors like this, it means the driver is missing on the device. To enable the wireless network, you simply need to download and install the driver.
- But if the driver is present, appears automatically, but there are connection errors, we will try to solve this problem using our own methods.
Wireless network connection: no connection (Windows 7). Driver problems
But the problems don’t end there either. Sometimes the reason for the lack of connection, even with the settings set correctly, may be due to the wireless network adapter. The main cause of problems is drivers. To check their status, you should enter the “Device Manager” from the “Control Panel” or through the “Run” console using the devmgmt.msc command in it. If a device is not working or not working properly, it will be marked with a yellow icon.
In this situation, you can simply reinstall the driver using the context menu to access the function (there you can choose to reinstall immediately or go to properties and perform a similar procedure in a new window). It is advisable not to install the driver offered by Windows, but install it from the original disk or download it from the Internet from the website of the adapter manufacturer. You can first remove the driver, and install it only after that.
The best option is to use automated programs that allow you to search and install drivers without user intervention (for example, Driver Booster). With this installation method, the user, as they say, kills two birds with one stone, because the latest drivers will be installed for all devices in the system.
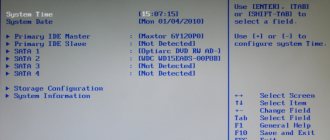
Sometimes, however, as a reason for the device’s inoperability, the system may display a message stating that it is disabled. Here you will have to check its activity in the properties section (there is a power button there), and maybe even in the configuration of the primary input/output system (BIOS).
Solving the problem by replacing the Wi-Fi adapter driver in Windows 10
There are problems when installing a new driver does not help. You can permanently remove the old driver and install the newest version, but this will not solve the problem. However, this does not mean that you should not try this option. This is the first thing you should do. Usually, during an update or a clean installation, the system loads several drivers, and it is important for us to choose one of them - the one that works correctly.
- In the search bar, specify “ Device Manager
” and click on the result, as in the picture.
- Go to " Network Adapters
". On this tab you will find your device. If neither Wireless nor Wi-Fi appear in the list, you don't have an adapter on your computer. Download it and see if the driver is there. If you see a yellow warning sign, click on the adapter and update the driver.
- To update the driver, follow these steps: Search for it using the search option on this device.
- Now you need to click on “ Select from list of installed ones
”.
- You will see several drivers that are already on the system. Here we need to select the driver that does not match the one in the manager. By installing this new driver, you will test it to see if it works. Select it and continue " Next
".
- Pressing the button activates the installation of the selected driver.
After completing the procedure, you should definitely reboot. Now you can test your wireless connection. If this driver also does not work correctly, go back to the search, look for a new driver, install and test again. If there are a lot of drivers, perhaps there will be a working one that will solve the problem with connecting to the Internet in the tenth version of Windows.
Connection diagnostics in Windows
Windows 7 or any other system modification can check the wireless network connection (no connection) on its own, although there is little hope of fixing the problem. However, if you click on the connection icon in the tray, you can see a link to troubleshooting problems.
Who knows, maybe it will help someone, but in most cases you shouldn’t really count on it.
Special utilities for troubleshooting problems
Finally, we take a final look at the wireless network connection. No connection after trying to fix the problem using all the methods described above? Alternatively, you can use special programs.
For example, one of the most popular utilities is still the small Microsoft Fix It program. The application, as is already clear, is designed specifically to eliminate errors in Windows systems, including eliminating problems with network connections. In principle, you can still find quite a large number of similar programs from third-party developers on the Internet, so you can eliminate errors and connection failures with their help.
Checking the network using the NetAdapter Repair utility
Want to reduce the time spent identifying and fixing network problems? The NetAdapter Repair utility allows you to perform most of the operations described in the article in literally one click. Program features include:
- Reconnecting the device to the DHCP server.
- Viewing the hosts file, editing and cleaning it.
- Disabling a static IP address, setting the permission to “obtain an IP address automatically.”
- Changing the current DNS to Google Public DNS.
- Removing DNS cache and clearing SSL.
- Reboot NetBIOS.
- Enabling network and Wi-Fi adapters.
- Reset browser security settings and system network services to basic values.
- Other features added in new versions.
Although the utility does not require installation on your computer, you should run it as an administrator. And to protect against malware and unauthorized entry into the system, download only from the developer’s website or trusted Internet resources.
Did the tips described in the article help you? Are you facing a problem for which the solution is not described here? Want to thank for your help or ask for advice? Leave comments and let's discuss.
“>
If all else fails...
It remains to add that if none of the above methods work, perhaps the problem lies precisely in the hardware. Here you will have to find out the reason yourself or at a service center. Maybe the router is faulty, maybe there is something wrong with the Wi-Fi module. In this case, there is simply no other solution other than replacing these components.
If failures are observed in the software part, you should pay attention to the presence of optimizer programs installed in the system. Sometimes they spontaneously try to “improve” the Internet connection, turn on Turbo mode, etc. Despite everything, this only has the opposite effect. What to do in this case? To begin with, you can simply try to disable their background optimization, or better yet, completely remove them and then check the connectivity.
We solve it by removing the installed wireless adapter driver
If not a single driver installed on the system connects to the Internet, it must be completely removed. This is done in the dispatcher.
- In the search bar, specify “ Device Manager ” and click on the result (explained above in the article). You will navigate to “ Network Adapters ”, find your device there and click “ Uninstall ”.
- Click OK.
- After the driver is removed, you need to restart the computer. Then the system will install it again automatically.