The most common
So why doesn’t the laptop see the wifi network? This can happen due to the fact that there is no wireless Internet at all!
- Let’s make sure that there is wireless Internet in the coverage area by using other devices: a tablet, smartphone, laptop or PC and check whether they see wifi on the laptop. If yes, we proceed further, if not, then it does not see wifi, check the settings of the router. We found out that there is Internet, but the laptop does not see the Wi-Fi network, why - it means that something is wrong with our device, as a rule, and there are extremely banal solutions.
- See if the adapter is turned on; as a rule, the indicator lights up on the keyboard:
- turned off - looks like the screenshot below.
- turn on the keys, according to the device layout, [Fn] + from [F1] to [F12].
- after that the search for networks should begin with a notification in the tray and a yellow star near the antenna, see screenshot.
- if everything works and the laptop sees the Wi-Fi network – enjoy surfing, otherwise further
- Let’s try to run troubleshooting – right-click on the antenna → “Problem diagnostics”
- the procedure helps in most cases, otherwise we are looking for another reason why the laptop does not see wifi.
What to do if the laptop does not connect to wifi
If the laptop does not connect to wifi, then the first thing to do is restart the operating system. Due to the presence of many Windows system services on which the correct operation of the wireless network depends, under a certain set of circumstances (automatic updating of device drivers, operating system, utilities pre-installed by the laptop manufacturer, as well as other application software is enabled), a situation may arise in which a reboot computer can really fix the problem.
The second step to take is to check the availability of the wireless network you need to access. This can be done by viewing the list of broadcasting wireless networks from a mobile phone equipped with a Wi-Fi module, or in the list of wireless networks that Windows displays, for which you need to search for available wireless networks.
If the desired name of the wireless point is missing, or the connection to it is unstable (there is no access to the Internet), one of the reasons may be a malfunction of the router itself, whose task is to create a wireless network with routing of connected devices in the right direction. As in the first example, sometimes it is possible to correct the situation by rebooting the router, because... As a result of power outages, overheating or overloading of the device itself, it is possible that some internal processes may cycle and, as a result, its improper functioning. A faulty Wi-Fi router is more likely if several clients connected to it have connection problems at the same time.
If other computers on the same wireless local network are operating normally, we will consider a number of measures to find out the reason why the laptop does not connect to wifi.
— Checking the Wi-Fi module of the laptop
Incorrect operation of the built-in wireless adapter may be one of the reasons why the laptop does not see the wifi network. The correct operation of the Wi-Fi module can be checked in the “Network adapters” section located in the “Device Manager” of the operating system, which can be accessed in several ways:
- open the “My Computer” (This Computer) properties dialog box using the “Windows + Pause\Break” key combination and go to the “Hardware” -> “Device Manager” section or immediately follow the corresponding link (on Windows 10);
- by calling the “Device Manager” snap-in with the “Run” utility (Windows + R) in the line of which you need to type the process name “devmgmt.msc” and click “OK”.
In the “Device Manager” window that opens, you need to make sure that there are no problems with the Wi-Fi module - it is directly present in the “Network adapters” group, as well as the absence of system warnings (exclamation or question marks).
If the name of the Wi-Fi adapter is displayed correctly, it can be assumed that the module is working properly, and the reason that the laptop does not see the wifi network is most likely due to incorrect connection settings. Otherwise, to troubleshoot the problem, you may need to check the network adapter drivers.
— Checking drivers
The Wi-Fi module driver is also checked in the “Device Manager” snap-in, where in the “Network adapters” group you need to select the properties of the wireless adapter. In the Wi-Fi adapter dialog box, you need to check the following points:
- system messages in the “Device Status” section on the “General” tab – make sure that the device is recognized and is working normally;
- check the “Events” tab for system messages about the operation of the device;
- make sure that on the “Driver” tab all fields are filled out correctly (there are no entries “No data”, “Unknown supplier”, etc.).
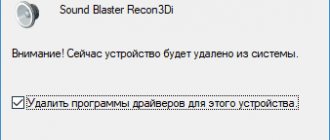
To prevent the adapter from malfunctioning due to the device driver, it is advisable to reinstall it by first downloading the latest version of the software from the laptop manufacturer’s website. Before reinstalling or updating the driver, you must first remove the device from the system by clicking on the “Delete” button on the “Driver” tab, and then run the updated version of the driver downloaded from the manufacturer’s website. As a rule, it has its own installer, which will perform all further necessary installation procedures independently.
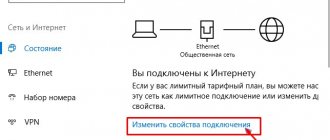
— Setting up connection parameters
Incorrect connection parameters may also be the reason why the laptop does not see Wi-Fi. The setup procedure is performed in the “Network and Internet” section located in the “Control Panel”. To set up Wi-Fi, you need to select the “Connect to a network” link in this section and, having selected the required network, click on the “Connect” button. It should be noted that to connect to a Wi-Fi network, you need to know its full name and access key (password). Upon successful completion of the announced procedure, the router is working and configured, the connected workstation should already have access to the Internet.
If the tasks of connecting to a Wi-Fi network include the need to manage shared access to files, folders and printers from other computers on the local network, then the next step after successful authorization in the Wi-Fi network is setting up a Home Group. This equipment will allow you to make the required settings for sharing both files and folders, and other devices (printers, scanners, etc.).
— Password check
You can check the password, and change it if necessary, in the “Network and Internet” section located in the “Control Panel”, where you need to click on the “Network and Sharing Center” link and select the property of the required connection. To view account information in the network connection status dialog box that opens, you must click on the “Wireless Network Properties” button. Password verification is available on the Security tab. By default, the password is displayed as hidden characters, which can be seen by checking the checkbox next to the “display entered characters” line.
— MAC filter settings
One of the reasons why the laptop does not connect to wifi may be the security settings of the router, namely the set MAC filter permissions. The MAC filter is configured directly in the section dedicated to wireless network security, located in the settings of the router itself. To allow a laptop to use a Wi-Fi network through a router, the security settings of the router must contain an entry for connecting the physical address of the network card of this device.
— Setting up the router
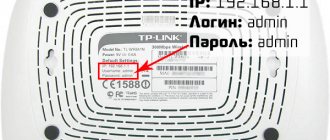
You can access the router settings by going to its IP address. The exact IP address of the router, as well as the login and password for accessing its settings, can usually be found out by the sticker present on the back of the device (provided that the accounts have not been changed by the user). Upon successful authorization on the router, to facilitate its correct configuration, most devices provide the use of an “Assistant”, which allows you to step-by-step configure the network in such a way as to ensure the desired operation of all connected devices at the proper level in the shortest possible time. It is advisable to make finer settings of the router only after reading the operating instructions for the router posted on the manufacturer’s website.
It should be noted that it is advisable to configure the router using a wired connection to it (most routers include a specially made network cable - a crossover).
Helpful tip: Almost all Wi-Fi routers allow you to save the basic settings of the device in a special file that is created; always do this before you change anything. This will allow you to instantly restore the router to its previous state if errors are made during setup or failures occur.
Can't connect to wifi on windows 10 laptop
If the laptop does not connect to the wifi network and the user has taken the above recommendations, then it would be a good idea to try resetting the TCP/IP protocol parameters manually, for which you need to:
open Command Prompt as an administrator (Start menu - System Tools - Windows section - in the properties of the Command Prompt item, select Run as administrator);
at the command line prompt of the window that opens, enter the command: netsh int ip reset c:\resetlog.txt restart the computer.
It is worth noting that Microsoft has also created a specialized utility for the convenience of users (available at: https://support.microsoft.com/ru-ru/help/299357/how-to-reset-tcp-ip-by-using- the-netshell-utility in the “Easy Fix” section) allows you to interactively perform the above procedure for resetting the TCP/IP protocol parameters.
Also, in some situations, updating the IP address received from the router can help correct the situation with connection errors. To do this, enter the following two commands in turn at the command line prompt:
- ipconfig/release
- ipconfig/renew
This command forces the update of the IP addresses of all network adapters installed in the system.
The driver is an important component!
We urge you not to forget that the driver is the link between the hardware and the OS. Without this talented negotiator, everything works quite crookedly or does not work at all - this may be the answer to the question - why the computer does not see the Wi-Fi network. Regardless of whether it is a laptop or a desktop PC, whether the adapter is connected externally or internally, the solution is common.
- In the taskbar you can see another icon - a crossed out monitor, see the screenshot. If Windows 7 or 8, follow:
- “Start” → right-click “Computer” → “Properties”
- " Device Manager"
- Expand “Network adapters” → look for “Intel(R) Centrino”, “Atheros...” is also possible, etc.
It should look like on the screenshot, without any marks
- if there are red or yellow symbols, right-click and select “Enable” - most likely, a driver update will be required.
If Windows version 10, follow:
- Right-click "Start"
- "Device Manager"
- We will also cover “Network adapters”
We see that the drivers are not installed:
- go to the manufacturer and download the appropriate drivers.
- install → restart system
- check, if it works, we’ll finish here, otherwise we’ll look for other reasons.
Let's adapt - adaptation!
There is such a word as adapter - this is the main opportunist in the name of the advent of the Internet, and if it is disabled, nothing will be visible!
Let's check if it is enabled:
- “Start - “Control Panel” - “Network and Sharing Center”
- "Change adapter settings"
- We detect our connection → RMB call the drop-down menu and click “_Enable”
- We check, if the laptop still does not find the wifi network, continue...
Sees everything, but not what is needed!
Why doesn't the computer see my Wi-Fi network, but catches everyone else - and this happens. Here you already need to understand the router settings. Let's look at it visually on Asus models, and write it down with commands for the rest. First, connect to another available Internet - for example, you can distribute it from your phone.
- Type “192.168.1.1” into the address bar of your favorite browser without quotes → [enter]
- Go to “_Wireless_network_”
- We look at “_Channel_” → there should be “_Auto_” - the default position is “13” → change and click “_Apply_”
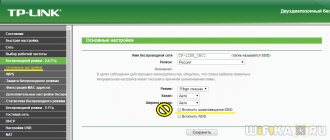
Now, regarding TP-Link equipment:
- Enter the address in the browser without quotes “192.168.0.1” → [enter]
- Go to the “Wireless” section. mode"
- “Wireless Settings/Configuring wireless. Regime"
- In “Channel” we set either static or “Auto”
- Apply the settings and try.
Tip #1: Check if this Wi-Fi network is available on another device
There can be many reasons for the problem, as we have already mentioned. But, before you start fine-tuning, you should make sure that this problem exists in principle. In fact, you will not be able to connect to the network if there is none: the router is turned off by a hardware button, disconnected from the power supply, or data transmission is suspended.
In all these cases, you will not be able to connect to Wi-Fi. Laptop won't connect to wifi? If possible, check whether the router is turned on: whether its plug is in the socket and whether the light indicators on the case are blinking. Remove software restrictions if you have previously set them, and then try again.
What's in a name…?
One involuntarily recalls the words of the classic A.S. Pushkin. Do not think that this is a joke, sometimes there is an SSID conflict, your computer does not see Wi-Fi, but everyone else does. And believe it or not, it turns out that his change and Voila are enough!
We change it using the example of an Asus router with screenshots:
- Enter settings
- "Wireless network"
- And we see the SSID - network identifier - change it to something completely different or add 1 letter or number.
- "Apply"
If TP-Link:
- Go to settings - described above as
- “Wireless/Wireless. mode"
- “Wireless Security/Wireless protection. regime"
- On the right side of “Wireless Network Name:” change the name (SSID)
- "Save"
Checking if everything is ok with the router
The first thing you need to do is check if everything is ok with your router. After all, the reason why your laptop does not connect may be precisely this. Let's move on to checking.
- Take any other device (smartphone, tablet) and try to connect with Android; if it doesn’t connect, then the reason has been found, the router is to blame. Try logging into it and checking all the settings, there is a possibility that it has reset them to the factory defaults.
- Go to the router and change in the “ Wireless ” section, “ Wireless settings ” opposite the “ Channel ” line instead of “ Auto ” and put any channel. This must be done because the router in “ Auto ” mode can set channel 13, alas, not all gadgets can work in it. Therefore, it is better not to risk it and set up the Wi-Fi broadcast channel yourself. And in the same section, pay attention to the checkbox that should be opposite the line “ Enable Wireless Router Radio ”; if it is not there, be sure to check it. It is responsible for turning on the wireless network.
- Look at the indicators on the router; at least three LEDs should be lit:
- — Power (power).
- - Wi-Fi.
- - WAN port
- — If the computer is connected by cable, then the LAN will still light up.
WAN does not light up, then check the cable that comes from the Internet provider, just pull out and reinsert the RG 45 plug.
- Check if you have a MAC filter configured on your router. Go to the “ Wi-Fi ” tab, “ MAC filter ”, then in the line “ MAC filter restriction mode ” select “ Disabled ”. This is so that any devices can connect to the wireless network.
5 Try setting a new password for the wireless Wi-Fi network on your router; if you don’t know how to do this, see the article: how to set a password on a Wi-Fi router. Then do it all over again, connect with a new password.
Nuances!
Each laptop brand has its own utilities that are responsible for the function keys, we will consider in detail in one position, so what to do if the Lenovo laptop does not see WiFi. We are talking about Energy Management software.
We go to the official support resource and download according to the OS bit size:
For Windows versions Seven: https://support.lenovo.com/ru/ru/downloads/ds027744
Eight and eight-one, respectively: https://support.lenovo.com/ru/ru/downloads/ds032254 https://support.lenovo.com/ph/ru/downloads/ds037680 Ten: https://support.lenovo .com/ru/ru/downloads/ds032258