02/05/2018 windows
Among other audio problems in Windows 10, 8 and Windows 7, you may encounter a red X on the speaker icon in the notification area and the message “No audio output device is installed” or “Headphones or speakers are not connected”, however, to fix this problem sometimes I have to suffer.
This guide details the most common causes of the “Audio output device is not installed” and “Headphones or speakers are not connected” errors in Windows and how to correct the situation and return normal sound playback. If the problem occurs after upgrading to a new version of Windows 10, I recommend that you first try the methods in the Windows 10 Sound Not Working guide, and then return to the current guide.
Checking the connection of audio output devices
First of all, when the error in question appears, it is worth checking the actual connection of the speakers or headphones, even if you are sure that they are connected and connected correctly.
First make sure that they are actually connected (as it happens that someone or something accidentally pulls the cable without you knowing about it), then consider the following points
- If this is your first time connecting headphones or speakers to the front of your PC, try connecting to the sound card output on the rear panel - the problem may be that the front panel connectors are not connected to the motherboard (see How to connect the front panel connectors of your PC to the motherboard ).
- Check that the playback device is connected to the correct socket (usually green, if all sockets are the same color, then the headphone/standard speaker output is usually highlighted, for example, circled).
- Damaged wires, a plug on headphones or speakers, or a damaged connector (including as a result of static electricity discharges) may be causing the problem. If you suspect this, try connecting any other headphones, including those from your phone.
Reason 4: Selecting a device in Skype settings
Another option for problems with the sound playback device in Skype may be the incorrect selection of equipment in the program settings themselves.
Audio playback settings in Skype 8 and higher
In order to check that you have selected the correct hardware in Skype 8, you need to perform the following set of steps.
- In the left block of the program window, click on the “More”
, which is presented as an icon depicting an ellipsis.
In the list that opens, select “Settings”
. - In the settings window that opens, click on the name of the “Sound and Video”
. - Next, in the section that appears, go to the “Speakers”
.
Opposite its name should be displayed the name of the acoustic equipment that Skype uses to output sound. As a rule, according to the default settings, the value is “Default communication device”
. Click on this name. - A list of audio devices connected to your computer will open. We choose the one through which we want to hear the interlocutor.
- After the device is selected, be sure to remember to check if the volume in Skype is turned off. If the slider in the “Speakers”
is set to
“0”
or other low values, then this is precisely the reason why the interlocutor is not heard or is hard to hear.
Drag it to the right the required number of divisions to achieve a comfortable sound level. And it’s best to simply set the slider to “10”
, and directly adjust the volume through the built-in speaker or headphone control. - After selecting your equipment and adjusting the volume, you can check the sound quality. To do this, click on the element “Sound Check”
. If the problem was precisely in the Skype settings, then after pressing the indicated button a melody should sound. This means the audio device is configured correctly.
Checking Audio Inputs and Audio Outputs in Device Manager
Perhaps this item could have been put first in the topic about “Audio output device not installed”
- Press Win+R keys, type devmgmt.msc into the Run window and press Enter - this will open Device Manager in Windows 10, 8 and Windows
- Usually, when problems with sound arise, the user looks at the “Sound, gaming and video devices” section and looks for the presence of his sound card there - High Definition Audio, Realtek HD, Realtek Audio, etc. However, in the context of the problem “No audio output device is installed” The more important section is "Audio Inputs and Audio Outputs". Check whether this section is available and whether there are speaker outputs there and whether they are disabled (for disabled devices, a down arrow is displayed).
- If there are disabled devices, right-click on such a device and select “Enable device”.
- If there are any unknown devices or devices with errors (marked with a yellow icon) in the list in the device manager, try removing them (right click - delete), and then select “Action” - “Update hardware configuration” in the device manager menu.
Why the computer is silent: the main reasons and methods for detecting them
As practice shows, in most cases, problems with sound occur through the fault of the user himself. The main factor is the same inattention, as well as the inherent reluctance of many people to familiarize themselves with the technical documentation of the PC. Often the user forgets to turn on the speakers or uses the audio jacks incorrectly. It's hard not to notice the crossed out speaker icon in the system tray, yet many people bother to ignore it. The possibility of mechanical damage to one of the connecting cords is often also discounted when troubleshooting audio problems. As a result of such banal omissions and an incorrectly assessed situation, the user begins to reinstall audio drivers, edit the registry, and, in general, experiment. As a rule, such rash actions lead to the previously mentioned problem. Therefore, to resolve the question: “Why are sound devices not installed?” — you need to approach, so to speak, comprehensively and systematically, so as not to waste precious time and energy fighting “windmills.” However, let's move on.
Sound card drivers
The next step to try is to make sure that the necessary sound card drivers are installed and working, while a novice user should consider the following points:
- If in the device manager in the “Sound, game and video devices” section you only see items like NVIDIA High Definition Audio, AMD HD Audio, Intel Audio for Displays - most likely, the sound card is either disabled in the BIOS (on some motherboards and laptops this is perhaps) or the necessary drivers are not installed on it, and what you see are devices for audio output via HDMI or Display Port, i.e. working with video card outputs.
- If you right-clicked your sound card in Device Manager, selected Update Driver, and after automatically searching for updated drivers, you were told that "The best drivers for this device are already installed" - this does not provide useful information that the correct ones are installed. drivers: there were simply no other suitable ones in Windows Update.
- Standard Realtek and other audio drivers can be successfully installed from various driver packs, but they do not always work adequately - you should use drivers from the manufacturer of specific equipment (laptop or motherboard).
In general, if your sound card shows up in Device Manager, the best steps to install the correct driver for it would be as follows:
- Go to the official page of your motherboard (how to find out the motherboard model) or your laptop model and in the “support” section, find and download the available sound drivers, usually marked as Audio, maybe Realtek, Sound, etc. If, for example, you have Windows 10 installed, and on the office. The site has drivers only for Windows 7 or 8, feel free to download them.
- Go to the device manager and remove your sound card in the “Sound, game and video devices” section (right click - remove - install, if one appears).
- After uninstallation, run the installation of the driver that was downloaded in the first step.
Once the installation is complete, check if the problem has been resolved.
An additional method that sometimes works (provided that everything worked “just yesterday”) is to look into the properties of the sound card on the “Driver” tab and, if the “Roll Back” button is active there, click it (sometimes Windows can automatically update drivers to the wrong ones , what do you need).
Note: If there is no sound card or unknown devices in the device manager, there is a possibility that the sound card is disabled in the BIOS of the computer or laptop. Look in the BIOS (UEFI) in the Advanced/Peripherals/Onboard Devices sections for something related to Onboard Audio and make sure it is Enabled.
How to set up headphones on a Windows 7 computer? Methods and recommendations
Recently, the computer has been used more and more for communication not only through text, but also using sound and video, but still not all users know how to set up headphones on a Windows 7 computer. The choice of Windows 7 as the operating system is not accidental , because at the moment it is the most common operating system.
First, let's look at how to connect and set up headphones to your computer.
Connecting headphones to a computer
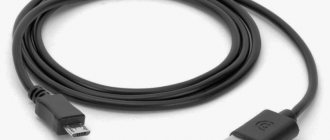
In modern computers, the headphone jack is located on the front wall of the system unit. It is marked in green. If there is no such connector, look for it on the back wall of the computer - it will definitely be there.
Let's move on to the headphones themselves, or more precisely, to their plug, which is a metal rod with a diameter of 3.5 mm and is called a “jack”. Pay attention to the “jack” - it should have two or three black rings. To connect headphones to a computer, you need a jack with two rings (three contacts). If the “jack” has three rings, then it is a headset (headphones and microphone) that connects to a universal connector, usually used on laptops. This connector is marked with an icon in the form of headphones with a microphone.
Setting up headphones on a computer
Most often, headphones with a microphone are used for communicating on Skype or in online games. Let's see how to set up headphones with a microphone on your computer.
First, connect the headphones and the computer (headphones in the green connector, microphone in the red). Next, by right-clicking on the speaker in the lower right corner of the screen, open the menu and select “Playback devices.”
Here we will answer the question of how to set up sound on a computer through headphones. In the “Sound” window, select “Speakers” and click the “Configure” button. In the next window, select “Stereo” and check how the headphones sound by clicking on the picture of the left or right speakers. If everything is in order, click “Next”. On the next tab, don’t change anything, click “Next” and “Finish”. In the same “Sound” window, check the setting by right-clicking on the “Speakers” icon and selecting “Check”. Let's listen to the sound. That's it, setting up headphones on your computer is complete.
Let's look at how to adjust the headphone volume on a computer. To do this, click on the speaker icon at the bottom right of the screen and move the slider that appears up, increasing the volume, or down, decreasing it. This is the most convenient way to adjust the sound in headphones on a computer.
Let's see how to set up a microphone in headphones on a computer. Right-click on the speaker icon and select “Recording Devices”. A window with a microphone will open. Right-click on it and select “Properties”. Change the settings on the “Levels” tab: use the slider to add volume to the microphone and set the gain level. Click “Apply”. On the “Enhancement” tab, check the boxes for “Noise reduction” and “Echo suppression”. Click OK. Now you know how to set up a headset on a Windows 7 computer.
The normal microphone gain level is no more than 20 dB. Exceeding this value may cause unpleasant noise and background noise.
Setting up headphones on a laptop
The laptop can use one connector for connecting a microphone and headphones. The headset is used with a four-pin connector (three black rings). You already know the answer to the question of how to adjust the sound in headphones on a laptop if you carefully read the article. This is done in the same way as on a computer - through the “Sound” window. You can open it in another way: “Start” -> “Control Panel” -> “View: Large icons” -> Sound. Next, select “Speakers” and click “Configure”.
Also on laptops, a classic scheme can be used to connect a headset - two inputs: for a microphone and, in fact, for headphones. Let’s stop and once again briefly explain how to set up a headset on a laptop.
Read about how to set up Skype on a laptop with the Windows 7 operating system here. The method for setting up a laptop for WiFi distribution can be found here.
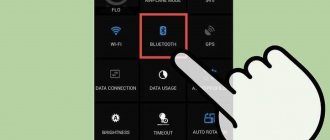
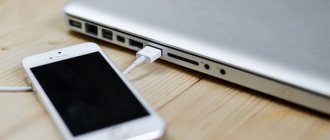
Connecting wireless headphones
It's time to learn how to set up wireless headphones to your computer. They work using Bluetooth technology. To get started, read the instructions. Usually a Bluetooth adapter is included with the headphones. You need to insert it into the USB port of your computer and install drivers on it. If everything went well, then we will see a Bluetooth icon on the taskbar.
Open the context menu with the right mouse button and select “Add device”. On the headphones, you will need to hold down the power button for a few seconds. This is usually described in the headphone manual. Then, within two or three minutes, the computer will find the wireless headset and ask you to enter the password that is written in the instructions. That's it, the headset is connected.
Now let’s see how to set up headphones on a Windows 7 computer. You can also find headphones by right-clicking on the speaker, selecting “Playback devices” and in the “Sound” window that opens, on the “Playback” tab, clicking “Configure” next to the headphones we found. Further adjustment of sound on a Windows 7 computer using headphones follows the scheme described above.
On a laptop, setting up wireless headphones is the same. But there is one nuance in how to set up headphones on a Windows 7 laptop. If the laptop is already equipped with a built-in Bluetooth adapter, then there is no point in installing another one - use the built-in one.
Sound card manufacturers try to put all the settings together. For example, the Realtek HD manager is suitable as a program for setting up headphones on a computer. It contains all the settings for speakers, headphones and microphones. It also allows you to add various sound effects. Finding this program is easy - it is located in the “Control Panel”. Realtek HD Manager makes it easy to understand how to configure the headphone input on your laptop.
In fact, there are several ways to set up headphones on a Windows 7 computer. You just have to choose the method that is most convenient for you. Reinforce your knowledge with a video on how to set up headphones on a computer.
Read also: - Setting up the BIOS on a computer - Setting up a Windows 7 network - How to set up a printer to print from a computer - How to set up a local network between two computers - How to distribute wifi from a windows 7 laptop - How to distribute wifi from windows 8
←Return
bitu.ru
Setting up playback devices
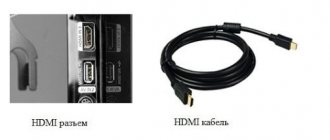
Setting up playback devices can also help, especially often if you have a monitor (or TV) connected to your computer via HDMI or Display Port, especially if through some kind of adapter.
Update: In Windows 10 versions 1903, 1809 and 1803, in order to open recording and playback devices (the first step in the instructions below), go to the Control Panel (can be opened through a search on the taskbar) in the viewing field, set “Icons” and open "Sound" item. The second method is to right-click on the speaker icon - “Open sound settings”, and then select “Sound Control Panel” in the upper right corner (or at the bottom of the list of settings when changing the width of the window) of the sound settings.
- Right-click on the speaker icon in the Windows notification area and open Playback Devices.
- In the list of playback devices, right-click and o and “Show disconnected devices.”
- Make sure that the default audio output device is the correct speakers (not HDMI output, etc.). If you need to change the default device, click on it and select “Set as default” (it is also wise to enable “Use default communication device”).
- If the required device is disabled, right-click on it and select the “Enable” context menu item.
Problem with the audio playback device in Skype
- First of all, you need to make sure that you are the one with the problem. If you can’t hear your interlocutor, then it is likely that his microphone is not working properly. To confirm or rule out this version, you need to ask him to make a call to someone else or call himself.
- Secondly - and this is not uncommon - a problem with the audio playback device in Skype can be caused by a poor Internet connection. In this case, you need to look for problems either in the network connection, or just wait until the connection is established again.
- No matter how trivial or funny it may sound, sometimes the whole problem may just be that the speakers are not connected or they are not connected to the network. Actually, this is the first thing to check: that the speakers are connected to the computer correctly. This, of course, does not apply to the built-in speakers in a laptop.
- If all these options are excluded, you need to look for the cause of the problem in the software settings. For example, for some reason the sound drivers may fail. To check this, you first need to open the Task Manager. To do this, right-click on the “My Computer”
and select “
Properties
” from the context menu that opens.
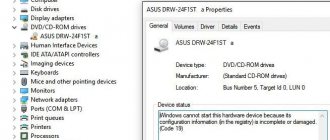
In the properties window, select the “Device Manager” tab.
There should not be any question or exclamation mark icons next to the “Audio Devices” icons. If something like this still happens, you can try updating the sound driver. To do this, right-click on the device icon and select “Update Driver”. You will be prompted to either locate the driver or start searching online.
If the problems began precisely after the next driver update, then you can do the opposite - roll back the drivers to an earlier version. This can be done from the same context menu of the device. You can also completely remove the audio device in the Manager and reinstall the drivers from scratch.
You can also try returning the system to an earlier restore point when the sound in Skype was guaranteed to work. Of course, provided that such a recovery point exists. After all, some users deliberately disable system recovery to save hard disk space. And completely in vain
.
You can check the correct operation of audio playback devices through the Control Panel. To do this, you need to actually open the Control Panel and select “Hardware and Sound”
. Then follow the link “Manage audio devices”. A special window will open in which you can view which audio devices are currently being used by the system. If there are many devices, you need to select the one that is connected right now and try to play some audio file. If everything is in order, a green bar will start moving next to the device icon.
By clicking the “Setup” button, you can configure the sound environment for the speakers from here. The properties button allows you to check which sound drivers are installed and whether they are installed at all. And in the “Levels” tab, the volume of the speakers changes. By the way, it wouldn’t hurt to check the volume. Perhaps you turned it off yourself and forgot about it... You can also reset the sound settings to the default ones. Perhaps the settings inside Skype itself have gone wrong.
To check this you need:
- launch Skype;
- in the main top menu, go to “Tools - Settings”;
- A settings window will open where you need to select the “Sound Settings” tab;
- we need the “Dynamics” area. Here you can select from the drop-down menu the speakers you want to use to play audio. The volume is also adjusted here. You can check the box for automatic volume control - and then Skype itself will determine what volume to set in a given case.
To check that the settings are correct, you need to click on the small blue button on the right, next to the device drop-down menu. The sound of the incoming call will start playing. Ultimately, if all else fails, your speakers may simply be bad. You can take them in for repairs or buy new ones.
If there is a problem with the sound recording device in Skype, then this is due to improper operation of the microphone. In the same sound settings tab, you need to select the connected microphone and say something into it. If the microphone is configured correctly, a green horizontal stripe will begin to move next to it in the window. In short, any problem with sound playback in Skype is completely solvable.
fails because a pop-up window says: “There is a problem with the audio playback device.” What kind of problem it is and where it came from - the computer is silent about that, leaving the user to figure it out on their own.
Reasons why there is a problem with the audio playback device in Skype
, there may be many, but they can all be divided into two large groups:
- problems with hardware
; - problems with the software
.
“Iron” problems may be hidden in the following:
However, to make such a categorical conclusion, you need to observe whether there is sound in other applications. If there is, then the hardware has nothing to do with it.
Checking the enabled parameters of the Windows Audio service
As a result of using third-party software, as well as in cases where the OS is “infected” with malicious machine code, system audio settings can be changed. As a result, it is unlikely that you will be able to successfully install a sound device: Windows 7 will still be “mute” (however, like any other version of the Microsoft system) if the operating parameters of the OS multimedia service are deactivated.
- Use the hotkey combination Win+R.
- In the Run box, enter the services.msc command.
- After the “Services” panel opens, you need to select “Audio Endpoint Builders” from the list presented.
- After you double-click the service window, pay attention to the “Startup type” checkbox: the value “Automatic” should be displayed there.
- After making changes, activate the “Run” button.
If the above steps do not give a positive result, then proceed to the following instructions.
Possibility of correcting a personal problem: SKYPE settings
First of all, you need to take care of setting up SKYPE. What needs to be done for this? In fact, the problem with the sound playback device on Skype is solved in the shortest possible time.
- You need to open Skype and go to the “Tools” section.
- Now it is recommended to open “Settings” and go to a special column, which will be indicated by the icon of headphones with a microphone.
- The “Speakers” parameter deserves increased attention, where settings can and should be made.
- You should expand the list and make sure that you have selected the correct device for playing sound. If an error is noted, you need to change the device manually.
- You need to say a few phrases. If Skype successfully picks up the voice, the green indicator will certainly appear.
What should you do if your interlocutor still has problems? In this case, the person can be helped with recommendations, because only he can find a way out of the current situation and correct the shortcoming of the communication program. Without fail, the other party must check their own and the correct choice of the sound source, because it is these settings that most often lead to disruption of sound reproduction.
SKYPE is an ideal program for communication, but its functions will only be manifested with the correct settings.
Using the familiar notification area icon
- Before edition 1803, everything was extremely clear - in the lower right corner you click on the speaker icon, a menu opens, from which you directly get to the right place;
- But then everything changed. And more than once. First, both items were combined into one - “Sounds”. And in 1903 (current at the time of writing the review), the line “Open sound parameters” appeared:
- After 5 seconds, a new window opens where you can see the “Input” and “Output” sections with the ability to select active equipment:
- If you look to the right, you will notice several links. Obviously, you should click on the “Sound Control Panel”:
- Literally in a moment you will find out the answer to the question - how to open recording devices on Windows 10. A familiar window with tabs will appear:
As you can see, there is nothing complicated. But in some cases this method is not suitable - some users complain that when they try to go to the OS settings, windows are reset and closed. And nothing can be done. This problem is most often associated with the use of a pirated copy or repacks from which unnecessary functionality is “cut out.” In this case, the main system settings may also be affected.
In this case, you should move on to other methods.
Other audio troubles, or What else prevents the user from installing an audio device
Working on a laptop is not only comfortable. Often a portable device is used as a multimedia center, especially when the laptop owner considers himself an incorrigible music lover. At the same time, intensive use in a mode when the speakers are operating at full power will sooner or later lead to the natural inevitability - “they have served their purpose.” Therefore, sometimes the problem of lost sound is resolved purely technically - by replacing the stereo pair. This, in general, is an expensive pleasure. Seeing a certain generality in portable configurations, it is worth noting that most modern laptops (including desktop modifications) are equipped with an Audio HD-standard sound circuit, which implies the use of a special audio controller.
Troubleshooting: Why don't I see my preferred audio device listed?
What if the audio device you want to use for recording is not listed? We talked about this problem in the Troubleshooting Common Speech Recognition Problems section. Remember that speech recognition devices are also configured through the audio window. By default, Windows does not show devices that are disabled or disabled, or devices without drivers installed. If your device is not listed, right-click or press and hold anywhere in the empty space in the Sound window. You can then choose to view devices that would otherwise be invisible by clicking or tapping "Show disabled devices."
The same goes for displaying disabled audio playback devices in the Playback tab of the Sound window.
How to open playback and recording devices in Windows 10
With each Windows 10 update, it becomes more and more difficult to find familiar elements and settings. For example, many are interested in how to open audio playback devices in Windows 10 1903 and other versions of Windows 10. We had to face a similar question after installing the next update. Next, we’ll look at how to get to the list of connected audio equipment.