Setting up LAN in Windows 10
You connect to the router with a cable or over the air - make sure that the network card (adapter) has received TCP/IP and DNS server addresses from the router:
- Open “Network Connections” and find there the network card through which the computer is connected to the router.
- Expand the properties of the adapter, and in them - the TPC / IP protocol.
- Make sure that all values are obtained automatically.
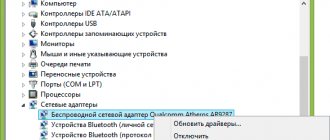
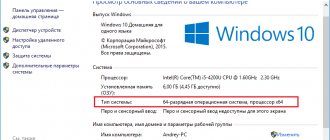
All adapter parameters must correspond to those shown in the picture
Next, you need to make sure that all Windows devices connected to the network have the same workgroup selected:
- Open the “System” window using the Win+Pause key combination on all clients on the network and check whether the name of the working network matches.
All computers on the network must have the same workgroup name
- If the workgroup names of the machines are different, we change the parameters so that the group name is the same for all clients.
If the names of the working network between devices do not match, they need to be changed and brought to a single option
- Also make sure that the names of the computers in the DS are unique (different). If this is not done, a conflict of network resources is inevitable and the operation of the LAN will be impossible.
Stages of creation
Local network via Wi-Fi - how to set up sharing
In Windows 10, network configuration is carried out in the same way as on other versions of this operating system. Difficulties can arise only with multi-level corporate networks, which require several subnets. In the case of a cable connection, all devices will need to be connected to each other. This connection virtually eliminates speed problems. All devices work stably.
home network
For your information! A LAN has one main computer called a server. This can be any computer or a separate device.
Creating the network itself and setting up parameters
Before you start creating, you need to connect all the devices to each other, that is, arrange the equipment accordingly. When using a Wi-Fi adapter, you need to connect it; when using a cable adapter, you need to make the wiring, pull the twisted pair to the equipment, where to create connectors and crimp the cable.
Note! With such a connection, when all devices are in working order, the connectors should light up. The same rule applies to routers and routers.
Now you need to create a network directly on the PCs themselves. Everywhere you need to check the name of the workgroup, it must be identical, otherwise the computers will not be able to find each other. If there are differences, then through the “Change” button you can adjust the name or completely enter a new one.
Important! The Windows 10 homegroup is named only in Latin and must be the same on all connected devices. After all changes, you will need to restart your PC.
After turning it on again, you need to find the network sign on the panel next to the clock and right-click on it, selecting “Network and Sharing Center.” Then go to “Change advanced sharing settings”. On each PC select:
- "Enable network discovery";
- “Enable automatic configuration on network devices”;
- "Turn on file and printer sharing."
Networking
At the end, you need to remove login access with a password and activate the line to save changes. Now you can exit the settings, here the work is completed. This instruction is suitable for organizing a personal account through a router capable of distributing dynamic addresses.
Configuring computers to recognize the network
How to set up a network between Windows 10 computers? If you are connecting directly or using a router, then you need to change the IP address of each PC. To do this, you need:
- Open the “Network and Sharing Center” section and select the line for changing adapter settings.
- Find the network connection, right-click on it and select the properties line.
- A window will open where, using the left mouse button, you need to enter “Internet Protocol Version 4”, then go to “Properties”.
- Each computer must have one subnet address defined. To do this, you need to know the IP address of the router; it can be found on the device body. For example, this is 192.168.0.1 or 192.168.1.1. The unit at the very end indicates the serial number of the device on the network; it can be different. The network needs to be set up as follows: 1 computer has an IP address of 192.168.0.100, a mask of 255.255.255.0, and a gateway of 192.168.0.10, 2 computers have the same thing, only the address will change, instead of the final 100 it will be 101, 3 will have 102, etc. d.
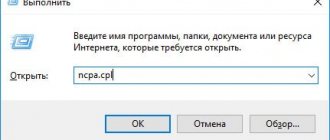
Note! Different routers have different IP addresses. To accurately determine the desired address, you will need to press the key combination “Windows + R”, a line will open, enter “cmd” in it. Next, type “ipconfig” and activate “Input”. The device's IP address will appear in the line.
Network recognition by new devices
Having made all the changes, the drug should become working. If this does not happen, then most likely the problem is with the eThernet firewall or antivirus program installed on the PC. They may consider the DM a threat and block it.
Connecting to a homegroup
A Windows 10 workgroup can be created as a home network or a corporate one. They will differ in the number of connected computers or laptops. In a home network, most often there are no more than 3-4 devices. If you need to connect a new device to an already created group, then:
- On the laptop that you want to connect, enter the homegroup section.
- Activate the “Join” line.
- Mark the sections that will be open for the new device.
- Enter the network password.
Granting access to individual files and folders
To enable devices over the local network to open individual documents, you need to configure the equipment as follows:
- Using Explorer, find the folder, select it and click on the line to open sharing. Select the option either with viewing only or with the ability to make changes.
- A new Homegroup item will open in the Explorer area and your PC will be listed. Once you enter it, a list of files available for viewing via the network will appear.
Opening access to folders via LAN
Note! To manage extended folders, you need the Computer Management tool. By going to the shared resources section, you can make changes to the settings of network folders and open access to the ones you just created.
How to disable network discovery
Network discovery is a mechanism that allows computers on a network to see other machines, their network drives and printers. If you don't want your machine to be visible on your home network, it's best to turn off network discovery.
- Check your account. The sections of the control panel we need are available only to the administrator.
- In the Control Panel, open the Network and Sharing Center, and from it open the dialog box we need.
Network Sharing Center in Windows 10 gives you access to disable network discovery
- For each network profile (private, guest, or all networks), enable or disable network discovery.
Disable network discovery for the selected profile
- Save the changes using the button of the same name at the bottom of the screen. There is no need to reboot the OS; network discovery will be disabled immediately.
Features of connecting via cable and Wi-Fi
How to create a home network using a WiFi router
How to create a home network in Windows 10? The easiest way to handle this matter is for a system administrator, but once you understand the connection methods yourself, you can do it yourself. Having created a home network on your computer, you can begin connecting other devices to it. It will only take a couple of minutes.
Note! To connect, you need to look at active networks. In the corresponding line, an inscription should appear in the home group about the opportunity to join it. Here you need to activate the link.
Wireless network
If there is no such inscription, you will need to change the network to home, for this:
- Go to the “Public Network” item.
- Click on “Home Group”.
In the last section, determine the correct parameters and connect, this is done as follows:
- Go to “Share access with other home computers.”
- Click on the “Join” line.
- Select devices, access to them must be provided from all computers.
- Click on the “Next” button.
- Enter the password and click on “Ok”.
Note! To ensure that all external devices on the local network are operational, it is recommended to perform this course of action on each one.
Home network does not work: causes and diagnostics
The network is both a technically and programmatically complex organism, equipment that ensures round-the-clock uninterrupted operation and costs a lot of money. In the home segment, the class of equipment is lower and it is prone to failures and malfunctions. All this leads to loss of network functionality. Let's take a quick look at the main mesh problems and how to fix them.
Router malfunction
Most home routers are made in compact plastic cases. Electronic components operate in a very severe thermal regime, almost “to the limit”. The hot season adds 10–15 degrees to the temperature of the device and the router freezes. Along with it, the entire home network loses its functionality. Symptoms include the inability to log into the router’s web interface and lack of access to the Internet and network resources. To restore the network, you need to turn off the router and let it cool down, but this is a palliative measure. A radical solution to the problem would be to improve the heat transfer of the router by creating additional ventilation holes and installing a fan for airflow.
Installing additional fans will help your router overheat significantly less and work longer
Operating a router in severe thermal conditions not only makes the network unstable and glitchy, but also reduces the lifespan of the router itself by 3–4 times.
Damage to the network cable
Pets, curious children, or just a wife with a mop can instantly render a network segment inoperable by damaging the wire that connects the computer to the router. If only one client has lost access to the network, the problem is most likely in the cable. Disconnect the connectors, carefully inspect them and the wire itself. If the RJ-45 plugs are damaged, you can cut them off and crimp new ones. If the wire itself is mechanically damaged, you need to replace it entirely. Twisted or soldered connections will lead to network errors and a drop in speed to a snail's pace.
Inexpensive twisted pair UTP is designed for installation in protected cable boxes. If the cable is laid along the baseboard and is poorly secured, it can be easily damaged