Echo and background noise are the two main problems that plague all microphones on a Windows computer. Because of them, for example, you will not be able to have a normal conversation on Skype or record a voice message in the desktop version of Viber. We have prepared detailed instructions that tell you how to remove echo and background microphone noise on any Windows computer.
Causes of microphone problems
Before we move on to the solutions, we need to take a closer look at the causes of the problem. If you think that this is a problem with your microphone, then you are mistaken! Often problems are associated with other factors, namely:
- Incorrect OS settings;
- Damage to the device cable;
- External factors such as other devices near the microphone;
- Problems due to additional software;
- And only the last thing to blame is the malfunction of the microphone itself.
It often happens that there is not one problem, but several at once. For example, external factors overlap with tuning problems. Below we'll look at how to fix each of the problems above, as well as what to do to prevent them from occurring.
Enabling the integrated microphone
To enable the built-in microphone on a Windows 10 laptop, follow these steps:
- Right-click on “Start” → select “Control Panel” from the context menu.
- Select the “Hardware and Sound” item and in the drop-down menu of the panel, click on “Manage audio devices”.
- Left-click on the “Recording” tab. A window opens with the inscription “Microphone”. In this window, click “Properties”.
- On the “General” tab, select the “Use this device” line, and then click “Apply”.
- Finally, you need to go to the tab called “Levels”, then in “Microphone Gain” move the slider to the +20.0 dB position and activate the changes made.
Can't turn on the camera on your laptop? Read the setup instructions.
OS setup
Before you carry out any repairs or troubleshooting, get your system in order. To do this you need:
- Install drivers on the sound card;
- If available, install drivers for the microphone;
- Restart your PC.
Please note that microphone drivers are not always available - especially often when the microphone is very cheap; expensive professional models have their own drivers. If there are no drivers, this is not bad, in this case you need to install drivers for the sound card. After that, you can try everything listed below with peace of mind.
It is also important not to forget to restart your PC. Without a reboot, you cannot be sure that the drivers have started working. And this must be done. The method applies to all versions of Windows OS.
A preventive measure is to install drivers for all equipment that is connected or installed on your PC. This applies not only to the microphone, but also to any other peripheral devices. This will help you avoid problems. It is also important to ensure that the device and its driver are compatible - some people download drivers for the 32-bit version when the OS itself is 64-bit - such a combination, of course, will not work. If you don’t want to repeat the mistakes of others, then find out how to see what bit capacity your PC has.
Also make sure your drivers are up to date. They are not updated as often as the OS itself, but nevertheless, with the release of a new version of a program, for example, for recording sound or conversation, you may encounter the problem that your old drivers do not allow the device to work the same way it worked before. Therefore, stay tuned and regularly install the latest versions.
Programs for setting up microphone noise reduction
Nowadays, almost every computer owner uses a microphone from time to time. However, not everyone has the opportunity to purchase high-quality and expensive equipment with active noise reduction. Then the device will also pick up various interference, significantly reducing the overall sound quality. You can try to correct this situation using special programs that use algorithms to prevent unnecessary noise from entering. It is these decisions that will be discussed further.
Before we begin analyzing the programs, we would like to draw your attention to the fact that sometimes the appearance of noise when using a microphone can be caused not only by external factors, but also by various problems with the equipment itself or the driver used. We advise you to study a separate guide on our website by clicking on the link below to understand the problem. If none of the above recommendations bring the desired result, proceed to study today's review.
Read more: Removing background microphone noise in Windows
Realtek HD Audio
To begin with, we would like to note the software from the developers of integrated sound cards called Realtek HD Audio. Just note right away that this software is not suitable for owners of sound cards from other manufacturers. It is this tool that is installed on the computer along with sound drivers, and can also be downloaded by the user independently. Thanks to this solution, detailed configuration of the equalizer, sound effects, volume and other parameters associated with the mentioned components becomes possible. The microphone can also be configured through this software, for which there is a specially designated section. Through it, volume, gain and additional parameters are set. The noise reduction function is one of these parameters and is activated by checking the box next to the corresponding item.
However, it is worth considering that not all users will have the ability to activate noise reduction in real time, which is due to the model of the sound card used and the microphone itself. In addition, good processing quality is not guaranteed, because the algorithm does not always function properly. Otherwise, this application is an ideal option for all those who want to customize the sound on their computer, taking into account absolutely all the details and interacting with a clear and convenient interface. We suggest you find out more detailed information about Realtek HD Audio in a full review on our website by clicking on the link below, where you will find a link to download drivers and utilities with a graphical interface from the official website.
Voicemeeter
The next program called Voicemeeter is designed to mix signals both incoming and outgoing. Thanks to it, any user, by connecting a microphone or speakers to their computer, will be able to adjust volume, gain, noise reduction and additional parameters. Voicemeeter supports an almost unlimited number of simultaneously connected devices, however, you will need to purchase the appropriate equipment to ensure that all devices function correctly. The program itself will immediately detect the presence of a microphone and allow you to configure it. When activating noise reduction, pay special attention to the volume gain, because often, due to an increase in this parameter too much, artifacts appear or noise pops up that might not have existed initially.
Voicemeeter has many unique features that are associated with the use of professional audio equipment, for example, moving the sound source in space or selecting the sound reading mode, so we will not dwell on this topic. For those users who are interested in obtaining relevant information, we recommend that you refer to the official documentation and obtain all available information from there. You can download Voicemeeter for free from the official website by clicking on the link below, but it is worth considering that the interface is not in Russian, so you will have to figure out all the points on your own.
NoiseGator
The NoiseGator program is suitable for those who are faced with the need to suppress microphone noise during calls on Skype or through similar applications. The operating principle of this software is to turn off and automatically turn on the microphone when frequencies fluctuate. That is, when a replica begins, the device is activated, and as soon as you stop speaking, it turns off on its own and waits for the next replica to begin. This allows the interlocutor not to hear all the noise that occurs in the background and prevents him from giving an answer. Those users who communicate via TeamSpeak or Discord probably know about the implementation of such technology.
However, thanks to advanced settings, NoiseGator allows you to get rid of noise in real time, suppressing unnecessary frequencies, which happens without much load on the operating system. To do this, the user will have to independently adjust the sliders that you see in the image above. Before starting the configuration, be sure to select an active input and output source so that all changes are successfully applied. As you can see, all settings are made within one window, and even a user who does not speak English will understand the items present, and there will be no need to understand a large number of menu items and sections. Additionally, pay attention to the “Reset to Defaults” button. Use it in situations where you need to return the default configuration if the current settings do not suit you.
SoliCall
SoliCall is an unusual software for which the developers have created a special algorithm that effectively suppresses noise and echo. After installation, this application is integrated into the operating system and interacts correctly with absolutely all applications where a microphone can be used. This solution is also suitable for employees of various companies who often make calls and need an appropriate tool that improves the quality of conversations, so you can be sure that the professional version of SoliCall will be compatible with the chosen telephony program. The user only needs to download or purchase SoliCall, install it on his computer, activate the settings by selecting the recording equipment itself.
We also note the additional functions present in SoliCall. Particular attention should be paid to the ability to record calls with automatic saving to a specified folder. The user needs to select a location and set the format, after which the sound will begin to be recorded immediately when the call begins, and all noise reduction and echo parameters will also be applied to this recording, so as a result, a high-quality track will be available for listening. The professional paid version of SoliCall has more advanced noise reduction settings, which are useful for configuring the aggressiveness of frequency cutting, enabling compensation for noise and other interference. You can get acquainted with all the features and try the free version of SoliCall on the official website by clicking on the following link.
Andrea PC Audio Software
Andrea PC Audio Software is another professional paid application that has a huge number of different options for configuring the sound from the microphone and speakers. Let's talk about noise reduction right away. It is implemented here using our own PureAudio technology, which is activated by the user independently by checking the box next to the corresponding item. There are no detailed settings for this option, since it works in smart mode, but if you still want to change the voice capture parameters, then refer to the aggressive noise reduction setting, which is also associated with the mentioned technology. You can move the slider yourself, choosing how much extra frequencies will be removed.
The software comes with a high-quality ten-band graphic equalizer with preset settings to specifically control the bass, mid, and treble levels to configure the audio tone according to your favorite type of music. Various effects are also applied in real time, not only distorting the voice itself or the track being played, but also directly affecting the sound quality. The application also has functions of microphone recording, stereo noise suppression, acoustic echo cancellation, light beam shaping, aggressive beam shaping, beam direction, microphone gain and much more. A pleasant interface completes the whole picture and makes interaction with Andrea PC Audio Software as pleasant as possible for the average user.
Samson Sound Deck
Completing our list of software today is Samson Sound Deck. Initially, this application was available only to owners of microphones from Samson, but now its functionality has expanded and it interacts correctly with many devices from other manufacturers. The developers of this software were inspired by the digital audio processing technology used in the cockpits of military fighter jets and implemented it in their tool for Windows. The program is based on modern digital noise reduction algorithms, which provide clear communication and recording of conversations in almost any environment and with equipment of different levels, which will be especially useful during conversations in a noisy environment or when connecting cheap or low-quality equipment.
It is an ideal tool for home and office VoIP communications, voice recognition software, gaming, music and audio recording for YouTube videos, webinars and more. Samson Sound Windows operates in the background, which allows you to go to the settings at any time, but does not load the operating system, since it consumes virtually no processor resources and RAM. Samson Sound Deck Windows includes a digital audio recorder with easy file saving and export functions in popular formats with customizable quality settings. We have already clarified above that this software works in tandem with almost any microphone, however, when using Samson branded products, you get many technological advantages, which should also be taken into account when choosing an application. You can download Samson Sound Deck from the official website of the microphone manufacturer by clicking on the link below.
Audio editing programs
To conclude the review, we want to talk about a separate layer of programs that are designed for editing existing audio tracks. Some of them are equipped with special options that allow you to suppress noise and get rid of unnecessary frequencies in recordings, simply removing them or muffling them using unique technologies. It is worth using such software for those users who did not find the options discussed above suitable or the need to get rid of noise or echo arose after finishing recording the audio track through a microphone. We offer a detailed study of the most popular tools of this kind in a separate article on our website from another author, which can be accessed by clicking on the title below.
Read more: Audio editing programs
You have just learned about a variety of microphone noise reduction programs, as well as other supporting information on this topic. Now all that remains is to choose the right application to cope with this difficulty and establish high-quality sound when talking or recording.
We are glad that we were able to help you solve the problem. Add the Lumpics.ru website to your bookmarks and we will be useful to you. Thank the author and share the article on social networks.
Describe what didn't work for you. Our specialists will try to answer as quickly as possible.
Did this article help you?
NO
Cable damage
The cable needs to be inspected first. Literally from start to finish. Pay attention to whether there are any creases or other visible damage on it. If you don't find them, it doesn't mean they don't exist. There is a working way to check the integrity of the cable:
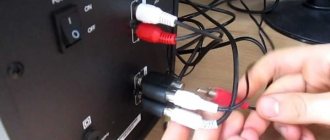
- Connect the microphone to your computer;
- Open Audacity or any other audio recording software;
- Start moving the microphone cable;
- Watch the audio recording.
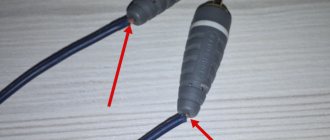
If, without external sounds on the microphone, you see that some noise and vibrations have appeared in the recording, it means that the cable on the way from the microphone to your PC is damaged. An example of such a picture:
In our example, we used Audacity, you can use any software, the main thing is that you can watch the track. But during the test, be careful, as you can simply set the microphone, which will logically lead to changes in the audio track.
If you find that the problem is with the cable, then you will need to either repair it or replace the microphone. Repairing a cheap microphone, as a rule, does not make sense, since the cost of repair is comparable to buying a new model, which will again be under warranty. If the warranty period of your existing model has not expired, feel free to contact us for repairs - if you did not intentionally break the device, you have every chance that the product will be accepted and repaired free of charge or replaced with a completely new one.
A preventive measure is to always handle the cable with care. You can extend the life of your device by many years if you take good care of it. Wires break so often that in our personal TOP list of causes of background and echo from microphones, this reason is in second place, right after problems with setting up the OS.
Removing noise and hiss after recording
If a noisy recording has already been made, then you often have to deal with what is there. If the noise is not too strong, then it can be cleaned up using modern sound editors.
Reaper
REAPER is a software environment for processing audio files. It has wide functionality for recording, creating and editing sound and is actively used in a professional environment. a 60-day trial version on the official website .
In Reaper, you can “clean” a track of extraneous sounds using the ReaFir plugin . To do this, press the FX button :
reafir in the search field that appears and select the appropriate filter by double-clicking:
Next, you should select the exact editing mode (Edit Mode – Precise) and the mode of operation by “subtracting” noise (Mode – Substract). You also need to start automatically building a noise profile by clicking on the checkbox next to “ Automatically build noise profile ”:
Now you need to move the filter plug-in window to the side so that it does not overlap the track, listen to it, select the area where only noise is heard. To do this, left-click on one end of the fragment, and then, while holding Shift, click on the other. reset the selection using the Esc key. Now turn on loop playback with the R button and press Play. If the area is selected correctly, after several “passes” the filter will recognize and clear the noise. Now you can turn off looping by pressing R again, turn off “ Automatically build noise profile ” and deselect the sample fragment.
How to fix Blue Screen of Death with STOP error 0x0000003b
Audacity
For the vast majority of home users, REAPER's capabilities are redundant. You can also remove noise from a recording using Audacity.
Audacity features sample-based noise reduction system To use it, you need to select a segment of the recording in which only noise is heard, and open Effects - Noise Reduction :
Next, click “ Get noise profile ”:
Now you need to select the entire track by pressing Ctrl+ A and open Effects - Noise Reduction again. Now you can click “ Listen ” and evaluate the filter’s performance. If you wish, you can try adjusting the settings. If you are satisfied with the result, you can click OK and save the cleared track.
External factors
It often happens that yesterday there was no background noise and echo, but today there is. My first thought was that the microphone was broken. But do not rush to throw away the device, it may be due to external factors.
The strongest factor that affects the microphone is other devices. For example, if a refrigerator or other large and powerful device is connected to the same outlet as your computer or laptop, then the likelihood that your microphone will literally hum is very high.
Try to analyze what is near your computer. These can be not only your own devices, but also the devices of neighbors across the wall or even a large store below.
If you identify a large consumer, try to switch it to another outlet, or even better, move the device itself or your laptop/PC to another room. In this case, the solution is simple - you need to move the microphone away from the “external factor” as far as possible, or at least separate them.
A preventive measure in this case is to keep your distance, never connect large devices to the same extension cord as your laptop.
What to do if the microphone is buzzing in Windows 10
It is unpleasant to communicate on Skype or another instant messenger for IP telephony when there is noise in the headphones due to software sound amplification. Having weak microphones, users often use the function of software to increase the amplitude of the incoming audio signal, which is digitized when entering the recording device.
The price to pay for the fact that the interlocutor will hear the user better is an increase in noise level, crackling, squeaking, etc. After reading the article, you will learn how to remove unpleasant noise from the microphone in Windows 10 without resorting to any serious solutions. First of all, we perform the following manipulations:
- reconnect the device to another port, for example, on the rear panel of the system unit, if available;
- We check the microphone on another computer or smartphone.
Problems due to third party programs
Often the problem is not so much due to third-party software, but rather due to the program that you use to work with the microphone. For example, if you want to call someone on Skype, it will be great to know about the main problems with microphones in this program.
Some programs require you to manually configure the microphone. Some utilities also have a special troubleshooting mode that can help you identify the cause of problems, and in some cases, help you figure out how to fix them.
If you have a program installed that “improves” the performance of your PC, it can also affect the performance of the microphone. Therefore, if you have such additional software from third-party developers, then you need to disable it temporarily or remove it permanently - and see if the situation improves.
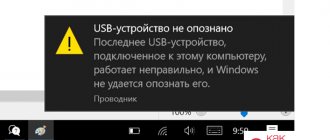
Device failure
In the case of a complete breakdown of the device, it is important to identify what the problem is. It can be either in the device itself or on your PC. To do this you need to do the following:
Connect another microphone to your PC - try to see if there is also background noise or echo;
Connect your microphone to a PC where there is definitely no echo or other noise - try to see if your microphone will work correctly in this case.
After this you will be able to understand what the problem is. If there is background noise on two different PCs, then there is a high probability that the problem is in the microphone itself. If the background noise is only on your PC, but not on the second one, then most likely the problem lies in your PC, and even moreover, most likely it is in the OS settings or lack of drivers. How to solve this problem is described above.
If the microphone does not work or is noisy on two devices, you can do this test on a third device, which could also be a mobile phone. If the result repeats, then with 99% probability the problem is in the microphone, and you need to make a decision: repair it or replace it with a new one.
How to remove background microphone noise
To eliminate interference, configure the device and reinstall the drivers.
Using standard operating system tools
If the microphone is very loud, perform the following actions:
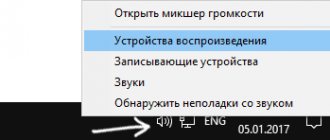
- Click on the speaker icon located on the notification panel. When working with a laptop, 2 microphones are displayed, one of which is built-in.
- Go to the “Recording” tab, select the name of the desired device. Say something into the microphone, adjusting the volume level.
- Open the “Levels” section. Go to the “Advanced Settings” tab. Adjust the sound quality. When adjusting the gain, do not set the maximum values. Otherwise, it will not be possible to completely eliminate background noise.
Reinstalling drivers
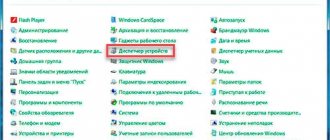
Sometimes the microphone begins to work incorrectly due to the lack of the necessary software. Available drivers become outdated, making audio recording tools incompatible with your computer. To check this version, press the Win+X buttons and open the “Device Manager”. Go to the Realtek Audio section. A new window opens with a “Driver” tab. Here you select the “Automatic update” option.
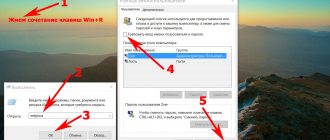
Checking power settings
When using Eco mode, the sound card does not receive enough voltage, so the microphone “hums” or “hisses.” In this case, press the Win+R keys and enter the Control prompt. The PC settings menu opens. Select “Power Options” from the list. Follow the link “Create a schema” and select the “High performance” option.