ATTENTION! The instructions have been verified by a specialist for all versions of Windows: 7, 8, 8.1 and 10.
Hi all! On the Internet, for this request, you can again find a lot of nonsense. While solving this problem at home, I came across several crazy and even harmful pieces of advice that you should never do. That is why I decided to look at this issue bit by bit and piece by piece. In fact, if the computer reboots itself, there can be quite a few reasons. Both from the hardware side and from the software side.
We will try to sort them all out in the article. I won’t promise you that the problem will be solved 100%. But we will try to do our best at home. If you have any questions, additions, or see a mistake on my part, write in the comments.
Power supply
Since the device runs on electricity, the first thing you should check is a commonplace outlet. In this case, the computer does not restart on its own, but simply turns off due to a power surge. We look carefully at the socket and plug; there should be no traces of yellowing or burning on it.
I'll tell you a case that I encountered myself. The computer reboots approximately every 15 minutes. In fact, it turned out that it simply turns off due to lack of power supply. The socket appeared to be in good working order, but upon disassembling it, I discovered that one of the wires was broken. That is why, in order to exclude this too, I would disassemble the socket and look at the wires there. This is especially true in old houses where the wiring is very, very old.
To check, you can plug in the vacuum cleaner and turn it on. If after some time it turns off, then the problem is in the outlet. I would also check the surge protector; for this, the system unit can be connected directly to the outlet. If possible, you can try reconnecting the computer to a completely different outlet directly without a filter.
Cleaning your computer
If the computer reboots spontaneously, this may indicate overheating of the main parts of the computer: video card, processor, hard drive, RAM, etc. That is why now we need to open the side cover and just simply vacuum it from dust. Be sure to turn off the power before doing this.
Pay attention to fans where dust and animal fur can become stuck. If the vacuum cleaner cannot suck out these scraps, then you can use a match or a brush.
ATTENTION! Do not use a wet cloth or water.
Check that there is no dust in the video card. It is to this board that your monitor is connected. If possible, turn it off and remove it.
Also, don't forget to vacuum the case itself. We pay special attention to the openings where air enters and exits. For now, don’t close the system manager and check the operation. If everything remains the same, then we move on.
The computer restarts when turned on
Once you turn on the device, after a few seconds it reboots itself. And this happens several times, the computer constantly reboots upon startup. First of all, you need to determine the cause. It can be in software or technical issues. First, let's look at the technical aspects, since they are most often the causes of problems. Why does the computer constantly restart by itself :
- Overheat
- Damage to thermal paste
- Contacts are damaged
- The power supply is faulty
Below, we will consider each case and its solution.
Overheat
Three things can overheat in a computer - the main processor, the mother card and the video card. There can also be several reasons for overheating. Due to improper operation of coolers or large accumulation of dust. To check this, open the system unit by removing the side cover.
Carefully inspect the internal parts of the computer. Typically, coolers are located on the CPU (central processing unit) and on the video card. To check their functionality, turn on your PC. If they turn slowly or make a buzzing noise, they will need to be replaced. But sometimes it is enough to thoroughly wipe all the internal parts from the dust that has accumulated there. To do this, you can carefully vacuum all parts of the computer. For small details, use a brush.
Do everything carefully - processor parts may be damaged by static voltage. Alternatively, wipe everything down with a damp, lint-free cloth. The cooler must be carefully removed, disassembled, removed dust and lubricated with a thin layer of machine oil. It’s also better to remove the video card, unscrew the fans with a screwdriver, and wipe everything thoroughly.
Damaged thermal paste
Thermal paste ensures optimal heat transfer between the internal parts of the computer. If it dries out, heat transfer is disrupted and the computer overheats. Thermal paste is sold in specialized stores. It's easy to replace it yourself. There are many training videos on the Internet with a detailed process of replacing thermal paste.
Overheating may be caused by a lack of external air exchange. If the system unit is located next to a radiator, is exposed to direct sunlight, or is built into a table, try moving it to another location. This may solve the overheating problem. Overheating often occurs during the hot season.
Faulty power supply
An outdated and dusty network unit may cause the computer to constantly reboot. Dry thermal paste or a low-quality motherboard can lead to periodic voltage drops. Because of this, the computer spontaneously reboots after a short period of operation. The problem can be solved by replacing the unit with a more powerful analogue.
Bad contacts
The problem may be with loose contacts. Carefully disconnect and connect one by one all externally visible connectors. These are the main technical points why the computer reboots itself, but there are also cases when everything is fine from the technical side, the problem is in the software.
CPU overheating
Even if you clean your computer from dust, this may not save it from rebooting if the processor’s thermal paste has not been changed for a long time. It could simply dry out. It is recommended to perform this procedure every 3 years. Otherwise, the temperature may reach such a point that the PC will reboot constantly.
First you need to check the temperature. This is done quite simply. You can view the temperature through the BIOS - when turning on the computer or rebooting, hold down one of the keys: “Del”, “F2”, “F10”, “Esc”.
You can also view the temperature in more detail in the AIDA64 program - just download it and install it on your computer.
Normal temperature (in degrees Celsius):
- In normal mode: 30 – 40.
- During play and active work: 45 – 65.
- Maximum value: 73
It is also necessary to take into account the features of the processor itself. If you still have the side cover open, then see if the fan is spinning, which should cool the processor. Check all other coolers in the same way.
If you are not satisfied with the temperature, or you think that the processor is too hot, then turn off the computer and disconnect it from the power supply. Unscrew the bolts from the cooler and remove it. Use a cotton swab to wipe off the old layer of thermal paste.
Apply a new layer of thermal paste. The most important thing is that you only need a little bit of it. A very thick layer can impair heat transfer.
At the very end, we screw the processor back, turn on the device and check the operation.
power unit
Spontaneous rebooting of the computer may also indicate a faulty power supply. There may be two reasons for this. The first is that the power supply does not have enough power to pull all the connected devices. This often happens when connecting a new video card.
The second reason is a breakdown of the power supply. The truth here may be a complete shutdown of the computer. But he can also sometimes just pass out on his own. Look at the fan during operation - it should spin steadily without any delays.
In more rare cases, when everything is normal with the power supply, oxidation of the contacts occurs. You can simply unplug the cables that come from the power supply and insert them back.
Faulty or insufficient power supply
If the computer restarts on its own without warning, there is a high probability of a faulty power supply or overheating of key hardware components. First of all, make sure that the power supply provides sufficient power and all contacts are free of oxidation.
In general, the power of the power supply should be approximately 20 percent greater than the total amount of power consumed by all computer components. This reserve is necessary for the normal operation of devices operating in high power consumption mode.
Power button
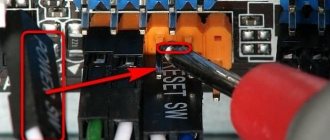
Another very common reason for a computer reboot is when the power button gets stuck. As a result, the computer turns on and then turns off again. It's very easy to check. Locate the small cable on the motherboard that goes to the front cover of the system unit. It must be signed: “Power SW”, “PWR SW” or “PWR_BTN”.
Pull the plug out of the motherboard. Now take something metal (like a screwdriver) and connect these two pins. The computer must be connected to the network at this time. The system unit should turn on normally.
Reasons for rebooting
It is impossible to completely avoid errors in the operation of a computer system. Sooner or later, all users are faced with the need to troubleshoot OS problems.
A very common problem is when, after updating, Windows 7 reboots constantly and spontaneously. The reason is a malfunction of the hardware or software component of the computer.
The most common reasons for unscheduled reboots in Windows 7:
- computer overheating. The essence of the reason is the hardware side of the PC. Both, for example, the video card and the north bridge of the motherboard or processor can overheat;
- equipment problems. Damage to the power supply and its components is possible;
- computer infection by viruses. In some cases, viruses can cause great harm to a computer. They also carry the risk of theft of user personal data;
- incorrect software. First of all, you should diagnose the operation of all system drivers;
- installation of OS update. Problems with Windows 7 can also occur due to the installation of an unfinished update.
Blue screen of death
Sometimes the computer does not restart, but displays the Blue Screen of Death first. Almost everyone has encountered it. First of all, you need to look at the name and error code. You can look at the pictures below for an example. The code and name may indicate a physical or software failure.
If the computer immediately restarts after this, and you do not have time to write down this data, then you need to do the following:
- Go to computer properties.
- On the “Advanced” tab, go to “Options”.
- Uncheck the box next to “Perform automatic reboot.”
You can then take a photo or write down the error number and name. Next, we look for information on this error on the Internet.
Very often a blue screen appears due to problems with RAM. It can be checked using standard tools in Windows. In the search bar, simply enter the name of the utility: “Diagnostics of computer RAM problems.”
It can also be launched in another way:
- Press the “Win + R” buttons on the keyboard.
- We write: “mdsched”.
- Select the reboot option.
- After this, the computer will reboot and you will see the verification process. At the very end you will see the result.
If you have several dies, then you can turn on and check the operation of the computer with each of them. If it is found broken, it should be replaced. You can also try switching the RAM to other slots; perhaps one of the working ones is faulty. If the contacts are oxidized, they can be cleaned with a regular eraser.
The second cause of the blue screen of death is broken or incorrect drivers. What does “Incorrect drivers” mean - for example, you have a Windows 7 system, and the drivers are installed for Windows 8. In this case, they may install normally, but problems may arise - when you see a blue screen of death when you launch a certain program.
In general, you need to download drivers from the manufacturer’s official website and install them on your computer. We pay attention to drivers for the motherboard and video card. It is not worth installing through the “Device Manager”, since in this case the drivers will be downloaded not from the official website, but from Microsoft servers. See the following instructions:
- Motherboard.
- Video cards.
- Laptops.
Why does the computer restart while playing?
If the computer is working normally, but a reboot occurs while the game is starting, there are several options.
- The game may be too "heavy" for the computer.
- You have contracted a harmful virus.
- Your video card is damaged or you need to update the drivers
The computer may overheat when starting a game that is “heavy” for your system, and automatically reboot. The reason is weak coolers or a low-power power supply. As a rule, a heavy game on a weak computer will not start or will slow down greatly, but it may be that the characteristics of your PC meet the requirements of the game and your video card runs the game without freezing, but the power supply cannot cope with the power consumption of the video card when the video processor is actively working . If this happens to all games, try reinstalling the drivers on the video card or cleaning the system from viruses.
How to reinstall drivers on a video card
- You need to restart the computer, and when turning it on, press F8 several times.
- From the menu that appears, select “Safe Mode.”
- When the OS boots, go to “My Computer”, “Control Panel”, “Add or Remove Programs”. In the menu that opens, delete all parameters related to the video card installer.
- Then move to the WINDOWS\SYSTEM subsection and find all DLL files related to the video card driver. For an Nvidia video card, select files with the nv*.dll extension and delete them. Be careful not to erase unnecessary files. After this, restart your computer and enter “Normal Mode”.
- After booting, the system will ask for drivers. Insert the driver disk and specify the system path to the directory with the installers;
- After installation is complete, reboot and try restarting the game.
Checking for a scheduled reboot
- “Win+R” and the command “gpedit.msc”
- Let's open the first section.
- Next, go to: “Administrative Templates” – “Windows Components” – open the “Windows Update” folder.
- Change two parameters as in the picture below.
- Let's reboot.
Autoload
When the system boots, not only drivers are loaded, but also some programs that can affect the operation of the PC, and it, in turn, can sometimes suddenly reboot during operation.
- In Windows, click on “Win + R” and enter: “msconfig”.
- On the general tab, uncheck the box as in the picture below and go to the “Services” tab.
- Disable program and application services. Click "Apply."
- After this we reboot.
Windows 7 reboots on boot
The cause of an endless (cyclical) reboot of the system can be either a virus or a problem at the hardware level.
If the problem is a virus:
- We are waiting for the next reboot and while the BIOS has not yet loaded, press DEL on the keyboard until the “Additional boot options” menu appears on the screen.
- Select “Safe Mode” from the list and try to boot. Usually, this helps to get into the system interface.
- Next, we begin scanning the system with an antivirus program. You can take the free “Dr.Web Cureit!”
- After checking, be sure to remove all viruses that the antivirus program found and reboot. If loading occurs normally, then the problem is solved.
If all the viruses have been removed or the loading in safe mode has not finished, but rather continues, then there is a problem with the hardware, in particular with the boot sector of the hard drive.
If it is damaged, the system simply does not find the download files and continues to reboot until it finds it. There are several options to solve this problem:
- Boot from a Windows bootable USB flash drive with command line support. Enter the command: fdisk/mbr and press Enter. Reboot and check the results. Only then try the following options.
- Reinstall the operating system, having previously formatted the hard drive for installation (not to be confused with local drives);
- Try to move the user’s files to another hard drive that works for sure, and then repeat step 1;
- Take it to a repair shop or use a program that can restore the boot partition, if at all possible. We can recommend: Active Partition Recovery, Testdisk, SFbootablecd. They need to be loaded onto a USB flash drive (make it bootable) and start the computer from it. Then everything happens intuitively according to the instructions of the application you choose.
Other options that affect the correct loading of the OS may be:
- Video card malfunction;
- Malfunction of sector(s) of RAM;
- BIOS failure;
- There is a large amount of dust in the system unit;
- Computer overheating.
If you can boot into safe mode, then the first three points are decided independently by the user. To do this, in the case of a video card, you need to reinstall the drivers. The possibility of a RAM malfunction can be resolved by checking the MemTest86+ program, which will show whether your RAM stick(s) can continue to be used. A BIOS failure can be resolved by removing the battery from the system unit. It looks like a small penny.
This will create an automatic reset of user settings and the BIOS will return to its original state. In case of dust and overheating - if you do not understand how to clean a computer or change thermal paste, it is better to contact a specialist who will do everything carefully and without harm to your computer.
Registry
Sometimes when programs are running, the registry can become clogged with incorrect settings. Therefore we do the following:
- “Win + R” and write: “regedit”.
- We follow the path:
HKEY_CURENT_USER/Software/Microsoft/Windows/CurentVersion/Explorer
- Find the “CleanShutdown” parameter and set the value to 1.
- After that we go to:
HKEY_CURENT_USER/Software/Microsoft/Windows/CurentVersion/Explorer
- Set the “CleanShutdown” parameter to the same value. If this parameter is not present, then we do nothing.
- Reboot the computer.
System rollback
If none of the above helped, and the computer still periodically shuts down, then here’s what you can do:
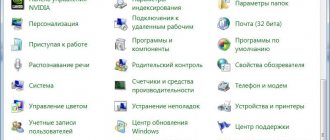
- “Control Panel” (Win+R=Control).
- Go to the “Recoveries” section.
- Click on the main button.
- We act according to the instructions. When choosing a restore point, I recommend choosing the earliest point.
- We wait until the computer reboots and performs basic actions.
Cleaning the system
Next, we will perform a comprehensive computer cleaning in several steps. Check your computer with an antivirus program. Next, download and install the CCleaner program. After this, perform standard cleaning and checking the registry for errors.
Go to “Control Panel” (Win+R=control). Next, go to “Programs and Features”. Set sorting by date - click on the third column. Next, remove everything unnecessary and suspicious.
Go to startup. In Windows 7, to do this you need to press “Win + R” and enter “msconfig”. In Windows 10, press “Ctrl+Shift+Esc”. On the Startup tab, disable everything except the sound card driver and antivirus.
What to do
First of all, you should use the services of a service center, or diagnose the computer yourself.
You should start by studying the software side of the problem. Most often, software problems are associated with viruses or with the latest installed system updates.
Below is the most common reason for rebooting Windows 7 and an effective method for quickly resolving it.
Uninstalling update KV971033
Windows Update Installation Center is a utility that allows users to install all the latest drivers and system updates. However, sometimes the operating system of a personal computer and the element installed by the center may be incompatible
Today, one of the most problematic Windows 7 OS updates is the KV971033 component, which, in most cases, disrupts the operation of the computer’s operating system.
To remove the KV971033 update, follow these steps:
- Go to Windows Update through the Control Panel;
- in the lower left corner of the window, select the “Update Management” tab and wait until the list of all installed elements is loaded;
- select the item “Update for Microsoft Windows (КВ971033)”, right-click on it and select “Delete” from the pop-up menu. It may take several minutes for the updates to be removed. After uninstallation is complete, reboot your system.
Activating Windows
After removing the KV971033 update, you need to reactivate the Windows 7 system. To do this, you need to install a special activator for Windows 7. It can be downloaded from many web resources.
Important! Before installing the activator, check the file for malicious content with an antivirus.
To activate the OS, follow the instructions:
- run an account with administrator rights;
- Through the Start menu, go to the command line;
- Write the following text in it (without quotes): “slmgr–rearm” and press Enter. This command allows you to extend the period of use of the OS by 30 days without violating the license agreement. If the command did not work, try typing “slmgr /rearm”;
- restart your computer;
- activate the operating system using the previously downloaded activator.
We are closing access to update KV971033
The next step is to block access to update KV971033, so that in the future you will not encounter system failures again.
The process of blocking access to the KV971033 update looks like this:
- The first step is to go to Windows Update;
- select the “Required updates” tab and select KV971033 from the list;
- Right-click on the item and select “Hide Update”.