Audacity is a multi-platform audio editor, distributed free of charge. The program is equipped with advanced tools for working with the contents of audio files, algorithms for performing spectral analysis of files, playing multi-channel tracks, mixing tracks with different characteristics, and more.
The Audacity library contains dozens of effects to change the sound of a track. In addition to them, there are a lot of official and unofficial extensions that can be connected externally. Most often used to cut music, for example, to set it to a bell.
Let's look at how to use Audacity, its main functions and tools. We will also show you how to do something interesting using this application.
Installation
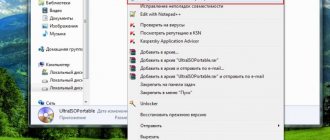
First of all, you need to get the program installer and install it, or download the portable version and unpack it to a convenient place on your computer. To download any version of the editor, go to the next page of our website and select the desired distribution.
For Linux, the program is available for installation from official repositories; for Ubuntu, it will download after executing the command: sudo apt install audacity.
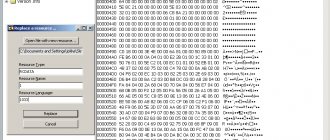
After downloading the archive with the portable version, you only need to unpack it. To export files to mp3 format, you must separately download the LAME application for mp3 compression.
How to work in audacity
Hello dear visitors and guests.
With this article I open a series of materials dedicated to the wonderful Audacity program. As usual, I will try to talk in simple language, clearly and in detail about the capabilities and how to use the program. The end result should be step-by-step instructions for Audacity. Audacity is a free, simple yet powerful audio editor. From the article you will learn about the purpose of the program, where to download Audacity for free in Russian, how to install lame_enc.dll to save files to mp3
Interface
The top part of the main application window is occupied by the main menu, which provides access to all Audacity functions. Below is a block of buttons for controlling playback of the active audio track from the specified location:
- Pause;
- Play;
- Stop;
- Jump to the beginning and end of a track;
- Recording a new track.
Then there is a block with tools for working with tracks, samples and their groups:
- Selection;
- Envelopes;
- Drawing;
- Scale;
- Time shift;
- Multi-tool – switches to one of the first three depending on the position of the cursor.
Next is a pair of volume meters at the input and output, after which there is a Quick Access Panel with shortcuts to frequently executed commands:
- Cutting out;
- Copying;
- Insert;
- Deleting audio data, except for the selected fragment;
- Filling the selected fragment with silence;
- Undo and redo steps.
After them there are tools for scaling: enlarge, reduce, fit the selected area or the entire project into the width of the window, and a button for sequentially switching between all display modes. The last group of buttons is responsible for switching between audio devices.
Below the tools is the main part of the interface - the work area, where there is a diagram of audio tracks with a timeline. This is where they are edited. The lowest part of the window is the status bar, it displays the status of the track, the selected instrument, the current position of the audio, the beginning and end of the selected fragment (the modes are switched).
Track control panel
If you turn on the “Play” button after recording several tracks, they will all play simultaneously. If this is not necessary, then you need to click the “Solo” button in the audio recording control window. In this case, only those tracks for which this function is selected will be played through the speakers.
In the case when there is a need to listen to all tracks except one (or several), unnecessary recordings are excluded from playback by pressing the “Mute” button for them.
The track control panel contains many useful functions for working with recordings. If you click on the small black arrow pointing down, a list of parameters will appear on the screen.
In this case, the first three parameters are the most useful for managing tracks. These include the ability to create a track name, as well as other ways to move entries up and down within the workspace. However, assigning a name to each specific recording can be very useful when the user is working with a large number of tracks, since in this case it becomes difficult to distinguish them from one another simply by the visual image of the sound waves corresponding to each track.
The track control panel also contains two sliders (“worms”):
- The first one, located above, contains the signs “+” and “-”. It allows you to control the volume level of the track, increasing or decreasing it accordingly. This volume control option can be useful if your audio project contains tracks that play much quieter than other tracks, or, on the contrary, drown them out with their more powerful sound. Volume control makes it possible to solve such problems and equalize the sound level of the entire podcast.
- The next slider, labeled “L” and “R,” applies only to those tracks that were recorded in stereo, and allows you to adjust the volume of sound that will come from the left or right speakers, respectively. This effect is called panning. By moving the slider to the right, you can increase the volume of sound coming from the left speaker and decrease the volume from the right speaker, and vice versa.
In addition, the track control panel makes it possible to automatically sort tracks by start time or name, without having to manually move them in the workspace. In order to sort all the tracks in the current audio project, you need to select the “Tracks” menu item, and then “Sort tracks by...” and select from the two proposed options.
Sorting tracks by start time can be useful for aligning all tracks in the same order they will be played in the current podcast project.
Sorting by name is most useful when your podcast contains many tracks with similar names. For example: Record1, Record2, Record3, Interview1, Interview2, etc.
Sound recording
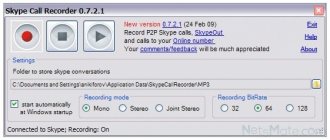
In addition to exporting audio files, Audacity can capture audio from audio devices (microphone). To do this, select your audio recording device, and then start monitoring it (top right in the toolbar).
Now click on the “Record” button to capture sound from the microphone.
There is a yellow “Stop” button to interrupt recording. You can also pause it (“Pause”) to continue shortly.
How to Record Audio in Audacity
To start recording, you need to press the record button (REC) and start speaking into your microphone. When you start broadcasting, a sound wave with a recording of your voice will begin to appear in the program’s working window.
If the recording is long enough, you can click on the “Pause” button and press this button again to resume recording. To end recording, you need to click on the “Stop” button.
Soundtrack
An audio track is a way of visualizing a digital audio recording. In Audacity it consists of the following components:
- Time scale – displayed at the top and shows the duration of the track;
- File properties - here the sound of the current track is muted, the appearance of its visualization (waveform, spectrum), colors for coloring various elements of the track and many other display parameters are changed;
- Scrubber – a line that marks the current position from which the file will begin playing;
- Audio track – here the audio signal is visualized in the selected form.
The second and subsequent ones will be located under the first track after they are opened in the program.
Download and install Audacity
To download the Audacity program, go to the official website of the developers.
Next, download the required version. The yellow window contains a link to download the version of the program for the Windows 8/7/Vista/XP operating systems. If you have one of these systems installed, then click on the link and download the program to your computer. If you have a different operating system, then click on the link below.
After the program installer file has been downloaded, run it and follow the prompts of the installation wizard.
Afterwards, a window will appear in which you will be asked to install additional plugins for the Audacity program to work. Install them too.
The program is installed and ready to use.
Trimming tracks
Audacity allows you to cut fragments of audio files for export to a file of the required format. To precisely select the start and end of a section, use the zoom tools or the “Start and end of selection” in the status bar. You can change the scale using the mouse wheel while holding Ctrl.
To specify a fragment, select the “Selection” tool and use it to mark the beginning and end of the fragment. As a result, the desired area will be highlighted.
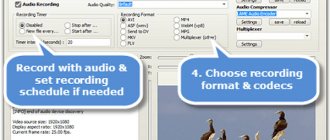
To save the marked fragment to an audio file, you must do the following:
- Call the main menu item “File”;
- Move the cursor to the “Export” item and select the desired format;
- We indicate the saving parameters, in particular, the bitrate;
- We save the result.
How to edit an audio recording
After the audio recording is ready, you need to edit it. After all, often when recording there are unfortunate moments that I would like to cut out. Audacity makes this very easy.
In order to cut out an extra, unnecessary moment of recording, you just need to select it with the mouse and press the button with the scissors drawn.
To make it more convenient to edit an audio recording, you can change the scale of the audio track. This is done using two buttons with drawn magnifying glasses and “+” and “-” signs, respectively.
If you did something wrong while editing, deleted, for example, too much of a recording or cut out the wrong piece, you can undo these actions. This is done using two buttons with drawn arrows.
Noise Removal
The application allows you to remove extraneous sounds from the recording. Open the file and select the desired fragment.
Call the “Noise Reduction” command from the “Effects” main menu item. Click “Get noise profile” to automatically detect third-party sounds.
Open this window again and click “OK”. You can first configure the noise reduction profile yourself by dragging the sliders and listening to the result.