What Is App Data on Android
When you install an app, either from the Google Play Store or by sideloading a third-party APK
How to Manually Install or Sideload Apps on Android
How to Manually Install or Sideload Apps on Android Want to sideload apps on your Android phone? Installing APKs manually on Android opens up a whole new world of apps, and it's easy to do. Read More
, the executable app file along with any necessary runtime library files are stored in the system's /data/app directory. This directory is inaccessible by file explorer, unless you root your device.
Each installed app also gets its own directory for private data, located in the system's /data/data directory. This directory is also inaccessible except by rooting your device.
As you use your various Android apps, certain settings and inputs get stored between sessions. For example, logging into an app and checking “Remember me” will store your details to private data. Data also stores things like account settings, app preferences, etc.
Some apps (like Spotify) may store offline audio data, while others (like Maps) may store offline map data. This can take up a LOT more storage space than you were expecting, so it can be useful to know how to wipe app data in case your storage space runs low.
How to Clear App Data on Android Phones
When you clear app data, you're essentially clearing all of the private data it has ever stored since you installed it and used it. In other words, clearing app data “resets” an app back to how it would be when first installed.
To clear app data for a specific Android app:
- Open Settings.
- Navigate to Apps.
- Tap on the app you want to clear.
- Tap on Clear Data.
Why do you need to perform a factory reset?
A factory reset clears Android of your data and programs and may be needed for various reasons:
- If Android does not work correctly and critical errors often occur
- After obtaining Root Android rights
- After the firmware (transition from original firmware to custom firmware, OS update)
- In order not to disseminate personal data (when reselling the device and transferring it to other hands)
In the Android ecosystem, resetting settings is usually called wipe. The English word Wipe [wipe] - wipe, wipe. For many, the familiar word in this case will be formatting or format. So remember, Wipe in Android is a reset, formatting!
Another reason
This function may be needed if viruses have entered your phone. This usually happens due to installing applications from unverified sources, as well as unsafe Internet surfing.
Even if for some reason you need to constantly use the Internet, it is better to get an antivirus program. It may not be able to filter everything, but it will definitely stop the most dangerous viruses.
If malware has already entered the system, the antivirus program may not be able to remove them. They can also damage many system files, which can cause the smartphone to stop working correctly. There will be glitches and various types of errors.
In this case, you will again need to use Factory Reset.
Other reasons
A factory reset may be necessary if:
- Regular phone system failures, the reasons for which cannot be found.
- Selling a smartphone to another person. This way, it will be much easier to delete all your personal data in one fell swoop.
- Unsuccessful flashing or installation of a custom shell.
Function options
As mentioned earlier, there are several types of resets. A partial reset deletes individual partitions and folders, cleans the system and gets rid of files that can cause errors and crashes. In this case, photographs and documents remain untouched.
Wipe Factory Reset is a hard reset that helps you get rid of all files on your phone. It completely clears the system of settings and configurations, deletes accounts and all personal data of the user. In this case, there is practically no chance that viruses or malware will remain on the system.
Option 2: Restore and reset
In Android settings you can see such an item as “Backup and reset”. It is designed to reset system settings and restore from a backup saved on the Internet.
Click on the "Reset settings" option.
Scroll down and optionally check the box next to “Clear phone memory - card” to delete personal data from the SD memory card, such as photos, music and other user data. Click on the “Reset phone settings” button.
User data will be deleted and factory data will be restored.
Recovery Mode or simply the recovery menu is a special smartphone mode that allows, for example, to reset certain data, reflash the touch device, run various tests, etc. Many users do not know about this menu. Don't be surprised, because the developers hid it away - one wrong click can lead to the loss of all data. However, in reality, the recovery menu can be extremely useful if you know where and what to click. In this article we will talk about one of the menu items - Wipe data/Factory reset.
Let's start with the translation: Wipe data is translated into Russian as “wipe data”, and Factory reset is “reset to factory settings”. This means that we can conclude that this recovery menu item erases all data and returns the device to factory settings - that is, the smartphone becomes the same as it was when purchased. This is very convenient if your device starts to slow down, work incorrectly, etc. Just remember to save the necessary data before selecting this menu item.
The Wipe data/Factory reset item replaces resetting settings using the menu of your Android smartphone: if for some reason you cannot use the main menu, use recovery.
How to open recovery? Usually you need to press and hold the Volume Up and Power keys when the smartphone is turned off. For example, as in the case of Xiaomi:
Sometimes you need to press the Volume Down and Power keys. On Samsung smartphones, a different scheme can be used: volume up key, Power + Home when the smartphone is turned off (press and hold until the device wakes up).
If everything is done correctly, you will see this picture:
Then this:
And only then the recovery menu will load. Here, as you can see, there is Wipe data/Factory reset.
If you select it, a confirmation will appear whether to continue deleting data or not. Selecting Yes will continue to clean the device.
Before selecting this menu item, think carefully about whether you have saved all the data - otherwise it will be deleted. And remember that if you do not remove the Google account from the device before resetting the data, then the next time you turn it on you will have to enter the password for this account (on modern versions of Android). If you know him, there will be no problems. If not, this is a serious problem, believe me.
The smartphone has become an indispensable part of everyday life - it is truly an extremely important device from which productivity and speed are required.
Over time, the Android system begins to work a little slower, and soon it becomes simply impossible to use some applications, and even . Often the phone gets clogged with temporary files stored in the cache memory. In many cases, even reinstalling applications is not a solution, because files remain in the depths of the system, which still slow down the work.
Why is this function needed?
There can be many reasons to use this feature. Users often encounter memory limitation problems.
An SD card always has its limit, and the phone's built-in memory can usually hold even less information.
However, despite all the warnings, we fill up the phone, filling it with music, videos and photos, which ultimately leads to unpleasant consequences:
- loading the smartphone is very slow;
- the gadget freezes even with the simplest manipulations;
- applications stop working correctly.
In this case, it becomes difficult, if not completely impossible, to use, so many, when faced with this problem for the first time, rush to the service center, wanting to fix everything as quickly as possible.
Important! Equipment repair and inspection services are not free and you will have to spend money on something that you can easily do at home yourself.
Viruses can also be one of the reasons. By downloading applications, games and information from unverified sites, the user risks his gadget.
Sometimes the built-in anti-virus program successfully copes with a virus introduced into the system, but their reliability is not always at the highest level.
An effective way to get rid of the problem is to use a system reset. Along with personal files, the deletion of which, unfortunately, cannot be avoided, the virus will also be destroyed.
You can use it for a number of other reasons:
- If you have recently updated the firmware of your smartphone, removing the built-in, original system, replacing it with a custom one, or simply upgrading to a higher version.
- When selling your phone to another person, without wanting them to have access to your personal information.
- In case of constant failures in the operation of Android, for which you cannot find an explanation.
A reset to factory settings, of course, can be done without an urgent reason, if desired, simply saying goodbye to old and boring applications that you don’t have time to delve into.
System recovery and how to clear the application cache
For a more complete understanding of the issue, it is worth considering such a section of the system as Recovery. In simple words, this is the second bottom of the system, which allows you to perform a number of basic actions with it. Most often, recovery is used to change the device firmware, backup or restore the system, and similar actions. The application cache is also cleared through recovery.
In order to enter the recovery menu, you must simultaneously hold down several buttons on your smartphone. Most often, this is by simultaneously pressing both volume change keys and the device power off key. So, the algorithm of actions should be as follows:
- Turn off your smartphone.
- Simultaneously hold down the volume rocker (both keys) and the power button. Hold until the characteristic splash screen appears.
- In the recovery menu that appears, find the Wipe Cache Partition item and activate it. (Switching usually occurs using the same volume rocker, and selection with the power button).
- After clicking on the menu item, the display will show the actions being performed and upon completion will confirm the success of the work.
- Next you need to choose to restart or turn off the device.
After the device is rebooted, it will be cleared of traces of applications. This applies to both installed programs and those already uninstalled. As a result of the Wipe Cache Partition procedure, the operating system and applications will run faster. The procedure should be repeated periodically, especially if you have to frequently install and uninstall applications. In any case, preventing a problem is better than fighting it.
Android smartphones and tablets have a special Recovery Mode menu or simply . This is a special device boot mode, thanks to which you can reset all settings or, say, install new firmware on the device.
This is what Recovery Mode looks like on a Samsung smartphone:
To bring up this menu, you need to do a number of steps along with rebooting the smartphone. For example, on a Samsung Galaxy S3 the process is as follows:
Turn off your smartphone.
Press the volume up button, the Home button and the power button of the smartphone at the same time.
Release the buttons as soon as you see the recovery menu logo.
Please note that the image shown above is the stock Recovery Mode. There are also custom versions of the menu, they are installed by the user independently and can have a completely different look
There are several items in the recovery menu that raise questions among users. Let's talk about some of them.
Through a special menu
For Factory Reset in this case you need to run Recovery. Almost all smartphones have this “built-in” menu. To do this, turn off the smartphone, and then use a combination of buttons: the power button and volume up. They need to be clamped and held until you feel vibration.
A menu will appear, which you need to navigate using the volume rocker, and make a selection with the power key. In the new menu, it is easy to find the required line to reset the system to factory settings. The system will automatically launch Factory Reset and, upon completion, notify you that the process was successful.
Vip what is it
Wipe (meaning “to erase”) is a feature that will return your server or phone to a pristine state. Like Windows-based PCs, the Android system has a peculiarity - a careless culture of saving junk files. After some time, it starts to work slower, freeze, and the device’s memory becomes full. In the process, the data area does not simply clear free sectors. Each block is completely deleted, and there is no information left in it; “zeroing” occurs.
Wiping for online game servers occurs without user participation (on the phone, the owner himself performs the reset). There can be many reasons for a wipe: errors in the game, incorrect balance of the gameplay, making radical changes, completing the testing of mechanisms in alpha and beta tests. In most cases, after a wipe, players receive some preferences that compensate for lost progress, but there are some games where wipe is a full-fledged part of the mechanics.
Why do you need a full reset?
Simply deleting files, even by reformatting the drive, does not fully protect the device. Traces of their presence remain, and an experienced hacker will be able to recover the information. If you decide to sell a gadget, it is better to wipe it: in the process, the database will be overwritten, which will eliminate the possibility of fishing out erased files.
Other situations:
- The device freezes and malfunctions occur . These problems can be caused by viruses, inept attempts to “repair” applications and files, or cache clogging. You can't do without swiping here.
- Prevention . Databases should be cleared of debris once a year, especially when the gadget is actively used. The only way to deal with this is to completely reset the settings to factory settings and rewrite the disk.
- Before flashing the phone firmware . They do this only on Android; for iOS such actions are not necessary. A hard reset is performed to install a new version of the operating system on a clean base and eliminate conflicts and operational errors.
What Is App Cache on Android
Generally speaking, a cache is a special kind of storage that holds frequently accessed files and data. The purpose of cache is to make future access to those files and data faster, because cache storage is optimized for quick loading. The downside is that cache storage is limited and takes up space on your device.
As you use an Android app, you may need to periodically pull data from the internet—for example, images. Instead of downloading a specific image every time it needs to be displayed on the screen, an app might store that image in the app's cache. It's immediately available the next time you need to display it, plus you save on bandwidth.
Note: App cache isn't the same thing as the system cache partition on Android. Keep reading to learn more about that below.
How to Clear App Cache on Android Phones
Sometimes cached data can fall out of sync with what the data should actually be, which can lead to out-of-date information. Other times, the cache may fill up with too much data, which can slow down app performance. When this happens, it can help to clear an app's cache
How to Clear Cache on Android (And Why You Should)
How to Clear Cache on Android (And Why You Should) What is the purpose of cache in Android, and how can you clear it? We look at everything you must know about Android cache. Read More
.
Cached data is meant to be temporary, so there's no harm or risk in clearing an app's cached data. To clear the cache for a specific Android app:
- Open Settings.
- Navigate to Apps.
- Tap on the app you want to clear.
- Tap on Clear Cache.
Reset options
Android allows you to do a Wipe Data Factory Reset in three ways:
- through phone settings;
- through the Recovery menu;
- through a special button on the smartphone.
The easiest way is through your phone settings. But sometimes a system failure does not even allow you to turn on your smartphone, so you have to use other options. It is also easy to reset with a special button, but this is not so common on modern models.
Peculiarities
In English, wipe is translated as cleaning, wiping, and if you see it in the gadget settings, always remember that this is formatting and hardly anything else. There are two types:
- Full wipe - selecting this action will completely clear and format both built-in and removable memory.
- Partial wipe - helps to delete individual sections and folders, performing a cleaning operation so that this does not lead to malfunctions and failures in the future.
On Android there are three ways to use it:
- through the options menu;
- using Recovery;
- thanks to a special reset button, if available.
The first and third methods are considered to be the simplest, because they do not take even a few minutes. As for the second, it takes longer, but is reliable.
Types of wipe on Android
Wipe on Android can be divided into full and partial.
Full wipe - completely deletes all data on the partition.
Partial wipe - deletes a specific directory (folder) on a partition.
Which modes can you use to Wipe on Android?
- From the settings menu (normal boot)
- From the Recovery menu
- From the Bootloader menu using fastboot
- Using the hardware reset button (if available)
Full Wipe for android
So, to perform Full Wipe, you need to select the following items in the Recovery menu one by one and then answer in the affirmative to the confirmation request. Navigation through the Recovery menu items is carried out using the volume down or up buttons, and selection is made using the Power button. Let's take a closer look at each operation that is sequentially performed with Full Wipe.
1. wipe data/factory reset
— deleting all settings and user data. This cleans the /cash and /data partitions located in the gadget’s built-in memory, and the .android_secure folder (storage for applications transferred to the flash drive). This operation is in many ways similar to the similar Hard Reset function that is performed on WinMo, although there are some differences. On Android, Factory Reset only leads to clearing the specified partitions, and the firmware itself remains untouched. At the same time, if the user, due to inexperience or intentionally, violated any functions of the system (for example, deleted some system files), a factory reset will not help restore lost capabilities - this can only be done by flashing it. On WinMo, Hard Reset does not just clear all memory, but it also rolls out new firmware, replacing the old one, that is, it completely updates the device system to the “only from the counter” state.
2. wipe cache partition
— clearing the cache memory (/cache section), which serves to speed up access to frequently used files. This is a kind of buffer that allows you to increase the speed of the device.
3. format/data
— clearing all user data and settings. This also includes all settings of any installed or previously removed programs, if for some reason their data was not cleared immediately.
4. format/cache
— clearing the cache partition.
5. format/system
— complete cleaning of the system partition, which leads to the deletion of operating system files (erases it). Please note that once this operation is completed, the device will not be able to operate until the new firmware is installed. When cleaning the system partition, only the factory Recovery menu remains working.
6. wipe dalvik-cache
- deleting .dex files. These files are created automatically by the system for all installed applications and are used during their operation. It happens that these files are not compatible with the new version of the application - in this case, conflicts may arise. Deleting these files will lead to their new creation the next time the OS boots, which will eliminate possible problems.
7. wipe battery stats
— deleting battery statistics stored in the batterystats.bin file. The operation helps recalibrate the battery. It is best to perform this operation when the battery charge is 100%. According to Google developers, this file only serves to display battery consumption statistics and does not affect the operating time of the device.
8. format/boot
— cleaning the OS kernel.
Wipe (wipe - wipe, wipe) in the Android system is called a reset. This process is also called “formatting” or “Hard Reset”. Why do you need to reboot on Android?
The fact is that after this action the device will be completely cleared of pre-installed programs and will help get rid of the following problems:
- Possible malfunction as a result of gaining root rights;
- Incorrect functioning and occurrence of system errors;
- Deterioration in performance as a result of operating system updates;
- Problems due to flashing, i.e., after switching from original to custom firmware;
- Deleting all personal data (hard reset) during pre-sale preparation of the device.
How to reset settings on Android
Option one: settings menu
Go to the settings menu, then go to the Backup and Reset option. You can then check the Clear SD card checkbox, which will erase the data stored on the memory card, including all programs and files. Information stored in the phone's memory will also be deleted.
Option two: hardware button
To perform a reset, take a thin paperclip or similar object. Use a paper clip to press the reset button, holding it for 15-30 seconds. The settings will be reset to factory settings.
Option three: recovery menu
Before proceeding to the description, remember how to get to the recovery menu. To do this, turn off the power, then hold down the Home key and the volume up button at the same time as the power button. Different devices may have different key combinations. Moving through all menus is done by decreasing and increasing the volume, and selecting one or another action with the power (power) key. You can also use a personal computer and a program that is universal for all devices. But first it’s worth it.
Now about wipe itself through recovery. You can perform a full reset using both the standard and custom menus. The advantages of performing this action through the recovery menu are that the options are more flexible than in the settings menu.
There are two types of reset available as standard.
wipe data/factory reset
— will delete all data stored in
the DATA and CACHE
, and the folder where the program data is located will also be deleted. When using this method, all your applications and their root directories, personal settings will be permanently deleted, but media files, that is, images, videos and music will be saved.
Wipe cache
— temporary information about the functioning of programs and applications will be erased. This method is necessary when system malfunctions occur.
Has similar points. When problems with programs appear on your device, it is recommended to try WIPE DALVIK CACHE
. This action is available in the advanced menu. After applying it, all programs and data will not be deleted.
If nothing helps and problems still plague your device, then you should do a WIPE DATA/FACTORY RESET
.
The custom recovery menu provides some additional features. To access them you need to go to the MOUNTS AND STORAGE
. There is a function that allows you to wipe any partition of the system.
What Does Wipe Cache Partition Do on Samsung Galaxy Cellphones
The cache partition includes most of the system, apps, or browser temporary files, logs and remembered bits from substantial applications on Samsung smartphone. Once you update Android version, they will be useless and left over your device. If that take place, your handset might be run slow or stuck.
It is likely to use web browser, if the caches reserve too much, it might cause operation accident or even other unexpected errors. Consequently, it is a better option to wipe cache partition every once in a while.
Does wipe cache partition delete pictures? To our delight, wiping cache partition will NOT delete any personal data, apps or configuration that stored in Samsung Galaxy mobile phones. This is different from wiping data/factory reset.
Alternative 1. Wipe Samsung Cache Partition with Hardware Keys
In order to wipe cache partition S8/S7/S6/S5/S4 manually, you have to take advantage of three buttons on Samsung Galaxy, which are Power key, Volume+/- key and Home key. The concrete steps are:
- 1. Shut down Samsung Galaxy mobile phone.
- 2. Press and hold Power, Volume+ and Home keys concurrently.
- 3. As long as Android logo appears, release Volume+ and Home buttons and wait for Android system recovery menu screen.
- 4. Press Volume-key and let the “wipe cache partition” option is highlighted.
- 5. Use Power button to select it.
- 6. Press Volume- button until “yes” is highlighted.
- 7. Use Power key to select it.
- 8. Once “wipe cache partition” is achieved, “Reboot system now” will be highlighted again.
- 9. Press Power button to restart Samsung Galaxy and finish wiping cache partition.
Alternative 2. Clear Samsung Cache Partition with ReiBoot for Android (Easier Way)
Most of the Samsung cell phone users complain that it is too difficult and complicated to clear cache partition S8 with hardware keys and some buttons are not working for old devices. Fortunately, we have got a third-party tool, Tenorshare ReiBoot for Android, to replace the intricate operation. Go ahead and see how to do that in the following contents.
Step 1. Download and install ReiBoot for Android to an accessible personal computer.
Step 2. Run the tool and connect Samsung Galaxy smartphone to the PC via USB cable. Enable USB debugging by following the pormpts in the software.
Step 3. Click on “One-Click to Clean System Cache” button to wipe cache partition S8.
Step 4. Wait for a moment until the system cache partition has been removed. Remember that do not unplug the USB cable during using this program.
Note: If you want to fix your Samsung Galaxy system issue, Reiboot also can help you, please check the video below:
Stock recovery menu structure
The standard recovery mode menu is usually not Russified. The purpose of its points is deciphered in the table.
| Function | Purpose | |
| Backup and restore | · creating backup copies; Restoring the system from a backup | |
| Wipe data\Factory reset | Reset | |
| Install zip from SD card | Installing root/Gapps or updating firmware from a ZIP archive on a memory card | |
| Apply update | from SD-card | |
| from ADB | The same, but using the Android Debug Bridge console tool | |
| Power off or down | Power off | |
| Mount/System | Connecting the /system partition | |
| Reboot system now | Reboot into the system | |
To switch between menu items you need to press the volume buttons. To select - the power button.
Recovery errors
Sometimes there is such a common error in Android System Recovery 3e as canceling the installation of the firmware or package. It can occur for several reasons: the firmware file is damaged, incorrect information in the binary file, or the firmware simply does not suit this device. But there is another option: before flashing the firmware, the device was not reset to factory settings. It’s good that they can be easily fixed in the same recovery. There are several ways to do this.
So, if the error occurs due to a broken firmware file, then you should download it, connect your smartphone to the computer, go to the Mount & Storage menu item and select Mount USB Storage. After this, you can copy the firmware again to the root of the memory card. If you forgot to “wipe”, then there is nothing easier than moving a few levels higher and selecting the appropriate menu item. But the Android System Recovery 3e error “No command” is very rare. It only appears when the user tries to install an update via ADB. Usually this method doesn't work. As a result, this error appears. So there is no point in using this method. Nothing will work anyway.
How to make a wipe?
There are several methods, so you need to familiarize yourself with them all, and then decide which one to use.
- The easiest way to wipe on Android is to use the regular settings menu. It is suitable if you have access to the device. Go to the menu, select the “Backup and reset” tab, then the “Reset settings” item. Documents and data will disappear from the internal memory of the device, so if desired or necessary, you can check the additional option “Empty SD card”.
- This option is only for tablet users with a RESET button on the device. You can use a paperclip to access the button. Straighten it and hold the button for 15–30 seconds. Wait until the operating system settings return to their original state.
- To perform a more detailed and smooth reset, use the Recovery menu item. You can perform wipe through standard and custom recovery. Entering this menu is different for all devices, so first find out how to enter it from your tablet. But, if you have difficulty understanding what we are talking about, it is recommended to use one of the previous methods. Now let's go a little deeper and take a closer look at the Recovery method.
What is wipe on Android
All owners of Android devices at some point have encountered the fact that their phone or tablet begins to respond more slowly to commands, freezes, or ignores pressing the sensor. The most common reason for this behavior is a dirty cache. This is a kind of auxiliary memory area where temporary files are stored. The problem with Android is that after this data is no longer needed, the OS does not delete it completely, but only compresses it and marks the partition as “free”.
Unlike online gamers, an Android phone user can independently clean the device of information garbage. This process is also called a factory reset.
It is important to remember that after a wipe, all settings and data stored on the phone will be lost. Separately, it is worth noting that most smartphones have the ability to wipe the cache without losing settings (commands are launched from the hardware menu, which is activated by a combination of buttons, which is individual for different device models):
- factory reset, wipe data (synonymous terms) – total removal of files, all user data, reset settings;
- cache partition (user data complete save) – clearing the cache of used applications without losing settings;
- dalvik cache – clears the cache of applications enabled on the phone.
Preventive action
What are wipes (Android)? It turns out they can be useful. As a preventative measure, the developers recommend that all owners of Android mobile phones periodically clean it in order to avoid clogging it with unnecessary virtual waste. There are exactly three types of wipe: Factory Reset, Cache Partition, Dalvik Cache. Each reset clears some part of the memory in different parts.
Cleans the entire phone and resets all user settings to factory settings.
Cache Partition - produces a complete set of used applications on the phone, but the user’s personal data is not affected.
Dalvik Cache - clears the cache of applications enabled on the phone, and custom ones do not suffer.
Erase Phone
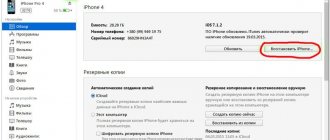
1. Wipe iPhone
- 1.1 Permanently Wipe iPhone
- 1.2 Wipe iPhone Before Selling
- 1.3 Format iPhone
- 1.4 Wipe iPad Before Selling
- 1.5 Remote Wipe iPhone
2.Delete iPhone
- 2.1 Delete iPhone Call History
- 2.2 Delete iPhone Calendar
- 2.3 Delete iPhone History
- 2.4 Delete iPad Emails
- 2.5 Permanently Delete iPhone Messages
- 2.6 Permanently Delete iPad History
- 2.7 Delete iPhone Voicemail
- 2.8 Delete iPhone Contacts
- 2.9 Delete iPhone Photos
- 2.10 Delete iMessages
- 2.11 Delete Music from iPhone
- 2.12 Delete iPhone Apps
- 2.13 Delete iPhone Bookmarks
- 2.14 Delete iPhone Other Data
- 2.15 Delete iPhone Documents & Data
- 2.16 Delete Movies from iPad
3. Erase iPhone
- 3.1 Erase All Content and Settings
- 3.2 Erase iPad Before Selling
- 3.3 Best iPhone Data Erase Software
4.Clear iPhone
- 4.1 Permanently Clear iPhone
- 4.2 Clear All Data on iPhone
- 4.3 Clear iPod touch
- 4.4 Clear Cookies on iPhone
- 4.5 Clear iPhone Cache
- 4.6 Top iPhone Cleaners
- 4.7 Free Up iPhone Storage
- 4.8 Delete Email Accounts on iPhone
- 4.9 Speed Up iPhone
5. Clear/Wipe Android
- 5.1 Clear Android Cache
- 5.2 Wipe Cache Partition
- 5.3 Delete Android Photos
- 5.4 Wipe Android Before Selling
- 5.5 Wipe Samsung
- 5.6 Remotely Wipe Android
- 5.7 Top Android Boosters
- 5.8 Top Android Cleaners
- 5.9 Delete Android History
- 5.10 Delete Android Text Messages
- 5.11 Best Android Cleaning Apps
Regular and complete data deletion
It is difficult to find a user who knows that writing to a hard/solid-state drive is many times, or even orders of magnitude, slower than deleting it.
You can copy a movie, even via a USB 3.0 interface or from one HDD partition to another, in a few tens of seconds at best.
Deleting such a large file occurs instantly. Doesn't this seem strange?
Creating a copy of a document is carried out in sector-by-sector mode: the operating system or application that copies/transfers (let’s look at the example of copying) the document, splits it into parts, creates a copy of each of them and writes it to the target media.
It takes time to recreate a copy of a document while preserving its structure and then recording it on a medium.
When deleting information, it seems that each sector where fragments of the deleted object are stored must be cleaned.
In theory, the time spent on the procedure is comparable to that spent on copying or a little less. At least the process wouldn't happen in a matter of seconds.
Why is that? The secret lies in the concept of digital storage.
A sector is a memory cell on modern hard drives. On flash drives and solid-state drives, such a cell is a floating-gate transistor. The recording principle in our case is similar. Although we will talk about sectors and disks, the information also applies to flash memory.
Files on disks are stored according to the principle of text in books (for example, cookbooks) or books on shelves in a library :
- the table of contents of a book is an analogue of a file table, which contains the path to the document, its attributes (hidden, read-only), size, date of creation and modification, ownership and access rights and many other service information;
- paper is the disk sectors where data is written;
- page numbers and chapter titles - path;
- text – the documents themselves.
Based on this analogy, in order to find a recipe in a book, we first study the table of contents and then go to the indicated page.
It’s the same in the operating system: when a user accesses any data, the OS or application first goes to the file table (table of contents) to find information about the required data in it.
And these, by and large, are the numbers of the sectors where the document is stored.
Unlike a book, where the text is presented sequentially, information on a disk can be stored fragmented, across its entire surface, in the form of a mosaic. When accessing the table, the program receives the sector numbers and the order in which they are read . Moving through the sectors, the reading head of the hard drive puts the file together, after which it appears before the user in the form of a picture, a movie track, etc.
(3) Formatting the user partition (/data)
Reasons why you may be advised to make a format:
— Sale of the device. This action guarantees the complete removal of data from the phone associated with the previous owner on devices in which the drive is combined with the /data partition.
— After/before installing proprietary, modified firmware.
- Freezes when turned on, spontaneous reboot, constant reboot, even after a factory reset.
— Applications crash, even after a factory reset.
All symptoms are often caused by file system errors. And a factory reset does not always mean formatting the partition, that is, creating a new file system, and not just deleting folders/files from the partition.
Formatting procedure:
- Load recovery
- Select menu item: Wipe.
- Press the button: Format Data .
- Type the word on the keyboard: yes , and press the button: Go .
- Once the process is complete, you can return to the main menu by pressing the button: Home.
- To reboot the device into normal mode, select: Reboot - Reboot System.