Be it LG, Samsung or Huawei, 90% of mobile phones run on Android. With such a huge growth in the mobile app development market, many compatibility tests are being conducted on a large scale, but developers due to increasing workload do not have time to test the compatibility issues of mobile app features.
In addition to time constraints, there are challenges in having sufficient resources to run tests for every feature of a variety of applications. As a result, the use of emulators has gained popularity to streamline and simplify the testing process to make it easier and less tedious.
Before moving further, let's first get a firm grip on the term "emulator". So what is it?
Well, for starters, an emulator, by definition, is a tool that simulates the Android operating system on a desktop computer. The developers create an emulator to help users or programmers who want to use Android without going through the hassle of installation.
This is a program that runs on a computer system, emulating the architecture of the guest's device. For example, you can easily use most games like PUBG or Pokemon Go on your computer without installing them. Cool, isn't it?
Now that we know what this tool is for, let's see how it helps in application testing.
We have witnessed a significant surge in mobile app development. Gradually, these mobile applications have arguably become the fulcrum of our existence and will continue to grow as the use of mobile phones becomes even more widespread. Be it housekeeping, grocery shopping or entertainment activities like gaming, everything is now just a click away.
Having said that, for something to work without problems, it has to be up to par.
Therefore, every app must go through a rigorous testing phase to catch any deviations before it is released to users. Hence, it is truly a godsend for all developers considering how it detects unexpected or unusual behavioral patterns during the testing phase of a mobile application.
Before we start discussing different emulators, let's take a little look at how it works and what makes users choose such a tool.
An Android or iOS application or browser is emulated on an operating system that is considered specific, such as Mac and Windows. It sets the virtual hardware conditions of an Android or iOS device. After that we use it for testing in addition to debugging. Like everything in this world, the emulator also has its limitations.
We can't deny how expensive it is to set up and maintain a real lab for Android devices because there is no time to spend on regular maintenance other than frequent device updates. Therefore, online Android and iOS emulators are a popular choice among users, and rightfully so!
Let's get started guys!
Appetize
Appetize is a browser emulator that plays well with HTML5 and JavaScript.
Considering that there are no or limited features for iOS emulators for PC and Mac, Appetize serves as the best solution as the most it asks you to do is upload the app to the website and from that point you are ready to go. It effectively serves both Android and iOS.
Part 1: Things to Consider Before Choosing an Android Emulator
Before you begin the tedious task of choosing the best Android emulator for Mac, there are a couple of things you need to consider first.
Price
The first thing you need to consider is the price . There are free Android emulators out there. These are great options for you. If you use these free options, be sure to check their terms and conditions. Perhaps they offer more than just an emulator. For example, a free emulator may also come with malware that can take up so much space on your Mac.
If you have iMyMac PowerMyMac after installation, you won't have to worry about unnecessary files getting into your system. PowerMyMac can easily clean up your Mac to optimize its performance. This is without a doubt a good software for your Mac.
Free download
Compatibility
The second thing to consider when choosing the best Android emulator for Mac is compatibility . For obvious reasons, you should make sure that it is compatible with your Mac. After all, there are emulators that cannot run on Mac. So be careful and stay away from them.
Android version
The third thing you should look at is the Android Version of the emulator. Make sure the emulator offers the latest version of Android.
Before you choose the best Android emulator for Mac, find out what people are saying about it. Are they happy with the emulator's performance? You can easily do online research to find out what people are saying about a particular emulator. Avoid making quick decisions.
Easy emulator setup
The fourth thing you should consider is the ease of setting up the emulator. Although emulators are very easy to install, they take a long time to download. After all, there are a lot of files that need to be downloaded to run the emulator. So, do your research to find out which emulator has the simplest setup.
These are just a couple of things to consider before choosing the best Android emulator for Mac. The point is, take your time to decide. Do our research and find out what other people are saying about a particular emulator. This is the only way to make the right choice.
LambdaTest
With over 2,000 different browser and OS environment combinations to choose from, LambdaTest ensures that websites and all applications are free of every error and run smoothly. The built-in developer tools are a gateway for debugging, which is also in real time.
This facilitates cross-browser testing on multiple mobile browsers such as Safari, Mozilla and Google Chrome. The Lambda tunnel feature provides the added benefit of testing both local and private pages.
Genymotion
This multifunctional emulator is easy to use and configure. It comes in free and paid versions.
Genymotion stands out because of its capable OpenGL graphics cards. This makes it one of the best and fastest Android emulators. It comes with plugins for Eclipse and Android Studio.
Apart from this, it is available on several operating systems Windows, Linux and OS X. It also allows you to use the webcam for the emulated device as a camera. ADB commands can also be executed using the ADB tunnel.
Android installation
Before starting the installation, you will need to download several programs and patches.
1. Download and install the latest version of the VirtualBox virtual machine.
2. Go to the Genymotion website. Select Get Genymotion . We are interested in the Free . Click Download and go through a simple registration procedure. After registration is completed, the Genymotion virtual environment will begin downloading.
3. Install Genymotion and Genymotion Shell in the applications folder.
4. Launch Genymotion. Now our task is to install a virtual machine emulator of the Android platform.
5. Press the +Add . From the list provided, select the Android version and the device on which the emulator will run. Despite the availability of Android 5.0 and devices with impressive resolutions, I recommend sticking with more modest settings. Android 5.0 is still very unstable, and too high a screen resolution will tax the MacBook's processor to its fullest. One of the best device options is the Samsung Galaxy S4 the Android 4.4.4 operating system with a resolution of 1080 by 1920 pixels.
6. Having chosen the platform and device, we move on to the next stage. Genymotion will automatically download the required system image from the Internet.
7. After the download is complete, Android will be installed immediately. Take your time to start the system. Let's open VirtualBox and in the list of virtual machines we will see the newly installed Samsung Galaxy S4 . Select your system and press the Settings .
8. In the window that appears, on the System tab, set the allocated amount of RAM equal to approximately 1/2 of the total memory of your Mac. On the Display tab, drag the slider to 128 MB .
9. After setting up VirtualBox, the application can be closed. Let's move on to Genymotion again. Select the installed system and click on Start . After a few seconds, a full-fledged version of the working Android operating system will appear in front of you:
Alas, the Android builds presented by Genymotion do not have a pre-installed Play Market application store. We will need to install it ourselves.
Sauce Labs
Saucelab's simulators for Android and iOS are a cost-effective approach to running tests on mobile apps. Their emulators allow cross-browser testing at attractive speeds at a fraction of the cost of real devices.
To sum it up, they are probably the best at providing a good mix of emulators, simulators combined with real devices to achieve the best result when it comes to mobile test automation.
AWS Device Farm
AWS Device Farm helps you run web and mobile applications with tests distributed across a wide range of desktop browsers such as Chrome, Internet Explorer, Firefox, and real mobile devices. This is done to ensure that the application functions the same regardless of its browser environment.
Automated testing identifies and groups problems so you can focus on what matters most first. These are analyzed and captured through heavy use of video, activity and console logs, and webdriver logs.
Bluestacks
Bluestacks, it is appropriate to mention how popular it is in choosing for Android emulators. Why is this so?
Well, for starters, Bluestacks is one desktop emulator that works well with both Windows and Mac. Although it is designed in such a way that it can run any Android application, its features work best to enhance the gaming experience of Android video games on Windows.
So if you love games with high graphics, then this is for you! The most significant advantage it has is that there is absolutely no loss of graphical quality and let's not forget its excellent compatibility with most Android games.
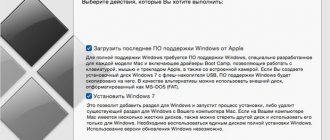
Setting up the MacOS SheepShaver emulator
Having all the necessary files, the rest will not be difficult to do. Read the text carefully and follow the instructions.
- the downloaded archive 0-sheepshaver.zip to drive C: and unpack it by right-clicking on it and selecting “unpack here”. Don't worry, there is a subfolder there, there will be no garbage;
- Go to the 0-sheepsaver folder and install the GTK+ 2 (gtk+-2.10.13-setup.exe file). Normal installation procedure for Windows;
- Go to the HFVExplorer folder and run HFVExplorer.exe. Using this program you need to create a virtual hard drive for your Mac. To do this, select from the menu: File > Format new volume
- You will see these settings. Fill in all the fields. You can use the same values as in the picture. Volume name is actually the same as the volume name in Windows. Choose a size no more than 1Gb, this is enough, but the program does not allow you to create more. When I tried to create 2Gb I got the no space . To set the path and name of the HDD image file, click the red arrow. .dsk extension itself, enter only the file name.
- After clicking OK, the program generates the HDD for a few seconds, please wait. When the creation process is complete, the volume name (disk1) should appear in the left navigation pane, above all of your physical disks. The next thing to do is to transfer the installation files from the System753 . Go to this folder using the HFVExplorer browser, select all the files (20 of them), then click 'Copy' in the top panel. Go to the virtual disk (I have disk1), and also click 'Paste' in the top panel. Both buttons are marked in the picture.
- After clicking 'Paste' the Select copy mode dialog will appear, leave the value Automatic, let the program decide and click OK to All . The files should appear in a new location. After which you can close HFVExplorer - you have prepared Makos for installation.
- Now run SheepShaverGUI.exe, and the first thing we need is the Volumes tab. There you need to add, using the Add button, first the DiskTools85_PPC.img file, then your created virtual disk. This is nothing more than indicating the boot order of the Apple Macintosh - boot disk, followed by hard disk. Here, indicate the letter of your CD/DVD ROM, I don’t have one, so the virtual one is indicated - that’s also possible. Not a required item if you do not plan to install anything from disks. Enable “My Computer” icon checkbox will allow you to organize direct file exchange between a real computer and a virtual one by mounting an external file system.
- On the Graphic/Sound tab, set the screen resolution of the virtual Mac, and you can also select Fullscreen mode instead of windowed, and increase the window refresh rate. I didn’t change anything except the resolution, I set it to 800 x 600. Experiment with the rest yourself.
- Let's go further to the Memory/Misc tab. Here set the memory volume to 512 Mb, since with a smaller amount there may be glitches and the emulator crashing. Also check the Ignore Illegal Memory Access box to avoid hemorrhoids.
Congratulations, all settings are done, and when you click the Start button, the emulator should start. The boot disk will warn you about installing the system. Picture below. Feel free to click OK, the simplest thing left is to install System 7.5.3.
After clicking OK, a graphical shell appears. This is not a system yet, as you can see by clicking the coveted apple and selecting from the menu: About this computer. Simply a bootable utility disk designed to install Mac OS.
We go to the disk (disk1), where the System 7.5.3 install files copied to you are located. Double-click the file System 7.5.3 01 of 19.smi. A window with a license agreement will appear, in which you must click Agree. After which the installation program will generate a Sys 7.5 V7.5.3 CD Inst folder on the virtual desktop
Inside this folder we find the Installer file and run it. A splash screen of System 7.5 appears, click Continue.
The installer complains that no installation files were found on the Disk Tools disk. Well, that’s understandable, they are on disk1. Here you just need to click Switch Disk, perhaps a couple of times, until you see the disk with the given name. At the same time, the Install button will become active - the green light for installation has been received. Click Install.
Copying files will begin immediately. We wait until it completes, and when finished, click Quit. The installation is complete, but it’s too early to relax. From the top shell menu, select Special > Shut Down . We fall out of the emulator and run SheepShaverGUI.exe again. The point is that you need to remove DiskTools85 from the download. Do it as in the picture - select DiskTools85 and click Remove. All that remains is to boot from the HDD. After this, click Start.
And now this is a victory. After the system boots, the EnergyStar window will appear, you can close it, or configure the energy saving settings, otherwise it will pop up every time you boot. But the main thing is that you are now the owner of a virtual Mac. This is easy to verify, click on the apple > About this Macintosh , information about System 7.5.3 should appear.
MEMU
It is an Android emulator designed to enhance your video game experience. It is easy to use as it does not require changing or adjusting any complex settings. All that is required is installation. Subway Surfers, Geometry Dash and Minion Rash are some games that you can enjoy to your heart's content using this emulator.
Apart from this, MEmu is an exception as it supports Lollipop, Android Jelly-bean as well as Kitkat. MEmu is recommended due to its outstanding performance as well as its free use.
YouWave
Although slightly less popular than Bluestacks, this emulator is still in demand. The interface was designed in such a way that even if you are not very knowledgeable with gadgets, you can easily work with it. It also has functionality to import applications that have previously been downloaded. You just need to place the apk files in a special folder to get started. The only drawback is that this emulator does not have a free version - only a demo for 10 days, and then access is closed.
So, today we have looked at those applications that can help you run your favorite Android games on a device running the Mac operating system. Install them and share your experience of using them in the comments.
Nox
This is another Android emulator that specializes in video games and supports multiple versions of Android. It is designed and created by BigNox and serves games like PUBG and Clash of Clans. It comes with advanced features such as keyboard layout. This feature gives you an edge over other players as the keyboard response is faster.
Multiplayer mode allows you to run the same game in different windows at the same time, allowing you to switch between multiple games at the same time. It is free to download and can be used on Windows 10 and Mac. By the way, it is easy to download and install like any other software.
Nox App Player
Nox App Player is an Android emulator with wide game support . To begin with, Nox App Player allows you to drag and drop elements like joystick or specific buttons which you can use for games like PUBG Mobile, Garena Free Fire and similar FPS games. In addition to assigning controls to apps, you can customize the emulator's performance settings and assign the maximum amount of RAM or number of CPU cores you want to use when running Android apps on your Mac. Moreover, you can also customize the interface resolution and also use the built-in macro recorder to record what's on the Android virtual device's screen. Finally, you can also install Android apps directly by side loading APK files using the built-in option, making Nox one of the most preferred and useful Android emulators for Mac.
Download: (free)
Android Studio
Android studio comes with various tools that help developers design and create gaming apps and games exclusively for Android. Likewise, it comes with a built-in emulator that helps you test your game or application.
However, the setup is quite complex and can be time-consuming. It can be a big challenge for beginners, but at the same time it can be an ideal choice for developers. It is a smart software and supports Kotlin, Java besides C/C++ languages.
Installing the Play Market store
1. Download the following file ArmTransv1-GA4.4.4.zip .
Attention! When downloading, use the Chrome or Firefox browser. The Safari browser automatically opens the archive, making further installation impossible. To use Safari, go to Browser Settings – General Tab and uncheck “Open safe files after downloading” .
ArmTransv1.zip file is suitable for any version of Android. The installation archive of the Play Market application store, different from the Android 4.4.4 version, can be downloaded here.
In the downloaded archive you will find two folders GenyMotionArmTrans1 and GoogleApps4.4.4 . Using Genymotion, launch the installed virtual machine and unlock the screen on the device.
Drag the archive (!) contained in the GenyMotionArmTrans1 folder Agree to the pop-ups, and after installation is complete, shut down the virtual machine.
2. Repeat copying for GoogleApps4.4.4.zip archive .
3. After turning on the virtual machine again, the installed Play Market .
In order to get rid of the periodically pop-up error, reboot the virtual machine.
Launch Google Play Market and go through the authorization procedure familiar to Android users. After this, you can safely download the required applications and games. Settings and adding the Russian language, as well as full navigation through the virtual machine, is carried out as on the standard version of Android.
(Be the first to vote for this article!)