The capabilities of the Photoshop graphic editor are extensive. People use it for a variety of purposes in many fields. If you connect your activities with this program, you will someday be faced with the need to increase the size of the image, which will lead to the appearance of pixels (loss of quality).
But, as I said above, the possibilities are vast, so it is possible to correct such a flaw. Andrey Zenkov is with you and today I will tell you how to remove pixels in Photoshop.
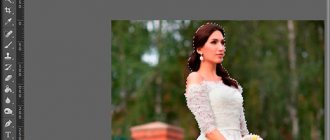
What can you do with a carelessly torn sheet? Take scissors and trim away any rough edges to create a smooth edge. The essence of the methods that I will talk about today is to smooth the pixels on the contours of the image. For training, I will take a simple picture that has lost quality when enlarged.
By the way, I recently told you how to do Photoshop in Russian. Check out this article to easily follow my tutorial today (if you have the English version), since I'm using a Russian interface. This can be done in a few minutes.
How to Enable a Grid in Adobe Photoshop
Before you start, you will need to create a new document in the program or launch an existing one. Enabling the standard program grid follows the following instructions:
However, if for some reason you are not satisfied with the standard grid view, you can customize it a little to suit your needs. This is done as follows:
You can also create a custom grid from guides. In this case, the canvas will be lined only for you, and not by the program itself. This function often turns out to be more convenient. Creating a grid in Photoshop from guides follows the following instructions:
More detailed adjustment of the guides occurs by analogy with a regular grid, which was discussed in one of the instructions above. The only difference is that you will need to work in the Guides and Smart Guides blocks. Here you can choose the color of the guide lines, as well as their style.
As you can see, installing and customizing a grid in Photoshop is a very simple matter. Use this information to get the most accurate location of objects in your images.
Pixel grid
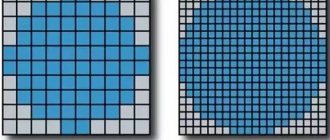
In addition to the usual one, Photoshop also implements a pixel grid, which works only with a large magnification of the canvas. It is turned on by selecting View - Show - Pixel Grid . This tool will be extremely useful for artists working in pixel art or similar styles, because it clearly separates the pixels, making the artist's work easier.
On the left is a project without pixel guides, on the right is with them.
Adobe Photoshop has a tool that makes editing graphics much easier. This is a grid. It helps in creating images and putting together collages. Using it you can estimate the size and distance, estimate how objects will be located relative to each other, and make markings. Find out where to place this or that part of the drawing. This is a useful tool if you know how to use it. Learn how to enable the grid in Photoshop, how to adjust its attributes, and how to remove it.
Layout grid in Photoshop
Just remember what a checkered notebook sheet looks like. The same grid can be placed on top of a document in Photoshop. To do this, run the command:
View - Show - Grid
The grid is configured in Photoshop settings: Editing - Preferences - Guides, grid and fragments
.
You can specify how wide the main (large) cells will be and how many additional internal divisions they will consist of. For example, my main cells are 2 centimeters each and are further divided into 4 smaller ones. Thus, each small cell is 0.5 centimeters.
This grid is useful when you need to align many different elements, such as text.
If you notice an error in the text, select it and press Ctrl + Enter. Thank you!
There is a tool that will make editing graphics much easier. This is a grid. It helps in creating images and putting together collages. Using it you can estimate the size and distance, estimate how objects will be located relative to each other, and make markings. Find out where to place this or that part of the drawing. This is a useful tool if you know how to use it. Learn how to enable the grid in Photoshop, how to adjust its attributes, and how to remove it.
The grid helps you arrange elements in a composition more accurately and symmetrically.
Essentially, these are guide lines. Level table. It overlays the image, but does not cover it. It makes it easier to calculate proportions, see symmetry, and place individual elements correctly.
As an analogy, let's take a school notebook in a cage. They built graphs and drew geometric figures in it. On such a sheet it was possible to draw a straight line without a ruler, set an angle of 45 or 90 degrees, without using a protractor. It was used to determine by eye how long the side of the rectangle was and how many cells made up its area. In Photoshop, a table has approximately the same functions.
It can only be seen in the program. It will not appear when printed. In the digital version there will be no pattern of cells either. This is not a part of the image, but an editing tool.
It should not be confused with the pixel grid. The last thing is breaking the picture into points. Useful for detailed editing. It can also be enabled and configured.
Even if you don't need these options, it will still be useful to know about them. For example, to remove a table if it was accidentally activated.
Principle of operation
The grid is a tool that allows you to arrange components efficiently and evenly on your Photoshop work surface. When you turn on the grid in Photoshop, a large number of horizontal and vertical lines are created. They line the canvas like a checkered notebook sheet. Each line attracts objects to itself if you bring them close enough (for this there should be a checkmark in the View - Snap ). Snapping to lines helps position objects evenly relative to each other.
The project is pictured here. On the left – without auxiliary elements, on the right – with them:
Banding does not persist during image output or printing. They will be saved only inside the program document itself (document name.psd).
How to setup?
You can make the cells a different size (for example, so that they visually indicate segments 1 centimeter long), choose the type or color of the lines.
- Open the "Edit" menu on the top panel.
- Hover your mouse over “Settings”. He's at the very bottom of the list.
- Click on Guides, Grid and Slices.
- In the window that opens, set the desired cell size. This can be done in the “Line every...” field. Different units of measurement are available: inches, millimeters, points and so on.
- In the "Style" section, specify how you want the grid to be displayed: solid, dotted, or dotted. This is not so important, since the markup will only be visible when editing the picture.
- Under Color, select a fill. This setting can be used when the table blends into the background.
Smoothing edges with your finger
Before we begin to study this method, we will make a copy of all visible layers. To do this, press the key combination CTRL + SHIFT + ALT + E. We will work with the created layer.
What do we have? When the picture was zoomed in, the quality of not only the external boundaries, but also the internal objects deteriorated. You can smooth them out using the Smudge tool. To activate it, find the drop icon in the left menu and right-click on it. In the window that opens, select the function you are looking for.
Leave the settings as they are. The essence of the work is simple. To remove pixels from, for example, a star on a cloak, you need to drag your finger along its outline until the large squares are smoothed out. The boundaries of the star should change like this:
For training, you can process several elements at once. I worked with the star, the month and part of the beard. Of course, the result cannot be called perfectly clear, but it has become much better:
Why do you need a mesh?
When you turn on the tool (or function, whatever it’s convenient for you to call it), the entire work area with layers is covered with a grid of squares. It “manifests” exclusively inside the editor. When saving and printing, there are no stripes.
The grid visualizes space and allows you to place design elements symmetrically and proportionally.
Guides are lines that perform the same functions as the grid. The only difference is the number of stripes. There is only one guide and is placed in the place where it is needed. If there is a need to center or define left and right boundaries, a grid is not necessary. One or two guides are enough.
How to enable the grid
Most editors have two methods for turning frequently used tools or features on/off. The first option is to find the menu in the bookmarks, the second is to use key combinations.
Important point! Regardless of the language of the interface, the location of the tabs in the menu is always the same. If the image in the example instructions is in English, but you have to work with the Russian version, it’s okay. It is enough to count the corresponding number of bookmarks from right to left and down in the submenu. As a last resort, use Google Translator.
The English version is taken as an example, as it is the most common.
Option 1 – through the bookmarks menu:
- 9th tab on the left View;
- 14th line from the top Show (demonstration);
- 4th line from the top Grid (grid).
Option 2 – through the key combination Ctrl+' (Ctrl and upper English apostrophe).
You can turn off the grid in Photoshop in the same way: view, demo, grid.
How to enable guides in Photoshop
There are 2 types of guides in Photoshop - permanent and temporary. Constants are set by the user when he needs them and where he needs them. Temporary ones appear automatically at moments that the program considers necessary, then they disappear. The appearance of temporary guides occurs at the moment when one part of the drawing, when moved, becomes on the same level as another part. This is a convenient feature that simplifies your work.
There is no on/off function as such. The guides are pulled out from the ruler.
- move the mouse cursor to the edge of the ruler;
- hold down the Left Mouse Button (LMB);
- pull to the side.
“Shutdown” – drag the guide back or select it and press the Delete button.
The number of lines on the sheet is not limited. The user can set as many lines as he needs.
There are no curved lines, only straight lines are available.
Horizontal lines are drawn from the top or bottom ruler, vertical lines from the left or right.
What to do if there is no ruler?
How to turn on the ruler
Any graphic editor contains in its arsenal of tools such a tool as a ruler. If it is not necessary for drawing a flower, then for creating a business card it is an essential element.
The rulers of graphic editors are equipped with special sliders that show the position of the mouse cursor or the limits of the selected part of the image. The ruler is used to center the sheet, align the fields, break the grid, install guides, etc., which may be associated with a clear definition of the location.
Thanks to the ruler, Photoshop automatically centers elements.
Eg.
There is text on the sheet. It is aligned to the right margin. When you add a new block of text to a sheet and move it to the right edge, a guide appears that automatically aligns the right edge of the new text with the previous one.
If the ruler is not visible, it must be turned on.
- View or View (9th tab on the left);
- Rulers or ruler (15th line from the top, immediately after Show).
Or use the key combination Ctrl+R (control and the English letter R).
Important! No need to switch alphabet!! The combinations do not depend on the alphabet. They depend on the location of the buttons on the keyboard. Since keyboards and software (software) are developed with an English bias, the English alphabet is given priority, as it is the most common in the information technology environment.
How to disable
Turning off the grid follows the same algorithm as turning it on. Click View – Show – Grid again
, will turn off the guides.
In addition to the usual one, Photoshop also implements a pixel grid, which works only with a large magnification of the canvas. It is turned on by selecting View - Show - Pixel Grid
. This tool will be extremely useful for artists working in pixel art or similar styles, because it clearly separates the pixels, making the artist's work easier.
How to use the Grid
Let's say we need to cut out a rectangle on a layer to make a frame, leaving 50 pixels around the edges.
Let's change centimeters to pixels and set the step to 50 pixels:
Activate the Rectangular Marquee
(
Rectangular marquee
), the hotkey for calling the tool
is M.
A little tip on using the grid in Photoshop:
When working with the Grid, as well as with Guides and layers, it is advisable to enable the Snap
.
When this function is active, the created objects seem to “stick” to the Grid lines (in our case). To make sure the feature is enabled, go to the
View –
Show
menu . If the “Binding” checkbox is not enabled, click on this item to check it.
If they have a different appearance, activate the desired item by clicking on it, or click on the “All” item; in the second case, the binding will be activated immediately for all available items:
Back to the lesson
Create a selection using the Rectangular Selection
, retreating 50 pixels from the edges of the image. The sides of the created rectangle “stick” to the Grid lines and do not allow us to go beyond the boundaries.
The graphic grid in Microsoft Word is the thin lines that appear in a document in Page Layout
, but is not printed. By default, this grid is not enabled, but in some cases, especially when working with graphic objects and shapes, it is very necessary.
If the grid is enabled in the Word document you are working with (perhaps it was created by another user), but it only bothers you, it is better to disable its display. It is how to remove the graphic grid in Word that will be discussed below.
As mentioned above, the grid is displayed only in the “Page Layout” mode, which can be turned on or off in the “View”
. The same tab must be opened to disable the graphic grid.
1. In the “View”
in the
“Show”
(formerly
“Show or hide”
), uncheck the box next to the
“Grid”
.
2. The grid display will be disabled, now you can work with the document presented in the form that is familiar to you.
By the way, in the same tab you can enable or disable the ruler, the benefits of which we have already talked about. In addition, the ruler helps not only to navigate the page, but also to set tabulation parameters.
AutoCAD is an advanced systems modeling program. It employs specialists of various levels: from students to world-class designers. In fact, the functions and possibilities of this environment are almost limitless. This is a convenient program that provides 2D and 3D modeling of objects. For novice users, it may be difficult to study this product on your own, since there are many functions and it is not easy to understand them all.
One of the questions that novice users often ask is: how to remove the grid from the screen in AutoCAD? Its image can sometimes interfere with the visual perception of the designer. Therefore, this article will be useful for beginners.
Rulers
Another measurement method in Photoshop is rulers. They are located outside the picture. With this tool you can estimate the length and width of objects and the image as a whole. You can activate rulers in the View menu. To select their parameters, go to Editing - Settings - Units and rulers.
The table is useful when drawing diagrams. Or for any other job that requires precision. But this tool is also useful outside the professional sphere. After all, when drawing, a lot of things are “pretended by the eye.” If you turn on the markup, you can navigate by it. And in the end you will get a verified, elaborate and beautiful drawing.
If you make a mistake, you can always use the “History” function.
Sources:
- How to make a calendar in Photoshop
There are many artistic photography techniques that allow you to achieve unusual visual effects
.
One of them is fisheye
.
It is achieved by using a wide-angle lens at short focal lengths. Therefore, it cannot be reproduced on amateur cameras. However, you can create a fisheye effect in
Adobe Photoshop from a regular photograph.
You will need
- - installed Adobe Photoshop;
- — image file.
Instructions
Open the original image in Adobe Photoshop by selecting "Open..." from the File menu. Using the text field located at the bottom of the document window or the Zoom Tool, set the appropriate viewing scale. It should allow manipulation of the entire image area intended for processing.
Create a main layer from the background one. In the main menu, select Layer, New, “Layer From Background...”. Click on the OK button in the Layer dialog that appears.
Select the area of the image to which you want to apply the fisheye effect
" Use the Rectangular Marquee Tool or Elliptical Marquee Tool. If the entire image must be processed, skip this step.
Activate image processing mode using distortion. From the menu, select Edit, Transform and Warp. After this, a grid will appear in the document window to control the effect parameters.
Change the type of distortion applied to fisheye
" Click on the Warp drop-down list located in the top toolbar. Select the Fisheye element. The control grid in the document window will change its appearance (only one marker will remain).
Apply a fisheye effect
» to the processed image. Move the control grid marker with the mouse until the desired level of distortion is achieved.
If you need to make additional changes to the image, for example, give the distortion area a rounded shape, select the Custom item in the Warp list. Move the grid nodes to achieve the desired effect. Apply the changes made by clicking on any toolbar button and clicking OK in the dialog that appears.
If necessary, modify the image with a fisheye effect .
A". For example, invert the current selection by pressing Ctrl+I, clear the background by pressing Del, and then fill it with the desired color using the Paint Bucket Tool. Crop with the Crop Tool.
Save the result of your work to a file. Use the “Save As...” or “Save for Web & Devices...” item in the File section of the main menu. When saving, pay special attention to the choice of format and degree of data compression. If you intend to work with the image further, save a copy of it in PSD format.
Professional raster graphics editors, such as Adobe Photoshop, provide powerful photo editing tools today. The effects created go beyond the usual reality. For example, in Photoshop
you can make
fangs
by imagining the character in the photographic composition as a vampire.