Programs and utilitiesVadim02/24/2019
Recuva is a popular utility for recovering deleted files. A universal solution for system administrators or service center workers. Using the application, the user can restore some of the information without the need to contact specialized institutions and give money. Documents erased after accidental deletion or reinstallation of Windows can be easily processed by the program’s algorithms. On our website you can download Recuva
, and also read detailed installation instructions.
- 1 Features
- 3 Installation
- 4 Quick Launch Wizard
- 5 Basic settings
Peculiarities
- The minimalistic interface design allows even a person who is not familiar with a computer to master the product. The recovery process occurs step by step with instructions from the developer, using the “Quick Start Wizard”.
- The application has been translated into several languages, so you can download Recuva for free in Russian.
- The product is available in several versions: free and professional. The second version offers more settings, automatic updates and support from the developer.
- Before you start searching for lost files, several filters are available. For example, if photographs were lost, then you need to set scanning to pictures. This will limit the selection and speed up the process of identifying worn-out hard drive cells.
Recovers irretrievably deleted items: how to use the Recuva program
Surely every user has at least once encountered a situation where an unnecessary file was deleted permanently, and later turned out to be necessary, or was deleted accidentally - for example, during a system failure. What to do in such cases? One of the simplest and most accessible tools for recovering previously deleted files is the Recuva program, which is not at all difficult to use.
Recuva - what is the program and what is it for?
Recuva is a program for restoring permanently erased files from the British software developer Piriform, known to Russian users for the CCleaner and Defraggler utilities. It is produced in three versions:
- Standart - designed to work on PCs, laptops, netbooks and all-in-one computers;
- Portable - does not require installation on a computer, as it is used to work with removable storage media.
- Professional - version with automatic updates, designed for in-depth recovery of damaged or lost files on PCs and virtual disks.
Standard and Portable are available for download for free. The Professional version costs 800 rubles. It is also sold as a set of four professional versions of the company’s products: CCleaner, Defragler, Speccy and Recuva for 1,190 rubles.
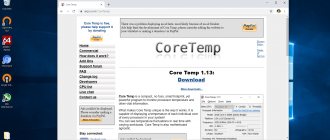
There are many resources on the RuNet from which this program can be easily downloaded, but the download files they offer may well contain viruses, so in the absence of a reliable antivirus program, it is better to download Recuva from the “native” site
Advantages and disadvantages
According to numerous ratings from ordinary users and professional magazines, this program has been the leader among utilities for recovering deleted files for several years now. However, like any program, it has its advantages and disadvantages.
The advantages of the product include:
- Russified, intuitive interface;
- availability of a fully functioning free version;
- interaction with any types of information storage devices - from hard drives to memory cards;
- the ability to manually select places to search for lost files;
- search for system and hidden files;
- the ability to restore the structure of previously erased folders and archives;
- work with most of the most common formats, types and types of information: text documents, tables, presentations, photographs, audio and video files, folders, archives, etc.;
- the ability to manually set the degree of depth for file recovery and the level of reliability of information deletion.
Installation
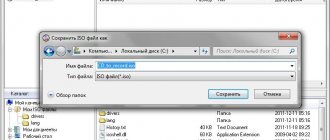
Let's look at how to install the Recuva program on your computer for free. Open the installer by double-clicking the left mouse button. The main window will open. Select your language from the drop-down menu at the top.
At the bottom of the panel there is an additional area where the user is offered to install affiliate software – CCleaner. Select the bottom line with the caption “No thanks, I don't need CCleaner.”
If you need to change the installation settings and installation path, click on Customize. A context menu will open where you can set the location for the application icon to appear, as well as integrate functionality into the system explorer and recycle bin.
Clicking on the More button will open the next panel with parameters. Here you can edit the path and parameter with the choice of installation for all computer profiles or the active account. Click on Install.
Recuva program overview
Probably, every user has at least once had a situation where it was necessary to recover deleted files or, conversely, to reliably remove any information from “unnecessary” eyes. If such information is contained in the Recycle Bin, then restoring it is a very simple process. Go to the Recycle Bin, find the file you need, select it, click “Restore” (from the Recycle Bin the file will move to the area of the disk from which it was deleted), or “Cut” (you independently determine where you will insert it after removing it from the Recycle Bin).
Remember! Deleting files from removable USB drives occurs without going to the Recycle Bin, unlike the process of deleting data from hard and solid-state drives.
With reliable removal of files, things are a little more complicated. Here you can use, instead of the standard deletion to the Recycle Bin, deleting the file using the Shift + Delete keys, but this method does not provide a 100% guarantee. Let alone the sad case when you need files that are no longer in the Recycle Bin.
Are they lost forever??? Not at all. They can be restored using the free Recuva program.
On the Internet you can find many programs that allow you to restore files deleted from the Recycle Bin and securely delete files and much more. Let's talk about one of these very useful programs.
Quick Start Wizard
When you turn on the application for the first time, a wizard will appear to quickly work and configure Recuva. It can be disabled by checking the box in the lower left corner.
Using the panel, you select filters for scanning files, as well as a search device. So the program selects the optimal algorithm in advance, for example, for better work with portable drives.
After deleting files, you need to launch the program as quickly as possible. At the same time, do not copy or move files, as this may overwrite cells with the required information.
Once the setup is complete, scanning of the selected drives or devices will begin. With display of a list of found files.
basic settings
To get to the configuration menu you need to switch to advanced mode. After completing the search, a list of found files will open. In the upper right corner, click on the Switch to advanced mode button.
The appearance of the interface will change and the Options button will appear. Click on it to open a panel with parameters.
In the main window, you can select a language, display style, and check for updates. You can also disable "Master".
Switch to Action. This section greatly influences the sector analysis process. The user can disable the display of files hidden by the system or with a zero size. And also enable deep analysis mode.
The process of editing parameters is completed and the program is ready for use. Now you can recover files from a damaged flash drive or after an operating system failure without contacting specialists.
@how-to-install.rf
Operating instructions
Let's not dwell too long on theory and understand the principles of software operation, because we have a completely different goal. Let's figure out how to download and install the software on a PC.
Download the program
So let's get down to business. The installation instructions are very simple and will not take much time or effort. To obtain the program on a computer or laptop, we follow the following algorithm:
- Download the archive with the executive file and unpack it on your PC. Immediately after launching the installer we see a window in which we need to click on “OK”.
- Select the language and click “OK” again.
- There is very little left. We are waiting for the software installation process to complete. This usually does not take more than 2-3 minutes.
That's all. The installation of the application is complete, and we can safely move on to working with it.
How to use
Now we suggest you consider brief instructions on how to recover lost data on a computer or laptop. To do this, follow a few simple steps:
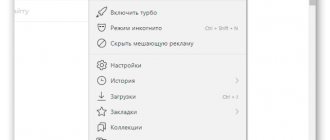
- We launch the tool through a shortcut on the PC desktop or using the “Start” menu, as shown in the screenshot below.
- Now is a very important step. You need to correctly determine the type of file that needs to be resuscitated. If it was a photograph, put a tick next to the “Pictures” item; if it was some kind of document, then about. Having decided, click “Next”.
- Now we use another filter in which we need to indicate where exactly the file was deleted. If you do not know this information, check the box next to “Unknown for sure.” Click on “Next” again.
- At the next stage of recovery, we advise you to first use a simple algorithm for searching for lost data, and if this does not help, check the box next to the “Enable in-depth analysis” line and repeat the procedure again.
- The search for deleted files has begun. The operation time will depend on several parameters, such as system performance, drive size and others. We are waiting for the procedure to complete.
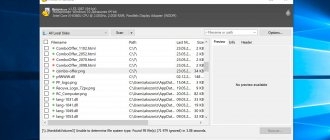
- The search is over, and we can use the filters to find the object we need. For example, the file type or its name. As soon as the necessary data is found, click on the “Restore” button.
When restoring certain files, you should pay attention to the color of the button. For example, if it is green, you can easily resuscitate the data. The yellow icon indicates that the data can be returned, but with some errors. The red icon indicates that you don’t even have to try to return the deleted object.