- 4shared
- 0Facebook
- 3Twitter
- 1VKontakte
- 0Odnoklassniki
Installing software on a computer, especially little-known software, is always associated with a certain risk. The program may contain errors that affect the stability of the system, built-in advertising or tracking modules, and other unwanted elements. In addition, any software leaves traces on the system that may not have the best effect on its operation. As for experiments with Windows, everything is even more risky here, because sometimes even a seemingly insignificant change in registry data or modification of system files can lead to the most unpleasant consequences.
Ask how to avoid them? It’s very simple, use virtualization systems, for example, the VirtualBox virtual machine - a special program that allows you to install, run and test different operating systems in an isolated environment. You can do anything with such virtual computers - install programs on them, configure them, modify system files, work with disks and partitions, in a word, perform any experiments. If the virtual OS is damaged, you can restore it from a snapshot or delete it altogether - this will not have any effect on the host system, that is, the main working system.
Installing VirtualBox for Windows
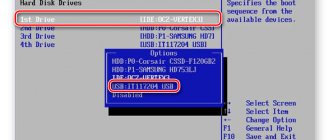
Perhaps all this may seem complicated to some, but in fact there is nothing in working with Virtualbox that a novice user cannot handle. So how to use VirtualBox? As usual, it all starts with installation. We go to the developer’s website www.oracle.com/virtualization/virtualbox/index.html and download the latest version of the program.
Installing VirtualBox on Windows 7/10 is almost no different from installing most other programs; you just need to follow the instructions of the wizard and do not change anything in its parameters. Upon completion of the procedure, you will receive a ready-made virtualization platform.
Installing phpvirtualbox
There is a free web interface for Virtualbox, implemented in PHP and using the virtualbox web service built into virtualbox.
Install phpvirtualbox:
1. On the developer’s website, look at the latest version and download it to the server: virtbox# cd /var/www && wget phpvirtualbox.googlecode.com/files/phpvirtualbox-4.1-7.zip 2. Unpack: virtbox# unzip phpvirtualbox-4.1-7 .zip 3. Configure: virtbox# cd phpvirtualbox-4.1-7.zip && cp config.php-example config.php && vim config.php 4. Register the address of the server on which VirtualBox is running for remote connections using the built-in VirtualBox RDP-plugin: var $consoleHost = '10.0.0.7';
Attention! For successful connections, incoming ports must be open on the server, by default starting from 3389 (TCP), one port per guest system.
5. Set up virtualbox web service, for which we create a file /etc/vbox/vbox.cfg with the following content: VBOXWEB_USER='vbox' VBOXWEB_HOST=127.0.0.1 VBOXWEB_LOGFILE=/srv/log/vboxwebservice
6. Start the virtualbox web service. Before doing this, you need to make sure that the file /srv/log/vboxwebservice is readable and writable by the vbox user: /etc/init.d/vboxweb-service start.
phpvirtualbox is now available at virtbox.site/phpvirtualbox.
Program installation
Any user can install VirtualBox without any problems. The process itself is standard and does not require any special professional skills or any specific knowledge.
Creating a virtual machine
After installing the program, you will see a working window prompting you to create a virtual machine, as well as help with the work.
- You can install a virtual machine by clicking the “Create” button.
- You will be asked to enter the machine name, operating system type, and version. For testing, install, say, Linux, one of the smallest distributions. Specify the Debian family. In the Name line, enter DSLTest.
Specify the name, type and OS version
- By clicking “Next” you will be taken to the next window with memory settings for the installed OS. By moving the slider, you determine the amount of RAM. We recommend setting the default settings.
- Next, you will be asked to select an existing one or create a new hard drive. Check the box for Bootable hard drive and about.
- Enter the disk parameters. It is recommended to make it “dynamically expandable”: the size will increase as data is entered, but will be limited to some fixed volume.
- Select the location of the new disk and set its size. It is recommended not to locate the new disk on C; the size can be set to about 8 GB - this is quite enough for testing the capabilities of Oracle VM
- You will be prompted to review your desired settings and confirm your intent to create a virtual machine. Click “Finish” if everything is correct.
Starting and operating the machine
Once the virtual machine is created, launch it. First you will see the settings window, it is activated upon first launch. In front of you is actually a new computer, without an operating system or other options. To install the OS we use a disk image.
- We put the choice on “Optical disc drive”.
- Specify the media: select the image from which the OS will boot.
Select OS installation source
- The image will begin to download, i.e. the OS will be installed.
- Once installation is complete, unmount the disk image so that the OS can run from the virtual hard disk. This is done in the “Media” menu: select your image in the window, set the drive field to “empty”.
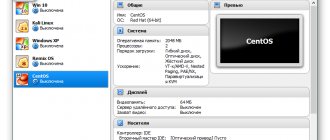
Please note that the Oracle VM VirtualBox program itself “weighs” a little, but the virtual hard disks created in it are quite large. Therefore, to create them, choose a disk with more free space.
Despite some shortcomings, Oracle VM VirtualBox is very functional and convenient for learning virtualization. Now you know what the Oracle VM VirtualBox program is and, perhaps, you will use it in your work.
The ease of installation and use of Oracle VM VirtualBox allows users of different levels of experience and skills to work with the program. After passing the testing according to our instructions, you will be able to create and install your first virtual machine. In the future, this process will take you less time, and you will be able to work with such machines without deleting your operating system: test new versions, check the performance of other operating systems, work with different programs.
Setting up the Internet and shared folders
Next, make sure that in the “Network” section your network adapter is enabled and the connection type is selected “NAT”.
If you plan to provide access to the VM to other users of the local physical network, you should select the “Network Bridge” connection type in the VirtualBox network settings. To ensure interaction between different virtual machines, the “Virtual Host Adapter” mode is used; to connect guest operating systems to a single internal network, the “Internal Network” mode is used. There is also a “Universal Driver” connection type, but it is used much less frequently.
Of particular interest are shared folders in VirtualBox, thanks to which the user can exchange any files between the host and virtual machines. You can connect such a directory in the “Shared Folders” section. To do this, click on the plus sign opposite the “Machine Folders” item, select a folder on your hard drive through the overview and connect it, not forgetting to check the “Auto-connect” checkbox.
What to do if VBox does not allow you to turn off your PC
Even if you don't have VBox installed on your computer, another application may be using it. For example, emulators like Bluestacks. They can keep the guest operating system running in the background.
There is nothing critical in the message that VirtualBox Interface prevents you from turning off your computer. If you wait a little, it will soon disappear. The system will still turn off, and next time it will start properly. However, the inscription itself, which delays the operation, can be annoying.
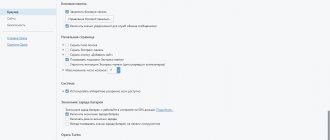
To get rid of the annoying message, configure programs to turn off automatically when you try to shut down Windows.
We offer easy instructions:
- Open the command line by holding down the Win+R key combination.
- When a window with an input field opens, enter the word “regedit” there. Regedit input window
- The Registry Editor will appear in front of you. In the left panel, select the “HKEY_CURRENT_USER” folder and open it. Registry window
- Go to the "Control Panel" section. To open folders, click on the small black triangle arrow. It appears to the left of their name. Control Panel section
- Go to the “Desktop” subsection. Where to find the Desktop section
- Right-click on the free space in the window located to the right of the sidebar. Click in an empty field
- A small window will appear in front of you with the “Create” command available. Hover your cursor over it. You will see a String Parameter option. Select it. What to do with the right panel
- The program will create a new parameter and prompt you to enter its name. What the new parameter will look like
- Enter “AutoEndTasks” in the input field. Press Enter. What should the parameter name be?
- When the parameter is created, right-click on its name. Select the "Edit" command. It is located at the very top of the list of available options. How to change a setting
- In the window that opens at your request, enter the number 1. This will set the parameter to the desired value. Assigning a value to a parameter
- Click on the "OK" button to confirm the command.
- Restart your computer.
After this, the system itself will send a signal to shut down the virtual machine every time you try to manually shut down the device. You will no longer receive the “VirtualBox has active connections” message.
This may be useful: Your computer hardware may not support booting from this disk - what should I do?
Starting a VM and installing the operating system
Now you know how to configure VirtualBox and the created VM. Next, let's see how to install the operating system on it. The procedure for installing an OS on Virtualbox is practically no different from installing it on a physical computer, except that instead of a bootable flash drive or DVD, an ISO installation image is used here. Launch the created virtual machine and specify the path to the bootable ISO image with the system in the window that opens.
The standard installation procedure will begin, during which you will be asked to accept the license agreement, partition the disk, and after copying the system files, create a user account.
The guest operating system is installed, but some functions, in particular, shared folders and the clipboard, will not work until you install a special plugin - guest OS additions. In addition, without these add-ons you will not be able to adjust the screen resolution, connect flash drives to the virtual machine, etc. Fortunately, you don’t need to download anything; guest OS add-ons are included with VirtualBox. All you need to do is select the option Devices – Mount guest OS add-ons disk image in the virtual operating system menu.
Go to the “This PC” section in the virtual OS, open the VirtualBox Guest Additions and, if the system does not prompt you to do this itself, run the executable file VBoxWindowsAdditions.exe .
Install the add-ons as a regular program, accepting the security agreement, and restart the virtual computer.
The guest system is ready for use, all that remains is to check the network operation. We will not dwell in detail on how to set up the Internet in VirtualBox. If you selected NAT, the VM will connect to the Internet automatically. With other types of connections, you will most likely have to tinker a little. Remember the main thing: if the IP address for your main computer is automatically issued by the router, the same settings must be set in the parameters of the virtual system network adapter. If settings are assigned manually, then they must also be assigned manually in the guest system network adapter settings.
Creating virtual networks
Inside VirtualBox you can create completely isolated virtual networks.
What opportunities does this provide? Minimizing the need to reconfigure cloned servers Creating a test environment to test the interaction of servers with each other
Creating a virtual network
To create a virtual network, you need to go to the properties of the guest system in phpvirtualbox, go to the Network section, select the “Internal Network” option in the “Attached to” field, and select the required virtual network in the “Name” drop-down list.
What difficulties might arise? You need to create a new virtual network, but there is no such option in the interface. There are two solutions:
Try writing the name of the new virtual network directly in the “Name” drop-down list. However, in this case an error may occur. Then you need to bind the guest system's network adapter to the virtual network via the CLI:
sudo su -s /bin/bash vbox VBoxManage modifyvm test1 —nic1 intnet
Here nic1 is the network adapter of the guest system, where 1 is its sequence number. The number of adapters in the guest system is not limited. intnet is a virtual network, the name can be anything. The peculiarity of VirtualBox is that there is no need to specially create virtual networks; it is enough to indicate the same virtual network to several guest systems and they will be connected at the (emulated) physical level automatically, which is similar to connecting several real computers to one switch (switch) .
For more details, please refer to section 8.7.2 Networking setting of the user manual.
Main problems when working with VirtualBox
VirtualBox is a stable and high-quality software product, and if users have to encounter problems during its operation, the causes of the latter are most often the errors of the users themselves. Thus, those who try to launch virtual machines on VirtualBox with Hyper-V active will encounter the error “Failed to open a session for the virtual machine” (code E_FAIL 0x80004005). The reason is the incompatibility of these virtualization platforms. If you are planning to use VirtualBox, please disable Hyper-V and vice versa.
However, the disabled virtualization function in the BIOS can lead to the same error. This will be indicated by the unavailability of hardware virtualization options in the virtual machine settings (VT-x/AMD-V and Nested Paging in the System - Acceleration section). By the way, these options must be enabled even with active virtualization in the BIOS, otherwise the VM will also not start.
A VM crashing into BSOD upon startup is a common problem caused by a lack of physical computer resources allocated to the guest operating system. When creating a virtual machine in VirtualBox, you need to ensure that the allocated resources meet the requirements of the operating system.
The Blue Screen of Death can also be caused by Hyper-V enabled on the host system and a controller type mismatch. If the virtual disk was previously connected to SATA, and then you connected it to IDE, the guest OS will fail with a critical error and crash into BSOD. The issue is resolved by creating a new compatible controller and connecting a container file with the guest system to it.
Accidental deletion of snapshot files by the user may result in the inability to start the VM. You need to delete snapshots correctly - through the “Snapshots” section, otherwise you will have to completely reinstall the guest system. If VirtualBox itself does not start or when you start it you get the error “Cannot access the kernel driver!”, most likely you will have to uninstall the program and then reinstall it.
- 4shared
- 0Facebook
- 3Twitter
- 1VKontakte
- 0Odnoklassniki
Managing virtual machines
Web-based management
Managing virtual machines via the web interface is trivial, just select the desired machine in phpvirtualbox and select the required action in the interface, for example Start, Stop (unconditional shutdown, sending a signal when the power button is pressed, reboot, saving the state of the guest system with the ability to subsequently roll back its state and suspending the guest system while saving its memory to disk and the ability to subsequently load memory from disk and continue working).
By right-clicking on the guest system, operations on its settings, deleting, viewing logs, etc. are available.
It is also worth noting the ability to connect to the guest system console, which is similar to connecting a mouse and keyboard to a real machine. To do this, you need to select the desired guest system, select the Console tab in phpvirtualbox, set the screen size (for text modes of guest operating systems, 800x600 is enough), click Connect and click on the remote connection client (which displays the contents of the guest system console). You can manage the guest system from the moment it is turned on.
Console control
To manage guest systems in VirtualBox, the VBoxManage and VBoxHeadless utilities are used, a detailed description of which is available in the manual.
You need to run commands from the vbox user, under which VrtualBox itself is running; if run from another user or root, VirtualBox will not be able to find the virtual machine configuration files that are stored in the Vbox user’s home directory and will generate an error.
To switch to the vbox user you need to say: su -s /bin/bash vbox
The shell must be specified explicitly because the default shell for the vbox user is /bin/false.
Below, as an example, are commands for enabling, disabling and working with disk images.
1. Start a group of guest systems (can be done automatically when the server is turned on and rebooted): for M in test1 test2 test3 ; do VBoxManage startvm $M —type=headless ; sleep 30 ; done
If you do not specify sleep 30, some machines may not start due to very intensive reading from the server's hard drive at startup, and some guests will think that they have a hard drive read error.
2. Shutting down a group of guest systems (can be done automatically when the server is turned on and rebooted): for M in test1 test2 test3 ; do VBoxManage controlvm $M acpipowerbutton ; sleep 30 ; done
Almost all machines understand pressing the power button and will be able to shut down gracefully.
3. Creating a fixed-size disk for the guest system: VBoxManage createhd —variant Fixed —size 20000 —format vdi —filename test
4. Convert the disk image from the VirtualBox format to a format understandable to other virtual machines: VBoxManage internalcommands converttoraw test1.vdi test1.raw
Connection via RDP
You can connect to the virtual machine console via RDP.
In Windows, you need to open Start->All Programs->Accessories->Remote Desktop Connection and specify the address virtbox.test and the port associated with a specific guest system, which can be viewed in phpvirtualbox. For ease of use, you can specify a screen resolution of 1024x768 in the connection settings, then the connection window will not occupy the entire screen and intercept system keyboard shortcuts such as Alt+Tab. Important note: it is possible for multiple users to connect to the same guest system at the same time. At the same time, everyone sees the same thing, and all actions performed by anyone are visible to the rest of those connected. To enable this setting, you need to check the Allow Multiple Connections checkbox in the virtual machine settings in phpvirtualbox in the Display section on the Remote Display tab.
Taking Guest Snapshots
Snapshots provide the ability to save the state of guest systems and return to that state on demand. What does this mean in practice?
- You can try different queries to the database on the guest system with the ability to restore the initial system after each query
- You can try different service interaction configurations on the guest system without having to manually roll back changes to many configuration files if you end up with a non-working system
- Finally, this is a sometimes handy backup tool that allows you to take a complete snapshot of a working machine and restore it completely with a minimum of administrative steps. Attention! Don't do this with production machines.
When you create a snapshot of the guest system, the disk space it occupies does not actually increase; the additional space will be occupied only by data that has changed compared to the pre-existing disk image of the guest machine.
For example, if the /etc/rc.conf file is modified, the modified copy will be written separately. To create a snapshot using phpvirtualbox you need:
- Select the guest system from which you want to take a snapshot
- Go to the “Snapshots” tab
- Press the “Take Snapshot” button (with a picture of a camera)
- Enter photo title and comment
To restore a snapshot via phpvirtualbox you need:
- Select the guest system from which you want to take a snapshot
- Turn off the guest system by clicking "Stop">"Power Off"
- Go to the “Snapshots” tab
- Select the photo you want to restore
- Click the “Restore Snapshot” button (with the image of a computer with an up arrow)
Creating a dump
Debian Linux
The cloning and recovery procedures are given on the example of the test1 server on which Debian Linux is installed (any version, starting from 5 Lenny for sure).
Let's assume that we have three partitions with three file systems: /, /var, /usr First we need to install dump: aptitude install dump
Next, to create a dump of the cloned server on Debian, you need to issue the following commands as a superuser (root) or using sudo (how to make sure that the dumps are not dumped, think for yourself): dump 0af test1.root / dump 0af test1.var /var dump 0af test1.usr /usr
Here: 0 - dump level 0 a - do not make assumptions about the size of the media on which the dump is performed L - do a dump from the examined file system, in this case, first a snapshot of the file is taken, a dump, then a dump again, so that there are no damaged files. Linux can't do that. f - dump to a file instead of a tape drive. The resulting files need to be transferred to a server with VirtualBox.
FreeBSD
The cloning and recovery procedures are given using the example of server test1 on which FreeBSD is installed (any version, starting from 6 exactly).
Let's assume that we have three partitions with three file systems: /, /var, /usr To create a dump of the cloned server on FreeBSD, you need to issue the following commands as a superuser (root) or using sudo (again, I remind you about dumping dumps): dump 0aLf test1.root / dump 0aLf test1.var /var dump 0aLf test1.usr /usr
Here: 0 - level 0 dump a - make no assumptions about the size of the media being dumped to f - dump to a file instead of a tape drive. Analogino, the resulting files need to be transferred to a server with VirtualBox.
Deploying a dump
Debian Linux
1. You need to make a virtual machine, attach a disk and a bootable Debian LiveCD to it.
2. Then you need to mount the resulting partition, upload dumps to it, and expand them: cd /mnt1 && restore -rf /mnt/test1.root && cd usr && restore -rf /mnt/test1.usr && cd ../var && restore -rf /mnt/test1.var
3. Install the bootloader: grub-install /dev/sda1.
4. Correct UUID in /etc/fstab
5. Check that the partition UUIDs are correctly specified in /boot/grub/grub.cfg: search —no-floppy —fs-uuid —set df7f92ba-2877-4b39-8805-966cf9ab52f3 linux /boot/vmlinuz-2.6.32- 5-amd64 root=UUID=df7f92ba-2877-4b39-8805-966cf9ab52f3 ro quiet
6. Check /var/spool/cron/crontabs, /etc/crontab and disable what is unnecessary.
7. If the console was enabled on the server being restored, then remove from /etc/inittab a line similar to the following: T0:23:respawn:/sbin/getty -L ttyS0 9600 vt100, and from /etc/default/grub this: GRUB_TERMINAL =console (just comment out).
FreeBSD
The created dumps must be deployed on a disk image allocated for the guest system.
Currently, support for UFS file systems used in FreeBSD is limited, so to deploy dumps, a FreeBSD virtual machine is created, a partition for storing dumps is connected to it, to which dumps from the cloned servers are sent using scp. Then a disk image dedicated to the guest system is connected to this machine, a FreeBSD file system is created on this image and the resulting dump is deployed. Further, it is assumed that the tmp partition is mounted in /mnt, the disk image for the guest OS is laid out under two slices, the first of which is mounted in mnt1, and the second is allocated for swap and is not mounted. Then you can deploy the dump as follows:
cd /mnt1 && restore -rf /mnt/test1.root && cd usr && restore -rf /mnt/test1.usr && cd ../var && restore -rf /mnt/test1.var
Here && is needed so that the next command will be executed only if the previous one is completed successfully, and thus situations are excluded when, for example, the var directory will not be created, the transition to it will not take place and the dump will be expanded to the wrong place, because The dump is expanded relative to the current directory.
Necessary changes in the guest OS configuration of the cloned server
Before booting, the guest OS must be reconfigured to run in a virtual machine.
The number of required actions is usually minimal and boils down to the following: 1. Being in the mnt1 directory (see above), delete the bootloader configuration files. This is especially true if we virtualize some production server in order to eliminate the use of the COM port as the default console, which leads to the bootloader freezing. rm /mnt1/boot.config rm /mnt1/boot/device.hints 2. Replace the contents of the file /mnt1/etc/fstab with the following: /dev/ad0s1b none swap sw 0 0 /dev/ad0s1a / ufs rw 2 2 This assumes that the guest OS disk image is divided into 2 slices, the first of which is used for data storage and the second for swap.
3. If necessary, tell the cloned system about the need to load the kernel module to work with the emulated network card, for which you need to add the line if_em_load="YES" in the /boot/loader.conf file
4. Specify the IP address allocated to the cloned system, for which in /etc/rc.conf you need to comment out the line of the current network adapter settings and add a new line like this:
ifconfig_em0=»inet 10.0.0.8/24″
6. If the cloned server is allocated an externally visible IP address, then you need to delete its settings that are responsible for its interaction with other servers. Attention! The cloned server has all the settings of the real one, so it is theoretically possible that if the settings are not removed, the cloned server will interfere with the operation of the combat system. The main place to check on FreeBSD-based servers is /var/cron/tabs/.
7. Turn off FreeBSD, which was used to deploy the dump, and boot the guest system with the server clone. In case of boot problems, it is possible that the kernel on the system was rebuilt with a changed configuration, this can be fixed by telling the bootloader to load the default kernel, which I hope you saved in the system during the rebuild: unload load boot/kernel.GENERIC/kernel boot
To issue these commands, you need to turn on the guest system, connect to it via RDP and wait for messages to appear on the screen indicating that you can press Enter to specify options for the bootloader.
8. Add a user for access via ssh by logging into the cloned server via RDP: pw user add username -g wheel && passwd username
Here the -g wheel option adds the user to the wheel group, whose members on FreeBSD have the rights to do sudo and su.
How to enable VirtualBox as a service
To have the host wait for the virtual machine to save state, you can try running the VM as a service. Then the host will calmly wait until VirtualBox Interface disables all processes on your computer. For this, utilities such as VBoxHeadlessTray and VBoxVMService are used. You can also download a shell of this type from sourceforge.net.
After downloading VBoxVmService, install this utility. Then open the VBoxVmService.ini file located in the program folder.
How to change it:
- In “Settings” VBOX_USER_HOME, specify the path to the directory with the VM.
- In [Vm0] sign the name of the virtual machine.
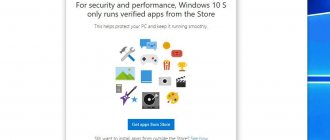
- Specify your preferred shutdown method, for example: ShutdownMethod=savestate. This will save the VM state. When you start it again, it will continue to work. If you replace savestate with acpipowerbutton, it will be equivalent to actually turning off the computer.
- The Autostart parameter can be set to yes or no. If you write “Yes,” the virtual machine will automatically start immediately after turning on the computer. Setting up VirtualBox as a service
- Save the file.
- Enable VBoxVmService.exe with the –i parameter. How should the i parameter be written?
- Restart your PC.
The Linux-Debian name is optional. A virtual machine can be signed in almost any way. Accordingly, instead of Linux-Debian, add the current name of your VM to the same line.
Guest Additions
Guest Additions enable features such as a shared clipboard, shared folders, drag-and-drop file integration, screen integration, virtual machine resolution adaptation, and more. This is an indispensable thing when working with virtual machines. Add-ons are installed on every guest system and make using VirtualBox easier.
To install add-ons, in the Devices , select Mount guest OS add-ons image :
Then all you have to do is run the installer for your system. Both Windows and Linux are supported. Read more about installing guest OS additions in Ubuntu. Now you know how to use oracle virtualbox comfortably.