For comfortable work in Windows OS, users are provided with a huge number of tools and services built into the system, designed for various purposes. Of the pre-installed Seven products, many paid attention to the Media Center service, which is a media combine with many capabilities. The integration of this tool allows you to play multimedia files and organize your collections, while the comfort of working with the program depends not only on the implementation of the software by the developers, but also on the settings that allow you to use the functionality to the fullest. Of course, not all users liked the service; many use similar third-party products or seek to increase productivity by disabling some Windows services, not considering certain tools interesting for themselves. The program constantly sits in system processes, consuming memory, and for owners of weak devices, who especially do not need Media Center, this does not add any comfort. The issue can be easily resolved by deleting/disabling the service, after which performance will improve.
Windows Media Center: what is this program
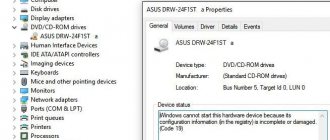
Built into Windows OS (some versions of XP, Vista, 7), the Media Center service combines many tools for working with multimedia files; in fact, it is a set of tools that allow you to play photos, videos, audio, and even watch TV. So, without any additional utilities, you can watch recorded TV shows, live TV, IPTV, but for this you need to make several settings. The program can play content from any drive (internal or external), as well as from the network, sorts files by date, name, tags, etc. Using Media Center, you get a lot of features collected in one place. For Windows 8 Professional, Media Center can be downloaded as a separate component. There is no program in the “Ten”, since other tools have been introduced that perform these functions separately, but if you wish, you can independently install the media harvester into the system.
Reasons to download and install Windows Media Center
- The widest functionality for working with audio and video content;
- Possibility of connecting TVs to organize broadcasts;
- Minimum application size;
- Convenience and ease of use.
Users of our Internet portal can download the installation files of the described player right now and make their personal computer even more functional! The distribution is suitable for both 32-bit and x64 versions. This is the official installation file, which, unfortunately, is not available for separate download from the official website. To get it officially you will have to reinstall the operating system and upgrade its status to PRO. But with us you can download the distribution separately and get the same result with less effort.
Key Features
When configured correctly, Windows Media Center can do a lot, replacing a number of other programs that function separately. Among the advantages of the software are the following features:
- projection onto a monitor, with keyboard and mouse for control;
- projection onto television panels, control using a remote control;
- viewing photos (slide shows), videos, listening to music;
- playback and recording of high-definition television, digital, satellite TV or antenna signal, support for streaming or recorded TV (available when using a TV tuner), recording to discs;
- listening to the radio (with the support of the FM format by the TV tuner);
- play streaming video from the network (if extensions are available);
- creating your own media content libraries (of any content);
- synchronization with portable devices.
Registry СCleaner
To completely remove Windows Media Center, you will also need to thoroughly clean the system registry. This is done manually or automatically by third-party applications.
A universal tool is CCleaner, designed to clean the system. To complete the removal of Media Center, you need to clear the registry and the installed browser. They contain the most viruses. Actually, the registry also contains a record of the presence of the program. The procedure is as follows:
- In the left panel you need to indicate scanning all system partitions.
How to install and configure the program on Windows
The Media Center application is included in Windows XP Media Center Edition, Windows Vista (Home Premium and Ultimate editions), Windows 7 (Home Premium, Professional, Enterprise and Ultimate editions). For the “Eight” professional version, the software is downloaded separately, and is not included in the “Ten” components, but you can independently implement it into the system (for example, install the version of the program for the “Seven” or use repacks). In the second case, the _TestRights.cmd file is launched with administrator rights, after which the application components are installed using Installer.cmd.
"Windows Media Center": what is this program?
So what is this app? In short and in general terms, Windows Media Center is a set of multimedia applications that are combined into one.
In other words, in order to watch movies, photos or listen to music, it is absolutely not necessary to call the corresponding programs separately. It is enough to run “Media professional version can use it exclusively when installed as an additional component) to carry out all operations under one software shell.
Installation on Windows 8
Media Center is not included in the standard set of applications for the Windows 8 operating system. But users have the opportunity to install it additionally. It is important to note that this is only possible if you are using the Professional OS version. In the case of RT, you will not be able to get this program.
First, you should check what version of the OS is installed on your PC or laptop. If it's not Windows 8 Pro, you'll need to update your OS first to install Media Center.
To upgrade, you must:
- ensure a high-quality Internet connection;
- on the main screen, enter the phrase “Add components”;
- The “Start” menu will open, and there you can select the “Add Features” menu from the search results;
- If the system asks for permission, click Yes.
Next, it should be noted that there are 2 ways to add components. Namely, with and without a product key.
If there is no key, then you need to do the following:
- in the menu that opens, select “I want to buy a product key”;
- then click on the “Select” button under the “Update program” section;
- enter your personal information in the window, and then click “Next”;
- in “Payment Information”, enter your account information;
- study the terms, accept them, and click “Next”;
- confirm that the information entered is correct and click “Purchase”;
- The product key will appear on the screen, which is better to write down and then click “Next”;
- accept the license terms;
- Click Add Components.
Next, automatic downloading will begin and the computer will restart. That's it, now the Professional version for Windows 8 is installed on your laptop or PC, as well as software components, including Media Center.
If you already have a product key, then in the window that opens you need to indicate that the key is there, then copy it, paste it into the appropriate field and perform the update.
If you have the required version of the operating system, you can simply download the Media Center package separately. To do this you need:
- Press Win and W at the same time;
- open parameters;
- specify adding components in the search bar;
- click on the “Adding Components” menu;
- allow changes;
- Depending on the presence or absence of a product key, follow the step-by-step download and installation of the application.
Upon completion of the program download procedure, the computer automatically restarts.
That's it, Media Center is installed. You can use all its features.
Installation on Windows 10
Media Center can also be installed on computers running the Windows 10 operating system. To do this, you must follow these instructions:
- create a restore point in advance if you suddenly want to return to your previous settings;
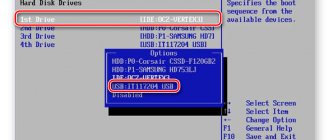
- open the download link for the software package depending on the OS bit depth on the official website;
- download the archive, activate its unpacking;
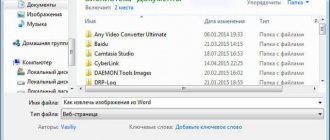
- the result will be a folder containing several files;
- in the directory of drive C, or where the OS is installed, create a folder called Wmc;
- copy the contents of the unpacked archive into it;
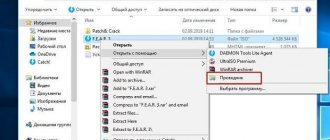
- right-click on the file called Test Rights;
- select the option to run as administrator;
- confirm your intention by clicking on the “Yes” button;
- if a command prompt window opens and then closes and a new window opens, you can move on;
- if the window does not open, try restarting the PC and repeat the previously completed steps;
- right-click on the file called Installer.cmd;
- run this file as administrator;
- Confirm the installation by clicking “Yes”.
When the installation is complete, you do not need to restart your computer. But sometimes it happens automatically.
To check if the tool has been installed, open the Start menu, then go to Accessories and Media Center should appear there.
Setting up Media Center
When getting acquainted with the program, the user will have two configuration options available - quick and custom. In the first case, you can configure the basic settings and move on to using the software (you can return to custom settings later), while the second option involves more detailed settings. Let's look at what to do with the settings to use more of the program's features:
- On the application remote control, press the green “Start” button (or open through “Start” - “Programs”).
- When using Media Center for the first time, on the settings page, click “Next” and select a custom setting.
- We agree with the proposal to use all the features of the program on the next page. Media Center will now be able to download covers for library albums, discs, program guides and other content.
Setting up media libraries
Every time you start the media center, it automatically scans the libraries on your computer that contain music, pictures, and videos. But what if the music files are located on an external hard drive or the images are stored on another computer in the home group? Don't worry. The media center can handle this.
- In the Media Library wizard, select the type of media you want to add (for example, Music), and then click Next.
- Select Add folder to library, and then click Next.
- Select This computer (including network drives) and click Next.
- Find the folder where the files are stored, check the box next to it, and click Next.
- This folder is where the media center should look for digital media files. In future work, the program will also remember the selected folders.
- Media Center automatically scans selected folders for compatible media
To import files from a shared folder on another computer, similar to the above: simply select On Another Computer, and the media center will look for shared folders on another computer, not local ones.
You can return to the Library Wizard at any time.
- On your media center remote control, press the green Start button.
- On the Windows Media Center startup screen, go to Tasks, click Settings, and select Media Libraries.
Setting up tuners, TV and program guides
In the advanced settings menu (when you connect a compatible tuner and after it is detected by the program), a new ability to watch and record TV shows in Media Center will appear. We agree to set up the TV when a page with signal detection results appears. Many parameters will be configured automatically, while the wizard will help you configure the rest. By setting up the set-top box and following the prompts on the screen, you can complete the necessary procedure in several steps; at one stage you will need to enter a key that will be displayed on the TV screen. The wizard will help you correctly set all the necessary parameters for channels, taking into account your location. Having a device if you need to use this ability to watch and record TV is a prerequisite. Without a tuner, television functions only if the function is already available in the provider’s service package; in some situations, it may be necessary to update Adobe Flash Player.
Questions about setting up TV set-top boxes
Setting up the consoles is quite simple. There is no point in dwelling on this, since the application itself has a special guide that will ask you to follow a few simple steps, and at one stage enter a special 8-digit key that will be shown on the TV screen when you connect to the Windows Media Center application.
With television, everything is also simple. If the user has a set-top box, you can use a special “Wizard” that will help set the correct parameters for TV channels based on the location of the computer (you will need to enter your zip code).
Alas, without a set-top box, Internet television can only work with those providers that initially provide such services. In some cases, it may be necessary to update the Flash player from Adobe, since these two components work in conjunction.
Other settings
Each start of the program involves automatically scanning the content it supports on your computer. For data on external drives and others, you can manually add it. In the parameters (we get here from the “Tasks” section) there is a “Multimedia Libraries” item, here you can select the type, and then use the “Next” button to move on to the next step, which involves adding directories to the library. You must select “Add folders to the library”, then “On this computer” (including mapped network drives), and then click “Next”. Let’s go to the folder (the place where objects are stored), check the box next to it and click “Next” again. The program will find files of a compatible format, and the next time you start the folders will be saved. Similar actions are performed when importing items from a catalog on another computer, for which you need to select the appropriate item when specifying the path.
In Windows Media Center, you can also customize the appearance on the screen by going to the “Tasks” section, where we open “Options” - “General” - “Install Windows Media Center” - “Set up your TV or monitor.” The ability to calibrate allows you to achieve high quality images on your monitor or TV display. By answering the questions, you can easily make the necessary settings with prompts that will help you determine the type of connection.
In the same subsection (Installing Windows Media Center) you will find speaker settings, which is very convenient when using a surround sound system. Here you need to select your speaker configuration and test the sound. If the signal does not reach the speakers, check the correct connection and volume, and if connected to a TV, it is possible that the video adapter or cable does not support audio (you may need to connect directly to the computer's sound card). In general, the program interface is quite convenient and understandable, and with the help of setup wizards you can easily make the necessary adjustments for more comfortable functioning of Media Center.
Processes
Find out how to properly remove programs from your computer from our new article - “How to remove a program in Windows 10.”
Of course, there are many viruses masquerading in system programs that rewrite their processes in the operating system using the “Task Manager”. From there you need to remove them manually. If this is not done, then when you restart the computer, the potential threat will appear again. You can unload from Media Center processes as follows:
- Launch “Task Manager” using the key combination Ctrl + Alt + Del. Go to the “Processes” tab.
Launch "Task Manager" and go to "Processes"
- Find Windows Media Center in the available list and click on this line. In the context menu, select the “Finish” function and confirm this.
Click “Cancel task”
The process may be duplicated. In this case, you should complete them all. After completing these steps, all that remains is to close the “Task Manager” and restart the computer. If you do everything correctly, after restarting the application will no longer appear in the system automatically. And it won't use up valuable system resources.
Typical errors when running the application
As with any software, the Media Center program also has glitches and errors. So, if, while trying to install the software (after testing with the first file), you encounter a problem in the command console, then it will be enough to reboot the device and start the installation procedure again. System and software failures are often solved by such a simple method, since they are one-time, and the system is quite capable of coping with the task of fixing such a problem by rebooting. Errors after installation, usually indicating that the software cannot be used, can be corrected by using the default settings; in the appropriate section you will need to activate the Windows Media Center line and about.
First solution
If disabling is not enough, you can try to get rid of the application completely. All you need to do is find and configure specialized tools that help you remove system elements live. The procedure is simple, since you just need to install the necessary software and find the Windows Media Center uninstall function in it. Everything will be ready in about a minute, but this directly threatens the security of the OS.
Note! In this case, there is a risk of infection by Windows 7/8. So you should initially consider how to remove Windows Media Center and at the same time prevent virus infection.
Why did we initially talk about malware? Most of them are encrypted under the guise of Windows Media Center, and then “live” peacefully in the system. After all, no one would think of looking for a problem in a system service. So, first you should do prevention or get rid of the infection.
Initially, you should delete all files associated with the center.
We remove media center through standard program removal
If there is no infection or its stage is early, standard means will do. In the “Panel” there is a submenu “Add or Remove Programs”, where all installed applications on the system are located. Sometimes after opening it you need to wait until all the software is displayed. Then all that remains is to select Media Center and confirm its removal using the corresponding button. Some may think the work is over, but it's just the beginning.
How to disable or remove Windows Media Center
Not every user is delighted with the service, and many even wonder how to remove the integrated Windows Media Center application from the system. In most cases, it is not necessary to completely remove the program, especially since the consequences for the system in such a development of events may not be very pleasant, since the component is a system one. So, when deleting a product from the registry, you must have the skills to work with the service, otherwise you can disrupt the operation of the OS. In any case, it is advisable to make a backup copy of the system in case of force majeure before any actions with the system registry. Let's consider several solution options that are suitable in specific situations.
Shutdown
If you are wondering how to remove Windows Media Center, you will have to try a lot. Let's start by dealing with a real program, not a virus. After all, to be honest, it is more difficult to get rid of than a computer infection.
Such an application cannot be removed normally. But you can disable it and, if necessary, enable it. To do this, visit the Control Panel. In it you will have to open “Programs and Features”. If you want to understand how to remove Windows Media Center, you will have to select “Disable/enable by component” from the list that appears. In the window that appears, select the program we need, and then select “Disable” there. Now you will have to restart the operating system. After this, you can forget about the question “How to remove Windows Media Center from your computer?” After all, you know how to disable this service. By the way, it turns on in the same way.
How to remove Windows Media Center from startup
Sometimes it is simple enough that the program itself does not run on the computer, and when you need to access it, it will be available. To do this, just do the following:
- open the “Run” console (Win+R), where we enter the msconfig command in the line;
- in the configuration window on the “Startup” tab, find and remove the software so that it does not load automatically;
- Now we go to the “Services” tab and find the components responsible for starting Media Center; double-clicking opens the option to select how to launch the application.
The second method involves using a third-party CCleaner utility, the capabilities of which also include removal from startup:
- on the “Service” tab you will see the “Startup” section, where you will find Media Center (if it is active), disable it;
- Here we go to the “Scheduled tasks” tab, where you also need to clear the elements related to this application.
Whichever method you use, after these manipulations you will have to reboot the device for the changes to take effect. In this case, there is always a possibility that some processes were running at the time of the procedure.
How to disable Windows Media Center
You can deactivate the program in several ways that do not involve complete removal. You can disable Media Center like this:
- go to “Control Panel” – “Programs and Features”;
- select “Turn components on or off”;
- from the list we find the folder “Components for working with multimedia”, click;
- uncheck all the checkboxes and agree with the consequences that the OS warns about, apply the changes;
- reboot the device.
Another effective option:
- open the “Run” console (Win+R) and enter the command services.msc;
- in the “Services” window you will see a considerable list of them; you need to find services associated with Media Center and change the startup type by disabling the application.
Removing Media
Next, we will describe how to disable Windows media center permanently - that is, we will find out how to completely remove Windows media center from the system. You can remove the application you are looking for in the same way as any other Windows component. To do this you need to do the following simple steps:
- Go to "Control Panel".
- Select the “Programs and Features” section.
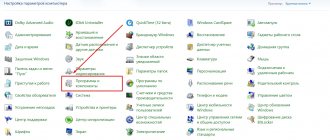
- On the left side of the screen, click on the “Turn Windows features on or off” link.
- In the window with a tree-like list of components, find a node called “Components for working with multimedia.”
- Expand it and uncheck the “Windows Media Center” item, as in the picture below:
The other day I decided to once again speed up the startup of Windows. This thought simply stuck in my head like a huge nail and did not allow me to live in peace. I released it only after accelerating this process to 9.2 seconds.
Today I’ll tell you how to disable Windows Media Center
- this greatly influenced the achievement of my personal record for speeding up system startup.
I have already written many times about overclocking the startup of the Windows operating system (there are several links at the end of the article). Having applied all my knowledge in this area, turning off all unnecessary services, etc., I reached a value of 13-15 seconds. But subconsciously I felt that it was possible to achieve a better result, that it was possible to cross the 10-second mark - and so it turned out.
And all because I looked at the “Scheduled Tasks” tab (with the “Advanced Mode” checkbox checked) in the “Startup” item of the CCleaner program...
Here I found about a dozen items marked “Media Center”. To do this, just move the slider to the far right position...
During my searches, I did not take screenshots, since I was not going to write an article on this topic - as a result, I cannot show you a screenshot with these items, my Media Center is already disabled.
At first I simply turned off all these startup items, but then it dawned on me that it’s probably possible to disable Windows Media Center completely. I rushed to look for information on the Internet and it turned out that this is a very simple, easy and fast operation...
How to uninstall Windows Media Center
Disabling system software in Windows 7 or other versions of the operating system where it is preinstalled is not difficult, but with complete removal things are different. Due to the fact that Media Center is tightly integrated into the system, it is more difficult to uproot it without consequences. If you are still determined, then standard Windows tools will no longer suit you; you will have to use products from third-party developers, for example IObit Uninstaller or the like. You will need to go to the Windows Manager section, select the Windows software menu and perform a complete uninstall. After the procedure, you will also need to remove residual elements.
If we are talking about Windows 8, where a set of tools is installed additionally, there is nothing easier than removing it in the standard way through the Control Panel. With “Ten” it’s also simple. If you used a repack, then the file distribution should contain another Uninstaller.cmd file. By running it as an administrator, you can uninstall the software.
But if you remove Media Center using standard tools, it may leave behind a large amount of garbage, various folders, and other things. Therefore, the correct solution for complete uninstallation would be to additionally use tools to clean the system registry.
This can be done manually, or done automatically using special proven applications. Here, CCleaner is a clear example of an effective tool. But the user can take any analogue. The main thing is that the program does not simulate cleaning, but actually deletes residual files.
Most often, viruses masquerading as Media Center, as well as residual files of the tool, remain in the registry and browser.
To complete the task using CCleaner you need:
- install and run a garbage cleaning program;
- in the left panel select the “Cleaning” section;
- run a scan of all system partitions;
- then click on the Analysis button;
- after completing the analysis, click on the “Cleaning” tab;
- repeat the same procedure.
If you follow the instructions and adhere to a certain sequence, then you will definitely be able to not only remove Windows Media Center, but also get rid of all traces of this program. Or you can temporarily disable the tool until you need it again.
From the program
Why did we decide to tackle computer infections? Yes, because many viruses are encrypted under the Windows Media Center application, and then “live” quietly on the computer. And no one will think to look for a problem in this location. Thus, now we will talk exclusively about getting rid of the computer infection of the same name.
The first thing you should pay attention to is how to remove the Windows Media Center program. After all, it is from this moment that our struggle will begin. Fortunately, here at the initial stage of infection you can get by with the most common “Control Panel”. Go there, and then select the Add or Remove Programs service. Wait a few minutes until the list of installed content is generated, and then proceed to action. You will have to find Windows Media Center here, then highlight the required line and select the delete function there. A few minutes of waiting, and all problems are solved. But you shouldn’t be happy that this is the end of our conversation. This is just the beginning. We will continue to think about how to remove Windows Media Center in Windows 7. It remains to take a few simple and important steps that will definitely help us deal with the issue.