Our next lesson in the training course is devoted to how to clear your desktop of unnecessary shortcuts.
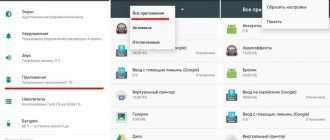
According to the latest data, almost 2 million applications have been downloaded in the Google Play digital store, most of which are free programs. At the same time, the functionality of applets extends from simple notepads and calculators to controlling household appliances in the house.
Naturally, it is extremely difficult for a mobile device user to resist downloading additional applications, even if he knows exactly what he wants to install. In this case, programs and widgets and “one-time” series begin to accumulate, increasing the number of desktops. Because of this:
- The desktop turns into a real dump of icons
- It's quite difficult to find the app you need in this dump
- Apps running in the background overload your battery and processor.
However, the functionality of the Android operating system allows you to properly clean up your phone’s desktop and get rid of the clutter of unnecessary shortcuts, widgets and additional work screens. There are 3 simple ways to do this:
Method 1. How to remove a shortcut or widget from the Android desktop through the system trash
This method is convenient because it does not require working with system settings. Everything happens on the main screen of your smartphone:
- Selecting an unnecessary program
- Hold your finger on the label
- Wait until the Remove/Delete option appears
- Drag the icon to the desired item
To simply erase an icon from the desktop, just select the “Remove” command. In this case, the program will remain in the smartphone menu, from where it can be returned to the main screen at any time. But the “Delete” command will uninstall the application.
It is worth noting that this method only works with third-party applications. System programs can only remove icons from the desktop.
As a rule, after deleting any application, the so-called cache remains in the memory of the mobile device - residual files that load the processor and fill the internal memory. Therefore, after uninstalling a program or widget, we recommend using a garbage cleaning application, for example, Clean Master:
- Install the application on your smartphone
- Give the program access to the files
- Click on the "Trash" button
- Click "Delete"
The utility will thoroughly scan your smartphone and delete all excess cache.
How to remove a widget from the Android desktop? Just like a shortcut. Press your finger on the widget, wait for the “Remove” command to appear, and drag the widget towards it.
Hiding an icon from the desktop
Starting with the Android 8 operating system, developers have introduced home screen personalization settings:
- Tap on an empty area of the screen using hold.
- At the bottom, click on the image in the form of three dots to go to “Settings”.
- In the list presented, deactivate the “Add icons” slider.
How to remove icons from the Android screen is a problem that exists for almost every smartphone owner. This can be done using standard operating system tools or third-party launchers. System icons can only be removed when using Root rights.
Method 3. Delete the desktop on Android
Empty desktops are no less redundant elements on the phone, just like unnecessary shortcuts and widgets. How to reduce the number of desktops.
When your desktop is cluttered with a bunch of unnecessary shortcuts and icons, it becomes difficult to find what you really need. Therefore, it is better to keep your desk clean. In addition, often when you need to take a screenshot of your desktop, icons get in the way. But how can you clean your cluttered desktop? To make the screen cleaner, let's get rid of unnecessary unnecessary icons.
Of course, you can simply drag all unnecessary shortcuts to the Trash, but there are two problems with this:
- What if we need shortcuts, but we just want to hide them temporarily?
- What if there are too many shortcuts, dragging one at a time is inconvenient, and if you delete them all together, you might hit something you need.
In such a situation, you need to act in the following way:
If you need to return everything to the way it was, you just need to perform the same operation, check the corresponding box and all the icons will appear again.
In this simple way we can remove and return icons from the desktop whenever we want.
The note!
In the “View” tab, there are several more functional items that can give your desktop a more presentable look. For example, it is possible to organize icons, sort them by name, size, creation date, and so on.
Video - How to remove shortcuts from the desktop
How can the Magnifier app help people with low vision?
It is with the help of such an application that your phone will help you easily read small text from any surface.
But if you want to read a book through a “Magnifying Glass,” then this will not be rational. Your smartphone, of course, will help in this case, but then it’s still better to take a different approach: download this work from the Internet and read it either using an “E-book” or directly from the Internet through a browser.
All of these apps have the ability to increase the font size on the screen to any size. This is easier and more convenient, since these applications are designed specifically for reading such things.
And the “Magnifying Glass” on a smartphone, rather like a microscope, is necessary for studying very small details or reading images from hard-to-reach places, for example, the unit number of an old Zhiguli.
How to remove the Trash icon
This way, absolutely all desktop icons are hidden, even the Recycle Bin. But what if you need to hide only the “Trash” and not absolutely all the icons? For many users, the “Trash” is an unnecessary element, because you can always delete a file bypassing the “Trash” using the “Shift+Del” keyboard shortcuts. And the icon on the desktop becomes a nuisance and takes up extra space. So how do you remove it? Here the operation is a little more complicated.
All. After completing these simple steps, the “Trash” will no longer be a constant eyesore. By the way, if you wish, in the same menu you can add other functional icons to the desktop. For example, “This PC” or “Control Panel,” which became difficult for many to find with the release of Windows 10.
Find out more detailed information, as well as consider detailed actions, in a new article on our portal.
How to remove the circle when you tap on the screen
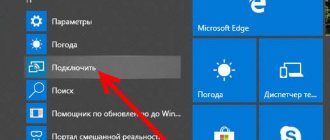
Some users confuse the navigation button with the circle that appears when you tap on the screen. These are actually two completely different things, so you need to do different things to turn off touch display. So, for clarity, detailed instructions have been compiled:
- Go to settings
- Go to the “About phone” or “Device information” section.
- Find the line “Build number” or “Firmware version” and click on it several times. This action should lead to unlocking the “For Developers” section.
Open the “For Developers” section
- Now return to the initial settings page and open the “Advanced Settings” menu.
- Go to the “For Developers” subcategory.
- Near the “Show touches” line, move the slider to the inactive position.
Near the “Show touches” line, move the slider to the inactive position
After completing the steps described in the instructions, the touch display function will be disabled. This means that when you click on the screen, no circle will appear.
How to hide the HomeGroup icon
Another annoying icon that sometimes appears at certain stages of installing new versions of Windows is “HomeGroup”. It cannot be deleted by any standard methods (drag it to the Trash). We'll have to use a more cunning method.
Yes, this is much more complicated than with the same “Trash”, but this is the only effective and reliable way to get rid of the “HomeGroup” icon. After performing this operation, simply press “F5” on the desktop and the icon will disappear. However, the next time the operating system is updated, it may appear again. Then the operation will need to be performed again.
The note!
You should delete the “Home Group” very carefully, since this involves working with the registry. If you accidentally delete the wrong line, your system may crash. So, use this method only if you know that you have saved .
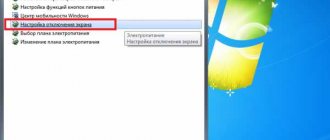
1Screensaver on Windows XP
The screen saver is disabled in different ways, depending on what operating system is on the computer. If you have Windows XP, you can disable it as follows:
- Step 1 - click on “Start” and call the context menu;
- Step 2 - select the “Settings” section and go to the “Control Panel” menu;
- Step 3 - in this menu, find the icon labeled “Screen”, double-click with the left mouse button;
- Step 4 - you called the “Properties: Screen” menu, now click on “Screen saver”;
- Step 5 - in the splash screen pop-up menu, select “No” and click “OK”. (here you can also set the time when the screen saver and its graphic image should turn on).
How to remove shortcuts from the taskbar
There are also annoying extra icons on the taskbar. Often, some programs arbitrarily add their icons to the panel in order to constantly loom in front of the user’s nose. But they can also be removed and this is done quite easily.
- Use the function key to click on an empty space on the taskbar and go to “Properties”.
- In the window that appears, you need to go to the “Taskbar” section, then find the “Customize” button and click on it.
- You will see a screen that lists absolutely all the icons displayed on the taskbar. Of course, some of them are needed for comfortable work, but many can simply be removed so that they do not get in the way.
- The display of icons is adjusted in three positions, depending on whether you want the icon to be displayed, not displayed, or displayed only when you receive notifications from the program.
- After you have placed the position you want next to each icon, click “OK”.
The note!
It is better not to remove all icons from the taskbar and not even turn off notifications. Know well which ones you need and which ones you don't. For example, it is better not to disable antivirus notifications.
How to add an icon to the menu bar
This method is relevant when the user needs to add or return a program icon to the menu. It is quite difficult to determine the reason for the disappearance of a shortcut, but the most common are the following:
- transferring the application to a memory card;
- moving the utility icon to another location on the desktop;
- adding an icon to a thematic folder;
- accidental deletion of a program;
- system failure.
Depending on what led to the removal of the icon from the home screen, you can solve the problem by using any of the proposed options.
- moving an icon from the phone menu;
- search for shortcuts in folders;
- transferring the utility to internal memory;
- reboot the phone.
Typically, manufacturers try to install standard camera and phone icons on the lock screen. The user, if desired, can add here shortcuts to any current applications, pages, folders and files. There is a standard procedure for this.
- Open the menu and go to “Settings”.
- In the “Personal” section, select the “Lock screen and security” category.
- Click on “Information and application shortcuts”.
- In the list that opens, select “Application Shortcuts”.
A preview of the lock screen should appear at the top of the screen after changing the settings.
The user will need to check the highlighted icons and confirm the action by pressing the “Save” key.
How to remove the shield icon
Very often, users notice that a shield icon appears next to shortcuts and it is unclear where it came from and how to remove it. No complicated machinations are required here. If this icon really bothers you that much, removing it won't be difficult.
The fact is that this icon means that you received the program from an unreliable source. And such files (in theory) can only be launched by the “Administrator”. Therefore, in order for the shield icon to disappear, you need to obtain “Administrator” rights in your operating system once and for all.
This is done as follows:
Now, when you turn on the computer, along with other users, you will be able to select “Administrator”. By logging in through this account, you will have access to all “Administrator” rights and the shield icons will disappear from the shortcuts.
It is worth keeping in mind that you are logging in as a new user, so the desktop will be completely empty.
The handset icon appears on the phone screen
If a handset icon appears on your phone screen, you should first look at its appearance. The following situations may occur here:
- The red tube is a missed call. The icon will disappear after viewing the list of missed calls.
- Neutral handset – the call is currently in progress.
- The handset icon at the top of the screen is green – speakerphone is currently on. To resolve the issue, just turn off the speakerphone.
- What does the tube with an arrow icon on the screen mean? This is call forwarding.
- The letter A (brick symbol) and a red tube is a sign that calls are blocked from numbers that are blacklisted by the user.
The last situation is the most difficult to solve. In this case, you need to remove phone numbers from the blacklist:
- Click “Settings”.
- Select the “Calls” tab.
- Click on “Reject call”.
- Let's go to the "Black List".
- Uncheck the numbers of subscribers from the black list.
How to change the shortcut icon
Often users want to change the shortcut icon to some picture to make it look more beautiful. This is quite possible to do, the main thing is to find a suitable picture and then not get confused in the labels. You don’t even need any additional programs; everything is already provided in the operating system.
To change the shortcut icon:
To learn how to change the icon on the shortcut to a picture you like, watch the following video.
Video - How to change a shortcut icon to a picture
Steps
1 Removing individual icons
- 1 Tap and hold the icon you want to remove.
Each new version of Android is slightly different, but the overall look doesn't change much, so the Uninstall option will appear at the top of the screen.- Widgets that you no longer use can be deleted in a similar way.
- 2 Drag the icon to “Delete.”
While continuing to hold the icon, drag it to the “Delete” text. If you accidentally let go of an icon while dragging, you will have to repeat the entire process again. - 3 Release the icon next to “Delete”.
The icon will be removed from the desktop.
2 Deleting Home screen pages
- 1 Open Screen Manager.
What you need to do this depends on the phone and launcher you are using. Below are some of the most common options:- Samsung and LG devices - Pinch your fingers together on the screen. This should create a zooming out effect and show all your desktops.
- HTC, Motorola and Nexus devices - Press and hold an empty space on the Home screen. Just be careful not to accidentally click on the icon. This will open the screen manager.
- Nova Launcher - Press the Home button to open the desktop, then again to show all desktops.
- 2 Hold your finger on the page you want to delete.
When you delete a page, you will also delete all the icons on it. - 3 Drag the screen to the “Delete” text or “X” icon.
If there are multiple screens, simply swipe up or down to delete them.
3 Preventing automatic addition of new applications
- 1 Launch Google's Play Store.
By default, icons for all newly installed applications will be added to the desktop. You can disable this feature if your device's home screen quickly becomes cluttered with various icons. - 2 Open the Play Store menu.
To do this, you must press the ☰ button or swipe left. - 3 Click on the “Settings” option.
This will open the settings menu. - 4 Uncheck the “Add icons of installed applications to the home screen” option.
This will prevent new applications from adding icons to your desktop (they can still be opened from the Application Drawer).
- Removing an icon from the desktop will not remove the application itself. It will still remain in the Application Drawer. Click to learn how to completely remove the app.
Often, when downloading applications on Android, shortcuts to the downloaded programs are automatically saved on the desktop. Subsequently, deleting this or that program as unnecessary, some, out of ignorance, or maybe simply because “they don’t get around to it,” leave icons, cluttering the desktop so that sometimes it becomes difficult to find the desired application.
Today we will tell you, speaking about devices with Android OS, how to remove a shortcut from the desktop. It must be said that this procedure is not particularly difficult, therefore, anyone, even a not very experienced user, can cope with it. However, for some models of gadgets you will need special utilities, however, first things first.
We will now look at all the ways to solve the problem for different device models. But, you need to understand that by deleting a shortcut, we will not delete the application itself.
Using system tools
On most models of Androbd devices, the procedure is extremely simple, and it is as follows: On the desktop, press your finger on the icon that you want to delete and hold it until “Delete” appears at the top of the display. Without releasing your finger, just drag it there:
On other devices, after clicking on the shortcut, a trash can will appear at the bottom of the screen, into which, without releasing your finger, drag the unnecessary application icon:
The situation is somewhat different with Lenovo smartphones. And if on models of later versions, for example Lenovo s660, the procedure is similar to those described above, i.e. click on the icon, on the display at the top we see the trash can and the inscription “Delete” and, without releasing your finger, drag the shortcut:
But on some devices of earlier versions - up to 4.0.x (Ice Cream Sandwich), for example, the same Lenovo A319, everything is not so simple. Here you will need to install third-party software. Read more about this method.
Using special software
There are actually more than enough applications that solve this problem. We want to offer the simplest and most convenient option - download the Apex Launcher program (or an extended version).
The fast, convenient and multifunctional Apex launcher, in addition to a fairly wide list of features that can be read about at the links provided, does an excellent job of editing shortcuts.
So, after the launcher is installed, open the desktop, select the application icon that we will delete, click on it and hold until the context menu appears. Select “Delete” and after this manipulation the unwanted shortcut will no longer be an eyesore:
Cleaning your desktop from unnecessary third-party and system shortcuts
Smartphone owners are faced with the problem of how to remove an icon from the screen on Android. To perform removal, you must use standard tools or third-party software.
Standard utilities
How to remove widgets on Android - detailed instructions
The Android operating system provides tools that allow you to perform the removal procedure without using third-party applications. The instructions are the same for almost all smartphones, including Honor:
- Go to the desktop and click on the desired shortcut.
- Using a hold, after a few seconds you will be able to drag the WhatsApp icon to another location.
- A shopping cart symbol will appear at the top of the main screen.
- Drag the icon and click on the “Delete” button in the pop-up field.
You can disable the automatic creation of icons using the standard Google application - Play Market. To do this, you need to call up the side menu and find the “Add icons” option. After that, uncheck the corresponding item.
Important! This function is provided only in earlier versions of the Play Market program.
You can also remove icons using standard tools in some smartphones, where the manufacturer implements its own graphical shell to display the interface:
- on Redmi phones, icons are deleted as standard by simply dragging them to the trash. System application icons on Redmi cannot be removed;
- Xiaomi gadgets have a “Hidden Programs” function. To do this, open “Settings” and go to “Application protection”. In the upper right corner of the screen, click on the gear icon. Then you need to unlock (pattern code or fingerprint) and activate the “Hide” option. Next, go to the “Management” tab and check the checkboxes with those programs that will be visible on the desktop.
For your information! On Lenovo phones, the removal process is standard, as is the case with most devices. On some earlier versions (4.0.0), you can clear your desktop of unnecessary shortcuts using third-party software.
Third party launchers
There are several of the most functional programs that allow you to perform cleaning.
Apex Launcher
To clean the main screen, you need to use a special launcher. Using Apex, you can hide unnecessary icons and also remove system icons:
- Download the software via Play Market and install.
- Perform the initial setup of the desktop layout “Horizontal” or “Vertical”.
- Press and hold on the icon and select “Delete” in the pop-up context menu.
Apex Launcher
Niagara Launcher
New launcher that allows you to hide and remove icons:
- In the main menu, select the desired shortcut and press and hold to bring up the context menu.
- In the pop-up window, tap “Delete/Hide Icon” and activate one of the actions.
Lawnchair
Instructions for using the application:
- Install the application and tap on the icon on the main work screen.
- Use a hold to bring up the context menu.
- Open the “Settings” item and click “Delete/Hide” in the pop-up window.
How to remove autosave shortcut
We have already said that when installing programs, icons, as a rule, are automatically saved on the desktop. Is it possible to make sure that application shortcuts are not saved, but simply add the necessary icons yourself when necessary?
Yes, you can. What do I need to do:
Go to the Play Store on your smartphone and open Settings. Find the item “Add icons” and uncheck the box:
Moving an icon to the home screen (as well as deleting it) may vary slightly across devices. Sometimes, it is enough to open the main application menu, where all the icons are located. Select the one you need, press it with your finger, and hold it for one to two seconds, after which the icon will appear on the main screen:
Now you can press your finger on the icon, wait for it to highlight and, without releasing your finger, move it to the desired location (if necessary).
On some devices our actions will look slightly different. For example, on the same Lenovo s660, opening the main application menu, long pressing on the desired icon will open the main screen. Continuing to hold the icon, drag it to the desired location, now you can release your finger, and we will see the shortcut of the selected application at the specified location:
How to remove duplicate shortcuts
Imperfections in the firmware or incorrect functioning of the launcher often cause shortcuts to appear not only in the smartphone menu, but also on the main screen. As they accumulate, the work area becomes so cluttered that finding the icon for the desired program becomes problematic. To delete them, OS Android provides several options: grouping them into a specially created folder, dragging them to the trash can, or deleting them through the system menu. Often, duplication of icons occurs due to the specific settings of applications or the Play Market service itself.
To disable the duplicate creation feature, just follow these simple steps:
- Go to the Google App Store.
- Click on the icon that looks like three vertical dots.
- Through the drop-down menu, go to the “Settings” section.
- In the list of available options, find the line “Add icons of installed applications to the home screen.”
- Deactivate the command by unchecking the box next to it or moving the slider to the left (on Samsung models).
In this way, the owner can limit the capabilities of programs, prohibiting them from independently placing icons on the main screen (they will only appear in the menu bar) and get rid of the problem of cluttering the desktop.
How to create a folder with shortcuts on the desktop
To optimize space on the main desktop, it is advisable to create folders in which you can enclose several icons. This is especially true if you often use different applications that are convenient to keep at hand.
Actions we must perform:
Move the desired application icons to the main screen as described above. Then, by clicking on one icon, we move it directly to the one with which we want to combine it. We will immediately be able to see the appearance of a folder with two labels. In the same way, you can add any number of icons to this folder. Now, by clicking on the created folder, hold your finger until the keyboard appears. Enter the name of the folder (for example, “Games”, “Mail”, etc.):
Well, for dessert, for aesthetes who want to create their own labels and inscriptions for them, we suggest watching the video. I say goodbye until the next meeting on the pages of our “Knowledge Base” section. Good luck!
How to remove magnifying glass from iPhone 10 (X) screen
What to do if a magnifying glass appears on the iPhone 10 screen and how to quickly remove it? In this short article we will look at an easy way to disable it permanently. The bottom line is that magnifying the screen on the iPhone X is designed for people with low vision and calling it up is as easy as shelling pears using a combination of gestures on the screen.
Often, iPhone X users, without knowing it, turn on the magnifying glass on the display by performing a gesture with 3 fingers on the screen. That is, to turn on the magnifier you need to double tap with 3 fingers on the display.
How to quickly remove a magnifying glass?
If the magnification has already appeared on the screen, the first thing to do is to double-tap the display with three fingers. At this point, the increase should disappear, but you should understand that it will not be turned off forever and may appear again.
To turn off the appearance of this “magnifying glass” once and for all, you need to go to “Settings” - “General” - “Universal Access”
and there select the “Zoom” item and turn it to the off position.
You can also not go to settings, but swipe down on the home screen and enter “Zoom” in the search bar. This will quickly take you to these options.
Few people know, but if you triple tap with three fingers on the iPhone screen in iOS 11, you can call up the settings for this mode, where you can also configure its other parameters, for example: the degree of screen magnification, lens size, add filters and much more.
Watch now:
Your mark:
Loading…
white-apple.club