Automatically shutdown the computer at a set time
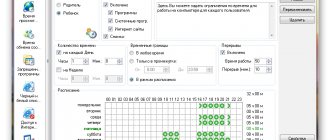
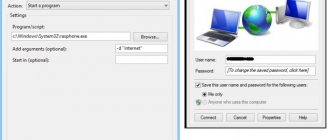
For those whose Internet speed is not high, you can download files at night (then maximum), but so that after the download is completed, the computer does not work in vain, you can configure it to automatically turn off for a specified time.
Programs and gadgets have been created for this purpose. However, Windows also provides its own option, but it is not convenient (for me).
The easiest way (you can download it by going to it). Set a timer in it. To set the time, for example, you want to turn off the computer at 2 am, then it is better to use.
That's all. I only wanted to write how to set the time, but somehow, unbeknownst to myself, I described a few more convenient functions of the computer - perhaps they will be useful to you. Good luck.
To set the date and time in Windows XP, a special utility is used. To call it, open the control panel and click on the date and time icon. An additional window will be displayed on the screen, consisting of three tabs: date and time - this is the first tab on which you can set the date and time. In order to change the date, you must select a month. Open the drop-down list and click on one of its items. Next, set the year and click on one of the days of the month. Changing the time can be done as follows. Set the rates to any position in the time entry line. And after that, click on the arrows to the right of the line to either increase or decrease the value.
Timedatectl for setting time in Debian
On most modern systemd distributions, the time synchronization service is already present in the default installation and is implemented through systemd-timesyncd . This service is intended to replace ntpd. According to the developers, it is lighter and faster than ntpd, plus it is integrated into systemd, so it is recommended to use it for automatic time synchronization.
It is important to understand here that systemd-timesyncd cannot work as a time server, which we will configure below. So, if you have a single server, timesyncd is quite suitable for you. If you want to use your own time server, then you need to configure ntp.
First, let's check what we have configured as a time update service.
# timedatectl
Time synchronization is already enabled and works through timesyncd. Let's see her status.
# timedatectl timesync-status Server: 195.3.254.2 (2.debian.pool.ntp.org) Poll interval: 17min 4s (min: 32s; max 34min 8s) Leap: normal Version: 4 Stratum: 2 Reference: C23ACA94 Precision: 2us (-19) Root distance: 42.113ms (max: 5s) Offset: -8.977ms Delay: 63.598ms Jitter: 9.582937s Packet count: 19 Frequency: +7.550ppm
Basically, you don't need to do anything else. Time synchronization via the Internet is already configured and working. The time is updated from the 2.debian.pool.ntp.org server. To be on the safe side, you can make sure that the service is running, plus we’ll add it directly to startup if it’s not there.
# systemctl status systemd-timesyncd # systemctl enable systemd-timesyncd
The list of servers for time synchronization in timedatectl is configured in the configuration file /etc/systemd/timesyncd.conf.
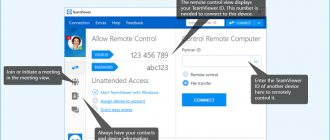
Internet time
If the computer is a member of a domain, its clock is probably automatically synchronized with a network time server. If the computer is not part of a domain, the computer's clock can be synchronized with an Internet time server. In order to synchronize, select a server; to do this, open the drop-down list by left-clicking on the arrow images on the right side of the list. Next, select one of the values in the list and left-click on it. Next, click the update now button and the synchronization will take place. If synchronization is enabled, the computer clock is synchronized with an Internet time server once a week.
The date and time can be configured both through Bios and through the operating system. In this case, we will look at configuration through the operating system.
So, in order to set the date and time on your computer, follow these steps:
Step 1
.
On the taskbar, in the lower right corner, click once on Date and Time
.
In the window that appears, click on Change date and time settings
...
There is another way to access date and time settings. Click Start
, select
Control Panel
and click on
Date and time
.
Step 2. In the Date and Time
Click on
Change Date and Time
.
This procedure requires administrator rights, if you are a regular user without knowing the password and special permissions, you cannot change anything
it will succeed.
Step 3. In the Time and Date Settings
use the arrows or manually set today's date and time.
When finished, click OK
.
Also, in the Date and Time
In
the Date and time
, you can select the time zone in which you are located.
To do this, click Change time zone
.
In the window, click on the drop-down list and from the list of time zones, select your time zone and click OK
.
Also, you can set up synchronization with any time server. To do this, in the Date and Time window, go to the Internet Time tab and click Change settings
(Requires administrator permission).
In the window that appears, check the box Synchronize with an Internet time server
.
In the Server
, click on the arrow and select any time server from the list and click
Update now,
then click
OK
.
That's all. The setup is complete.
A computer can now be found in every home. It is not only a device for accessing the Internet, but also a complex system of various functions and capabilities. Most settings are set and updated offline. But there are failures, for example, when setting the date and clock in a specific region. This brings up the question, how to set the time on a computer? In order to understand this, you need to familiarize yourself with at least the basic principles of using a personal computer.
Using the control panel
The option is relevant for all editions of Windows, starting with XP. To change the date on your computer you will need:
- open “Control Panel”;
- select “Date and time”;
- click on “Change”;
- set the required values for the clock.
This method cannot set the time on a Windows 10 first edition (before 1511) computer. There in the “Control Panel” the required item was simply missing, and the clock could only be changed through “Settings”. The situation is similar in Windows, where updates have not yet added the traditional Start menu.
After setting the time, you can also enable the display of several clock shortcuts on the taskbar: separately for selected time zones. For travelers - a convenient feature for a laptop.
Why do calendar and time settings get lost?
There are several reasons why such indicators on a device may go wrong. These problems are not global and are easy to fix. Let's look at a few common reasons.
BIOS tablet is faulty
To fix this problem, you should replace the battery on the motherboard:
- First, disconnect the device from the power supply.
- Then open the cover of the system unit and find the BIOS tablet. It is not difficult to replace it, since it is in a single copy and is the size of a coin.
- Gently release the latch and remove it from the motherboard.
- Buy the same one at a computer store and install it in your usual place.
After this, you will be able to correctly set the time on your computer.
Wrong time zone
Click on the item to change time settings, change the time zone according to your region. You can adjust the settings using the “Internet time” section. With this option, the device will check the indicators down to the millisecond.
Computer virus
This reason for changing calendar parameters is very rare. To fix the problem, install an antivirus and diagnose the device. If the situation is more than serious, then immediately reinstall the operating system or contact a qualified specialist.
From all of the above, we can conclude that most problems can be fixed independently, without the intervention of specialists.
Setting the clock and date through the BIOS
If the clock on your computer has gone wrong due to a dead battery, a message about this will appear immediately after turning on the device. The notification asks the user to go to the BIOS settings and set the time on the computer, or press the F1 key to continue booting the device.
If you are familiar with the basics of using a personal computer, then you can safely set the date and clock without loading the operating system. At the moment, modern systems are available with different types of BIOS. They are divided into two types - old and new (UEFI).
Let's take a closer look at them:
- Old BIOS - as soon as it boots, a section will appear on the monitor, which may be called “Main” or “SysInfo”. In any case, this section is always in the first place at the top of the screen. Next you will see the date and time indicators. And at the bottom or on the right side of the screen, the device gives hints which keys need to be pressed to change the indicators. First you need to press TAB or Enter. And then adjust the date with the clock using the F5 or F6 buttons. In order for all installed changes to be saved, you should exit the BIOS and press the F10 key.
- New BIOS (UEFI) - go to advanced settings by pressing the F7 button. Next, you need to click on the “Basic” tab, adjust the date and clock using the prompts on the right side of the screen. After changing the necessary indicators, exit the settings and save the changes.
Thus, no special knowledge or effort is required to set the time on the computer. You just need to familiarize yourself with the basics of using a PC.
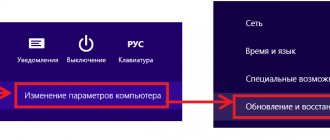
Setting the time on a Windows 7 computer
If you do not know how to change settings in the BIOS, then it is better to use the method of changing parameters through the operating system. You can adjust timing in Windows 7 using the document “timedate.cpl”, which is located in the “System 32” folder.
You can open a document in several ways:
- Using Windows Search. To do this, type the name of the document in the search bar, and it will be found in a matter of seconds. The method is very simple, but typing the file name every time gets boring.
- In the lower right corner, hover over the image of a clock. Then right-click and select the “Change date and time settings” option. If you accidentally right-clicked the mouse, a window with options will appear. From all of them you need to select “Time Settings”.
- You can set the clock on your computer using the control panel. To do this, select the “Language, region and clock” section. After which another tab with items will open. You can select any section you need to edit.
- Using the “Win Master” program. After opening the program, in the second tab you will see information about the calendar and time. By clicking on a section, you will automatically go to the settings editing section and can adjust the time zone and time indicators.
Using these simple methods, you can easily cope with adjusting calendar and time indicators.
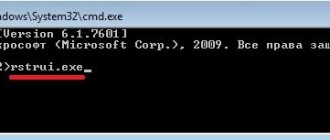
How to view and find out the system time
Let's start with the simplest thing - connect to the server via ssh and look at the current time in the console. You can do this using a simple date .
# date Wed 21 Aug 2020 03:38:12 PM MSK
| Wed | day of the week, in this case Wednesday |
| 21 Aug | date and month, August 21st |
| 2019 | year |
| 03:38:12 | time in hours:minutes:seconds format |
| P.M. | designation of the time of day, am or pm, before or after noon |
| MSK | time zone, also known as timezone |
As you can see, we have the MSK time zone set, the current date and time in 12-hour format. This is not very convenient. If you need to view the time in 24 hour format, add the display +%R to date.
# date +%R 16:04
It is convenient to use such parameters in scripts. Here are the most popular current time viewing combinations that I use.
# date +%Y-%m-%d 2019-08-21 # date +%H-%M-%S 09-16-47 # date +%Y-%m-%d_%H-%M-% S 2019-08-21_16-09-50
There is also another way to get complete information about the Debian server time - use the timedatectl .
# timedatectl status
Setting calendar and time in Windows 10
Calendar and time indicators in the Windows 10 operating system are configured in exactly the same way as in the seven. The only differences are in the appearance of the tabs. You can click on the watch face with the left or right mouse button, calling up the “clock settings” options. In the calendar and clock settings, one large window will open, called “Language and time”. In it, the user has access to all the basic settings of the clock and calendar.
Let's look at these points in more detail:
- To edit clock indicators, go to the “time and date” section.
- Turn off automatic time setting.
- Click on “Edit” and edit the clock with date.
- Change the time zone to the appropriate one.
- You can change the design of the calendar and clock using the “change format” option.
- You can set additional time for different time zones.
As you can see, the task of installing a calendar and clock on such a device is quite simple. Any confident user can do this.
Installing, configuring and changing the time zone
Above I explained how to find out what time zone the debian server's system clock is in. In my case, timezone is set to MSK, that is, the Moscow time zone. If you have a different time zone specified, and you, for example, want to set it to Moscow, then this is done simply. Changing the time zone is done via timedatectl:
# timedatectl set-timezone Europe/Moscow
You can view a list of all timezones available for installation on the server using the command:
# timedatectl list-timezones
Before setting or changing the time zone, it is recommended to update the timezone list on the server. They change periodically.
# apt update && apt upgrade tzdata
Once you have updated and configured your time zone, you can begin time synchronization.